This evening I made "Fresh Tomato Basil Grilled Chicken". It was so easy to make because I marinated the chicken breasts ahead of time and just needed to grill them when I got home from work. The tomato basil topping is quick to put together as well and can easily be made ahead of time and refrigerated until ready to use. I decided to make broccoli for our veggie but wanted to do something to "jazz it up a bit". I still had almond Paleo Bread in my freezer, so I pulled out a couple of slices and toasted it several times until it was very crispy and then put it in my Magic Bullet for about 20-30 seconds and "poof" I had grain free bread crumbs! I seasoned the bread crumbs with Italian seasoning, onion and garlic powder, salt and pepper and browned them in a little butter to use as a "topping" for the broccoli along with some shredded Parmesan cheese (you could substitute almond flour for the paleo bread crumbs). It turned out really good and was quick and easy to make. I snapped a few photos for you to see below as well as the recipes. Enjoy!
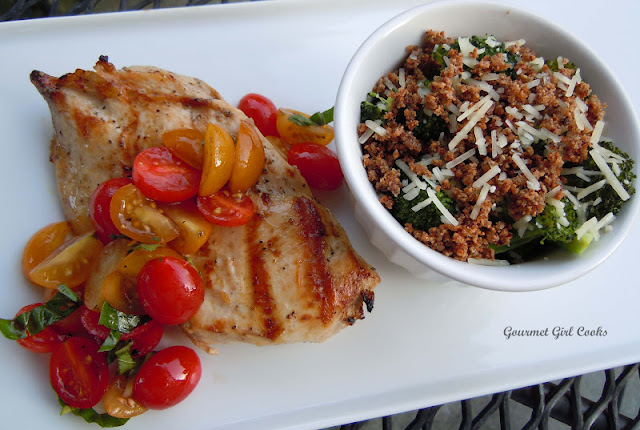 |
| Voila! |
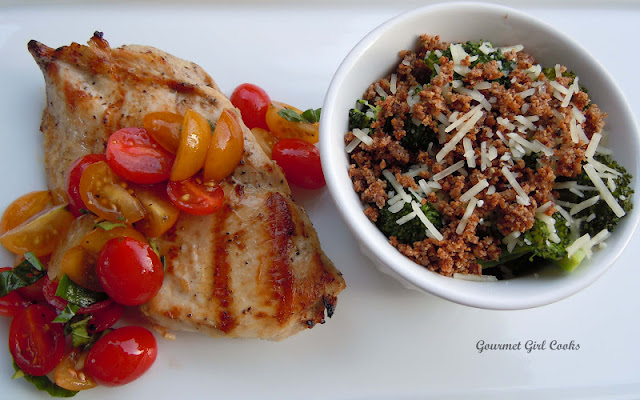 |
| BOOM! |
Fresh Tomato Basil Grilled Chicken
INGREDIENTS:
Chicken Marinade
3 boneless, skinless chicken breasts, marinated in the ingredients below
1/3 cup olive oil
4 tablespoons red wine vinegar (or preferred type of vinegar)
1/4 teaspoon garlic powder
1/4 teaspoon onion powder
1 teaspoon Italian Seasoning
Sea salt, to taste
Freshly ground black pepper, to taste
Fresh Tomato Basil Topping
1/2 cup red cherry tomatoes, sliced in half
1/2 cup yellow cherry tomatoes, sliced in half
1 tablespoon olive oil
1 teaspoon balsamic vinegar
4 - 5 whole fresh basil leaves, sliced thinly (chiffonade)
Pinch sea salt, to taste
Freshly ground black pepper, to taste
DIRECTIONS:
Place chicken breasts in a large Ziploc-type bag and pound to an even thickness; add remaining marinade ingredients; seal bag tightly, removing as much air as possible. Refrigerate and marinate at least 4 hours or overnight. Note: To save time, instead of making your own marinade, you could substitute about 1/2 cup or more bottled Italian dressing (Newman's Own makes a decent one).
In a small bowl mix all topping ingredients together and set aside. Grill chicken breasts until cooked completely through, about 4-5 minutes per side, depending on their thickness. Serve grilled chicken topped with the fresh tomato basil mixture.
~~~~~~~~~~~~~~~~~~~~~~~~~~~~~~~~~~~~~~~~~~~~~~~
Broccoli w/ Buttered "Bread Crumbs" & Parmesan
INGREDIENTS:
3 cups fresh broccoli florets
2 tablespoons butter (divided into 2 1-tablespoon portions)
1/2 cup "Almond Paleo Bread" crumbs (approximately 1-2 slices, toasted and pulverized)
(or substitute almond flour for the bread crumbs)
1/4 cup Parmesan cheese, shredded
1/2 teaspoon Italian seasoning
Couple shakes of garlic powder
Couple shakes of onion powder
Sea salt, to taste
Freshly cracked black pepper
DIRECTIONS:
Steam broccoli florets until tender (I place them in a glass covered pyrex dish with about 1/2 cup water and microwave for about 4-5 minutes). Drain broccoli florets well and place in a bowl; add 1 tablespoon butter (or more if you prefer), salt and pepper to taste; mix until butter is melted.
In a non-stick skillet, melt 1 tablespoon butter until hot and bubbly, add "bread crumbs", Italian seasoning, salt and pepper to taste, and cook for several minutes on medium-high until crumbs are crispy.
Serve broccoli topped with shredded Parmesan and topped with seasoned "bread crumbs" (or serve in individual ramekins).
*Note: Almond flour, lightly browned in butter and seasoned can be substituted for the almond Paleo Bread crumbs.


