Sunday, March 31, 2013

Chicken Divan (Wheat/Grain Free) -- Happy Easter!

Happy Easter!  Today we have had a combination of rain then sunshine back and forth -- it can't make up its mind what to do!  At the moment, it is bright and sunny, but scary clouds loom in the distance.  Today has been a very busy day trying to get ready for Easter dinner...but everything is ready now...just waiting for everyone to arrive shortly, so I thought I'd take a minute to wish everyone a very Happy Easter and to show you a picture of the Chicken Divan (Wheat/Grain Free) that we are having.  This time everyone is having the wheat and grain free version.  The only difference is the rest of the family is having it over rice and I am having it without rice.  We are having mini Strawberry Trifles for dessert -- they are having theirs with angel food cake and whipped cream and I am having mine with whipped cream!  I am including a link to the recipe above.  Also embedded in the recipe list is the recipe for the homemade cream of chicken soup (this time I only used chicken in the cream of chicken soup instead of adding mushrooms).  Enjoy!

Voila!
BOOM!


The strawberries I picked up at Costco Friday night were HUGE -- the berry on the left is a "normal" sized berry -- the ginormous one on the right is what I used to make my Strawberry Shortcake Trifles
Dinner is served...

Saturday, March 30, 2013

Saturday's Grilled Salmon, Parmesan Cauliflower Mash & Roasted Asparagus

Today was a busy day running errands, working on projects around the house, and getting my grocery shopping done for the week as well as tomorrow's Easter dinner with the family.  The grocery stores were packed, as usual, before a holiday.  I still have to clean the house before everyone comes tomorrow -- it looks like a bomb went off in it!  :-)   We actually made it up to 73 degrees for a high this afternoon, so I thought it would be a perfect evening to grill out for dinner.  We had a simple, fresh and delicious dinner of grilled salmon, my Rich and Thick Parmesan Cauliflower Mash and roasted fresh asparagus.  It just lightly began to sprinkle as we pulled the salmon off the grill and tomorrow we are supposed to have thunderstorms in the afternoon.  I hope it stays dry long enough for the little kids to be able to enjoy their Easter egg hunts.  My kids are all way too old for egg hunts...but I still make them Easter baskets every year and probably will until they make me stop (and so far I am not getting any requests to stop)...LOL.  They are all grown and live on their own...and do not follow the Wheat Belly program as I do...so I am still sort of the "odd woman out here".   But, no worries, I have now lost a total of 57 pounds which makes me a very happy odd one, so that is perfectly okay!  I snapped a few photos of our dinner this evening and have embedded the link to take you to the recipe for the cauliflower mash above where I list my dinner menu.  I also snapped a few shots of my Easter table floral centerpiece that hubby bought me yesterday -- it is so pretty and just SCREAMS spring.  Enjoy!

Voila!
BOOM!
Va Va VOOM!!!


Happy Easter...Happy Spring!!!

Friday, March 29, 2013

Friday's "Leftover Lunch"!

I am off this afternoon to work on taxes (ugh)...but I wanted to first start with a good lunch before I get knee deep in papers.  I had some leftover rotisserie chicken breast we had for dinner Wednesday night that needed to be used. I cut up some chicken breast, diced an avocado half left from yesterday's lunch and diced a ripe roma tomato and plopped it on top of a bed of torn butter lettuce, and "Boom"... leftover rotisserie chicken never looked so good! For a quick dressing, I mixed a rounded tablespoon of sour cream with a couple tablespoons of spicy chunky fresh salsa and "Boom"...I had a delicious cream dressing that looks almost identical to Thousand Island dressing....only this one is a little snappier, I think.  I love it when you can makeover an often passed over leftover into a whole new meal.  Check out a couple of pics below....now it's off to tax doom and gloom for me.  Enjoy!

Voila!
BOOM!

Thursday, March 28, 2013

Speedy Shrimp "Stir Fry" w/ Broccoli

This evening I decided to make a Speedy Shrimp Stir Fry with Broccoli that only took me about 15 minutes to put together.  Last night I took about 1 pound of frozen cooked shrimp out of the freezer and thawed it in the fridge overnight to use for dinner tonight (I buy it in 2-pound bags from Costco and it is delicious). Since the shrimp is already cooked and just needs to be heated...it is more of a "faux fry" than a "stir fry" -- but since I am stirring the shrimp around in a wok to heat...I am going to call it a "Speedy Shrimp Stir Fry" since it is technically a Chinese dish.  I steamed fresh broccoli florets and sliced carrots in a covered glass bowl in the microwave for about 3 to 4 minutes.   I heated about 1 tablespoon of coconut oil in my wok, then added 1 minced clove of garlic and the sliced bottom halves of about 3 green spring onions (I reserved the sliced top green parts to add at the end).  I sprinkled in a pinch of red pepper flakes and then poured about 3/4 cup of chicken stock into the wok with the garlic and onions.  Once it was simmering, I added 1 to 2 tablespoons of raw cashew butter by Artisana to use as my thickener.  I purposely chose raw cashew butter as opposed to roasted peanut butter or almond butter because it does not have a strong taste at all and is very light colored (and gives much the same results and look that I would normally get from cornstarch that I used to use to thicken my stir-fry sauces).  I whisked the cashew butter in well and it instantly thickened the broth mixture.  I had extra chicken stock set aside to thin the sauce further, if necessary, but it was a perfect consistency with my first attempt.  Once the sauce was the thickness I wanted, I added a couple tablespoons of low sodium Tamari sauce and then added the thawed shrimp that I had rinsed, drained and patted dry.  I heated the shrimp in the sauce and added additional red pepper flakes, a dash of cayenne pepper and tasted it again for seasoning.    Once it was seasoned to my taste, I added the drained steamed broccoli and carrots to the wok and tossed everything to coat evenly with the sauce.  This was absolutely delicious and definitely worth the investment I made in purchasing the raw cashew butter.  I plan to keep it on hand for use as a thickener.   It worked better than I anticipated.  Although it was a bit pricey,  I found it online at iHerb for about $15.00, which is a few dollars cheaper than I have paid for it in the past from Amazon.  You could also make your own cashew butter much cheaper, too, if you wanted to.  This raw unsalted cashew butter worked like a dream and gave me the consistency I wanted without altering the taste at all.  Think of it as sort of "cornstarch paste/butter".  Hubby enjoyed his Speedy Shrimp w/ Broccoli over brown rice and I enjoyed mine without any rice. I snapped a couple photos below for you to see.  Enjoy!

Voila!


BOOM!
Awesome as a thickener for sauces, etc.

Tuesday, March 26, 2013

Tuesday's "Pizza for One"...

Today was a crazy day here weather wise. Besides it being freezing cold here (literally)...we awoke to snow flurries that continued on and off during the day. While there wasn't any accumulation, it was totally bizarre to see snow of any sort here in March. What we are usually plagued with is sky-high pollen counts this time of year instead. Even at lunch time I saw snow flurries and I had to take a double take to believe that I was still seeing "snow" in the air when I was returning from lunch. Well, tonight hubby had a meeting he had to attend and I wasn't expecting him home before 9:30 or 10:00...so that meant it was just little old me for dinner...well, me and Spike (the Bichon) that is! So, I decided to make myself a super simple "Pizza for One". I made a batch of my Almond/Flax/Parmesan Herb Crust and decided to keep the toppings simple. After I baked the crust for 15 minutes, I topped it with some shredded mozzarella cheese and a diced (and seeded) fresh roma tomato and a light sprinkling of Parmigiano Reggiano and then popped it in the oven to bake for 5 minutes and then switched to broil for about 2 minutes until the cheese just began to bubble a bit. After it came out of the oven I topped it with some fresh torn basil and cracked black pepper. It was simple, fresh, quick and most importantly...delicious!  On a freezing cold night like tonight, this was so much better and quicker than any take out pizza I could have ordered...hands down!  ;-)  I snapped a couple photos for you to see below and the link to the crust recipe is embedded in the different colored text above.  Enjoy!

Voila!


BOOM!

Sunday, March 24, 2013

Pan Seared Cod & Cheesy Cauliflower Puff

This evening, youngest son came for dinner.  We had pan seared fresh wild caught pacific cod that I picked up at Costco yesterday.  I made a simple mixture of almond flour, salt, pepper, paprika and cayenne pepper.  I lightly dusted both sides of the fillets with the flour mixture and sauteed them on each side for about 5 minutes.  I also had some leftover extra sauteed fresh spinach that I mixed with some sliced fresh mushrooms and seasoned with salt and pepper and then after the cod was cooked, I moved the fillets to a baking pan and topped them with the spinach-mushroom combo and sprinkled with some finely grated Parmesan cheese and ran under the broiler for a few minutes until browned.  It was simple, easy and delicious!  I also tried a recipe I found on the back of the Publix weekly sale flyer for Cheesy Cauliflower Puff.  It sounded and looked good.  I modified it a bit to make it a little lower in carbs as well as grain free by substituting half-and-half for the milk as well as 1/2 cup almond flour with 2 tablespoons butter cut in for the "baking mix" called for in the recipe.  It had lots of cheese -- probably more than I really care for considering it only had 12-oz of cauliflower in the casserole.  It had 8 ounces of shredded white Vermont cheese, 1/2 cup of ricotta and 4 ounces of cream cheese as well as eggs.  While it was good, I probably would not make it again -- it was just too rich for my taste.  Below, I snapped a couple photos for you to see.  Enjoy!

BOOM!
Cheesy Cauliflower Puff
P.S. -- In case you are interested in the recipe I used for this Cheesy Cauliflower Puff, it can be found here at this link:  Cheesy Cauliflower Puff

Saturday, March 23, 2013

Baked Flounder Stuffed w/ Spinach & Cheese

This evening I made flounder for dinner.  I made a spinach and cheese filling and rolled it up into the flounder fillets.  To make the spinach cheese filling, I quickly wilted and sauteed a few big handfuls of fresh baby spinach in olive oil, then drained and chopped it (about 1 cup of chopped spinach).  I stirred in about 1/4 cup of ricotta, 1/4 cup finely grated Parmesan cheese, salt, pepper, dash of cayenne, and a couple shakes of onion and garlic powder.  After it was all mixed together well, I divided it up and placed a mound in the center of each flounder fillet, rolled them up and placed them seam side down in a lightly greased baking dish.  Then, I melted 2 tablespoons Kerrygold Garlic and Herb butter and zested and juiced 1/2 of a lemon and mixed it with the butter and spooned it over the flounder rolls and sprinkled with paprika and a little shredded Parmigiano Reggiano.  I baked it at 400 degrees F for 15 minutes and then switched over to broil and broiled for about 3 minutes.  I had originally planned to make a cauliflower dish to go with it, but decided instead to serve it with a wedge of my "Awesome Golden Cheddar Broccoli Pie" that was leftover from Thursday night.  Since I cook almost every night, I need to keep up with eating the leftovers so I don't end up having to throw out good food at the end of the week.  During the week, I eat my dinner leftovers for lunch, but since I rarely eat lunch on the weekends, I try to incorporate them into our meals, when possible.  I snapped a couple photos below for you to see.  Enjoy!
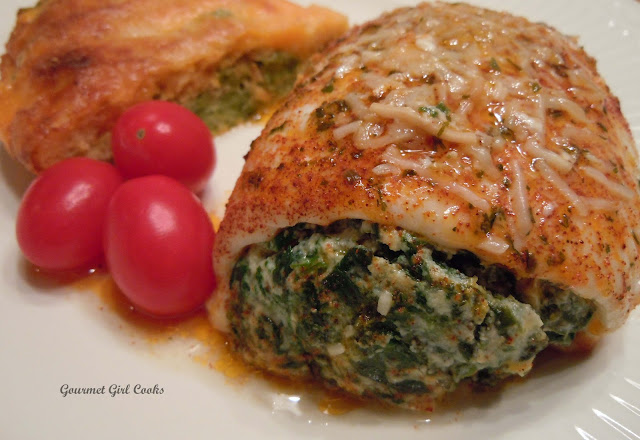
Voila!
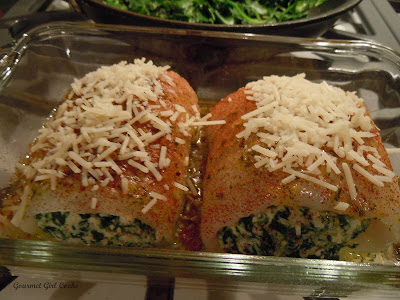
Before going into the oven...
BOOM!

Saturday's Steak & Cheese Eggs

This morning I slept in a little later than usual so I decided to have "brunch" instead of breakfast and lunch.  I had leftover thin sliced sirloin tip steaks that I didn't use last night as well as some leftover cooked peppers and onions from the Stir-Fried Steak w/ Onions,  Peppers and Mushrooms we had for dinner.  So...what better brunch choice could follow last night's dinner theme than "Steak & Cheese Eggs"?  I quickly pan sauteed and browned the thin sliced steak and seasoned it with salt, pepper and a dusting of smoked paprika.  Since they are so thin, they only took about 3 or 4 minutes, tops to cook. Next, I made a simple omelet and filled it with the reheated peppers and onions left from last night and added a little white cheddar cheese...folded it over and..."Boom"...I was having steak and eggs for brunch.  It was a "gourmet brunch" that took a few minutes longer than "fast food" time -- and no golden arches required!!!  I snapped a few photos for you to see below.  Enjoy!


BOOM!

Friday, March 22, 2013

Stir-Fried Steak & Cheese w/ Onions, Peppers and Mushrooms

This evening I made a dash to the grocery store after work to pick up a few things. I had originally planned to make pizza for dinner, but while I was in the store a few items caught my eye and swayed me an entirely different direction. I found some absolutely beautiful thin-sliced sirloin tip steaks, a bag of precious mini red, yellow and orange bell peppers...and I began thinking..."steak and cheese". I thought about coming home and making some quick little flax sandwich buns that I have made before (I never posted the recipe because they were just "okay"...not awesome). Then, an idea struck me like a bolt of lightning (well, maybe not like lightning...but it was definitely a "flash" of some sort...LOL). I decided I would make "Stir-Fried Steak & Cheese w/ Onions, Peppers and Mushrooms). Of course, I also wanted to add a little green to my bowl and had 1/2 of an avocado left from my lunch, so I sliced that up and had that along with it. I know it probably sounds weird....but it was awesome! When I came home, I sliced about 1/4 of an onion and 3 small mini-bell peppers and sauteed them in a little olive oil until crisp-tender and moved them to a plate. Next, I sliced and sauteed a few mushrooms and moved them over to the plate. Then, lastly, I sliced the thin sirloin steak into 1/4" strips and quickly sauteed that until cooked (for about 3 minutes). I seasoned the steak with some salt and pepper and then placed the steak, onions, peppers and mushrooms together in a shallow bowl and topped it with some strips of provolone and popped it in the microwave for about 30 seconds to melt the cheese. I sliced my avocado and placed that on the sides of my "stir-fry" and "Voila....Stir-Fried Steak & Cheese". This wasn't just good -- it was awesome. It was so super quick to make, too! I snapped a few photos for you to see below. Enjoy!

Voila!


Here, take a closer look...
BOOM!

Thursday, March 21, 2013

Awesome Golden Cheddar Broccoli Pie

Tonight I was in the mood to experiment a bit again and I wanted a meatless dinner...so I decided to make an Awesome Golden Cheddar Broccoli Pie!  It was really easy to make and it turned out really good.  It also has endless possibilities for how you can swap ingredients for your favorites or add meat to make it a more substantial meal!  Since it has eggs and almond flour...you still get protein even without any meat.  Below is my easy peasy recipe.  Enjoy!


Awesome Golden Cheddar Broccoli Pie

Ingredients:


Olive oil spray

1/2 cup blanched almond flour
2 tablespoons solid coconut oil (not melted) or diced chilled butter
1/4 teaspoon sea salt
1-1/2 teaspoons baking powder
1 cup half-and-half or cream
3 large eggs
1/4 teaspoon ground black pepper
1/2 teaspoon dry mustard
Dash of cayenne pepper, optional
2 cups chopped steamed broccoli florets
1/2 cup diced cooked onions 
1 cup shredded sharp cheddar cheese
2 tablespoons finely grated Parmesan

Directions:


Preheat oven to 350 degrees F.  Lightly spray a 10-inch glass or ceramic pie dish with olive oil spray. 


In a medium-large bowl, add almond flour, coconut oil, salt and baking powder.  Using a pastry or dough cutter, cut the coconut oil into the flour mixture until it is evenly distributed and resembles crumbs.  Add half-and-half, eggs, pepper, and dry mustard and whisk until blended.


Spread broccoli in the bottom of pie dish; scatter with cooked onions and top with shredded cheddar cheese.  Pour liquid mixture evenly over the top of the broccoli/onions and sprinkle with Parmesan.  Bake at 350 degrees for about 40-45 minutes until golden brown and done (not jiggly).  Mine took about 42 minutes.  Cool about 5 minutes before cutting.  


Note:  When you pour the liquid mixture over the filling ingredients, it may appear like there isn't enough, but it will puff up and surround the filling as it bakes.  If your oven tends to run hot, begin checking the pie at around 35 minutes.  


Wednesday, March 20, 2013

Super Simple Chicken...Chicken & Salsa

This evening I continued my "use what needs to be used up" theme (a carryover from last night's dinner).  I had a large container of fresh salsa that expires in a few days, and half of a bag of fresh brussels sprouts.  I buy my sprouts at Costco in 2-lb bags and usually fix 1 pound at a time.  I also had a package of chicken cutlets in the fridge so I placed my chicken cutlets in the bottom of a baking dish (didn't need to grease the pan) and then spread about 1/2 to 3/4 cup or chunky fresh salsa on top and baked it at 375 degrees F for 30 minutes.  While it was baking I shredded some sharp cheddar cheese and at the end of the 30 minutes, I topped the chicken with shredded cheese and broiled it for about 4 minutes until bubbly.  It was quick and Super Simple Chicken!  I have seen other recipes before where you use taco seasoning as well...but I wanted to keep it simple.  The chicken turned out good -- not "4 cartwheels good"...but, maybe 3. I halved and roasted my brussels sprouts (tossed with olive oil and sea salt) and cooked them at 400 degrees for about 15-20 minutes (tossing them around half way through the cooking). When they were cooked, I dusted them with ground Chipotle Chile Pepper and then sliced an avocado and "BOOM"...dinner was ready! I snapped a few photos below. Enjoy!

Voila!
BOOM!


Tuesday, March 19, 2013

Whatever Floats Your...Stuffed Tomato Boats!

This evening I needed to use a package of ground sirloin I didn't use Sunday for my Zucchini Lasagna since my youngest son had requested "no beef".  I didn't have any plan for what to do with it...so I took a quick scan around my kitchen to see what I might be able to whip up easily and use up some of the other ingredients that needed to be used.  I started the process by browning the beef and then it just sort of spun off from there.  As the beef browned, I came across part of an onion in the fridge that needed to be used up...so I diced that and added it to the browning beef. I had half of a block of feta cheese that also needed to be used.  I found fresh basil and oregano in the produce drawer that was begging to be used too...LOL.  Then, I remembered I had a huge container of baby spinach in the fridge in the garage...and my final revelation/eureka moment was the 7 or 8 big ripe roma tomatoes just lying there on my counter looking all juicy and cute...so my plan was officially hatched.....Stuffed Tomato Boats!  Here is the easy peasy and sort of cheesy concoction I made up (recipe and photos below)...and by the way, they were delicious!  Enjoy!

Voila!


BOOM!

Stuffed Tomato Boats

  • Brown 1 pound of ground sirloin
  • Add about 1/2 cup diced onion to the browning sirloin and cook until tender
  • Season the beef and onions with salt and pepper
  • Add a couple teaspoons of fresh oregano and 1 tablespoon fresh basil, chopped
  • Add about 5 big handfuls of baby spinach and cook until wilted
  • Remove from heat and add about 4 ounces of crumbled feta cheese 
  • Halve 6 ripe roma tomatoes lengthwise and scoop out their pulp with a spoon
  • Tear up a large slice of provolone cheese and put a 50-cent sized piece in bottom of each tomato half
  • Spray casserole dish with olive oil spray
  • Put a heaping scoop of the beef/spinach mixture in each tomato half and carefully set it in the pan
  • Top each stuffed tomato boat with shredded Parmigiano Reggiano and bake at 350 degrees F for 10 minutes, then switch over to broil and broil until lightly browned for about 3 minutes...and Voila...Boom...Stuffed Tomato Boats for dinner!


Sunday, March 17, 2013

Happy St. Patrick's Day...Zucchini Lasagna

This evening I made Zucchini Lasagna for dinner to get our "green" in for St. Patrick's Day! I had intended to grill the zucchini slices but our gas grill ran out of gas so I just broiled them in the oven instead. It was really simple to make. I sliced about 4 large zucchinis lengthwise into 1/4" thick strips and then brushed with olive oil and seasoned them with salt and pepper and broiled until fork tender. This is the order I layered everything:
  • I spread a layer of sauce in the bottom of my casserole dish;
  • Layer of zucchini
  • Layer of sliced fresh mozzarella cheese
  • Layer of zucchini
  • Layer of sauce
  • Layer of sliced provolone cheese
  • Layer of ricotta
  • Layer of zucchini
  • Layer of sauce
  • Topped with shredded Parmigiano Reggiano
I baked it in a 375 degree F oven for about 35 minutes.  I used one of my favorite jarred pasta sauces by DelGrosso, and at my youngest son's request, did not use any meat (I had originally planned to make a meat sauce).  I only used a little over half of a jar so it wouldn't be too "sloppy".  It's important to let it sit for about 30 minutes so the cheeses set a bit and it doesn't slide all over the place since the cheese is hot and melted when it comes out of the oven.  Of course, we didn't wait 30 minutes...probably 15 minutes and it wasn't as neat as it usually is...so do as I say, not as I do...LOL. I snapped a few photos below for you to see.  Enjoy!

Voila!
BOOM!