Showing posts with label Breakfast Ideas. Show all posts

Saturday, January 11, 2020

Eat the Rainbow - Happy 2020!

Happy New Year!  My first New Year's resolution is to get back to the things that I love. So, I am beginning with that here. 

Long time, no see...right? I'm not going to lie, it has been a tough couple of years for me for so many reasons which I won't get into. Not now at least. I never intended to stop blogging. But when things in my life got really stressful and hard, I stopped doing the things that I didn't absolutely have to do. One day became 2 days, which turned into 2 weeks, which then turned into 2 months and before you know it over a year had gone by. During this stressful/difficult time I fell off the low carb wagon and essentially stopped taking care of me. 

So, here I am today beginning with baby steps. I have always been a very private person...to a fault and my own detriment at times. I am an open book to those I'm closest to. My blog, besides being a platform to share my love of cooking and eating, this blog gave me a little spot in the world to share myself with so many people that I got to "know" over the years (I began blogging in 2012). I'm making my first baby step back today. Nothing fancy and I didn't plan or set out to do this today, but as I made my breakfast/brunch this morning and snapped a photo to share with my daughter, I thought...why not share it with others too. So, I posted it first to Instagram, then Facebook and Twitter. And while many of you probably use at least one of those social media platforms, I know there are some of you that don't. So I came back here to my blog...my home base...to share my simple breakfast with you. 

I'm not sure who, if anyone, will even see this post since I've been absent for so long, but even if there is only one of you that sees it...that's okay too. So here I am again...and I'd like to share my breakfast/brunch with you. Nothing fancy...a simple veggie omelet filled with sauteed onions red peppers and mushrooms with a bit of spicy cheese inside and a side of fresh strawberries and blueberries. They say you should eat the rainbow...so I did. Here's my rainbow breakfast. Happy 2020. Enjoy!

P.S. -- I've missed you!


Sunday, May 27, 2018

Sunday's Spanakopita Omelet - Spinach, Feta, Onions & Dill

We awoke to a sunny and very humid morning. The sun was a complete surprise and probably won't last long because there's actually no sun whatsoever in our forecast until next Saturday! The humidity with all the rain we've had over the past 2 weeks makes being outside quite miserable. I decided to start our Sunday morning with a good breakfast. Since I had a bunch of fresh spinach in the fridge and 2 large containers of President's Feta Cheese (it's on sale at Costco right now by the way), as well as some fresh dill, I went with spinach and feta omelets for breakfast. I made two omelets, one for me and one for hubby. I lightly wilted and sautéed about 8 ounces of fresh spinach in 1 tablespoon of olive oil, then moved it out of the skillet to a large cutting board. I added a bit more olive oil and sautéed 2 sliced green onions and about 1/4 cup of diced Vidalia onion until translucent and slightly caramelized. I moved that out of the skillet and wiped it clean.  I placed the sautéed spinach on a large cutting board and blotted the excess liquid out by pressing it with several paper towels, then I coarsely chopped the spinach. I chopped a few springs of fresh dill and set it aside.

I picked up a dozen Vital Farms pasture raised eggs this week and decided to give them a try this morning. They were beautiful large brown eggs with the deepest golden yolks that I've seen. I would definitely buy these eggs again. We each had a 2-egg omelet that I prepared one at a time. I added a pat of butter to the hot nonstick skillet and poured 2 beaten eggs (beaten with 1 teaspoon of water) into the sizzling butter and rolled the pan around to evenly spread the eggs in the bottom of the pan. I cooked it over medium heat until done, then scattered half of the cooked spinach and 2 to 3 tablespoons of crumbled feta cheese, half of the chopped dill, a few grinds of black pepper, and folded it over in the skillet before sliding it onto our plates. I added the cooked onions to my omelet only since hubby isn't a huge fan. I served his omelet with turkey bacon and mine with 2 Applegate chicken sausages. It was delicious and should hold us until dinner. I snapped a few photos below. Enjoy!


Monday, November 20, 2017

Thanksgiving Recipes: 12 Breakfast Ideas, 12 Side Dish Ideas, and 16 Dessert Ideas

Well, it's that time of year again for sharing my Thanksgiving recipes. I'm a bit late this year because things have been a little crazy around here. This will be my 6th low carb, wheat free Thanksgiving. It's hard to believe. It just seems so "normal" now that I don't stress about it or worry about what to make since I've recreated so many of my favorite recipes over these last 6 years. I still make a few things for the family that I don't eat but I really don't mind at all because I have plenty of dishes to choose from. If this is your first wheat free Thanksgiving, you might feel like you will never be able to eat your old favorites again...trust me, you will. There are so many options and choices available and so many wheat free recipe conversions of your old favorites. I'm sharing some of my favorites that I have made and enjoyed over these past 6 years.

I've attached 3 different collages of recipes below; 12 Thanksgiving Breakfast Ideas, 12 Thanksgiving Side Dish Ideas, and 16 Thanksgiving Dessert Ideas. To get to the page where you can have access to the recipes via links under each individual enlarged photo...simply click on the 3 headings over each collage below. That will take you to the blog page where you can scroll through enlarged photos of each dish with a link in the caption underneath each photo to that particular recipe. Certainly you should be able to find something you'd like to try or something you worried you would never be able to enjoy again. I hope you find some new favorites to put on your Thanksgiving table this year. These recipes also work for Christmas dinner, too. From my table to yours....Enjoy!

12 Thanksgiving Breakfast Ideas


12 Thanksgiving Side Dish Ideas


16 Thanksgiving Dessert Ideas


Saturday, September 16, 2017

Pizza for Breakfast - How to Use Leftover Pizza

Happy Saturday!  It's a beautiful sunny morning here. When I woke up this morning I thought about having a piece of last night's cold leftover Roasted Tomato & Shallot Pizza for breakfast. Instead, I decided to "breakfast-tize" it a bit! I placed a piece of pizza in a small nonstick skillet, covered it and heated it over low heat until it was warmed through and the crust was nice and toasty. In a separate skillet I fried an egg in a little butter. I used the pizza as my "toast" and topped it with the fried egg. It was so delicious together and the flavors were as if I was eating a delicious roasted tomato omelet over toast. I loved it and will save a piece to make again for breakfast tomorrow too! Next time you have leftover pizza, give it a try. I can't wait to make it again!  Now, off to put our furniture back out on our screened porch after Irma blew through earlier this week! Enjoy!


Monday, September 4, 2017

Labor Day Breakfast 2017

It's a crisp and cool beautiful morning here this morning. We awoke to 57 degrees which is such a pleasant surprise. It's amazing how much the cool fresh air energizes you. After a chilly walk with Spike this morning I couldn't wait to get back inside and make breakfast. I scrambled eggs with cheddar cheese, cooked up some chicken sausage patties (Delia's Chicken Sausage), and made a delicious Brussels Sprouts Hash using only thinly sliced fresh sprouts (from Sprouts Farmers Market) -- haha; sprouts from Sprouts and thinly sliced Vidalia onions that a sauteed on high in the same skillet I cooked the sausage in and seasoned with salt and pepper. I sliced up some beautiful ripe strawberries and we enjoyed a simple, healthy breakfast that will last us until dinnertime. I snapped a quick photo below. Enjoy!


Saturday, September 2, 2017

Saturday's Breakfast - Cheddar Eggs, Bacon and Hashed Brown Sprouts

Happy Saturday! This morning we awoke to a beautiful cool and breezy morning. It was in the mid-60s and simply gorgeous out. Hubby wanted to take me out to breakfast but I told him I'd rather make it at home before we start our day. I kept it simple, fresh and easy. We had scrambled eggs with lots of sharp cheddar cheese (I used Sargento's traditional cut sharp cheddar because it melts so nicely into the eggs). I made bacon, using Costco's pre-cooked bacon that simply needs to be heated in a skillet to crisp up. This is the first I've tried it and it's pretty good and certainly no where near as messy as cooking it raw. Only a small amount of fat cooks out as it heats. I cooked 8 strips and maybe only 1 tablespoon of drippings remained in the skillet. I moved out the bacon and added a few generous handfuls of fresh brussels sprouts that I sliced into 1/4-inch thick slices. I added a tablespoon of butter to the skillet with the bacon drippings and added the sprouts to a hot skillet and seasoned with salt and pepper. I let them brown before stirring and continued to cook them over medium high heat for about 5 to 7 minutes. Hubby and I both commented how delicious they were. I actually prefer them to hash brown potatoes. They'd be great with some diced Vidalia onions tossed in but I kept it simple and uncomplicated this morning. Our plate consisted of eggs, cheddar cheese, bacon, brussels sprouts and butter...that's it. So simple yet so delicious! Check out the photo below. I'm also including a copy of last night's easy dinner. We grilled burgers and placed them on top of a big fat slice of heirloom tomato topped with 3-pepper spicy cheese and topped them with Bubbie's pickles and a bit of ketchup and mustard. It was another simple and easy meal. Enjoy!


Monday, July 3, 2017

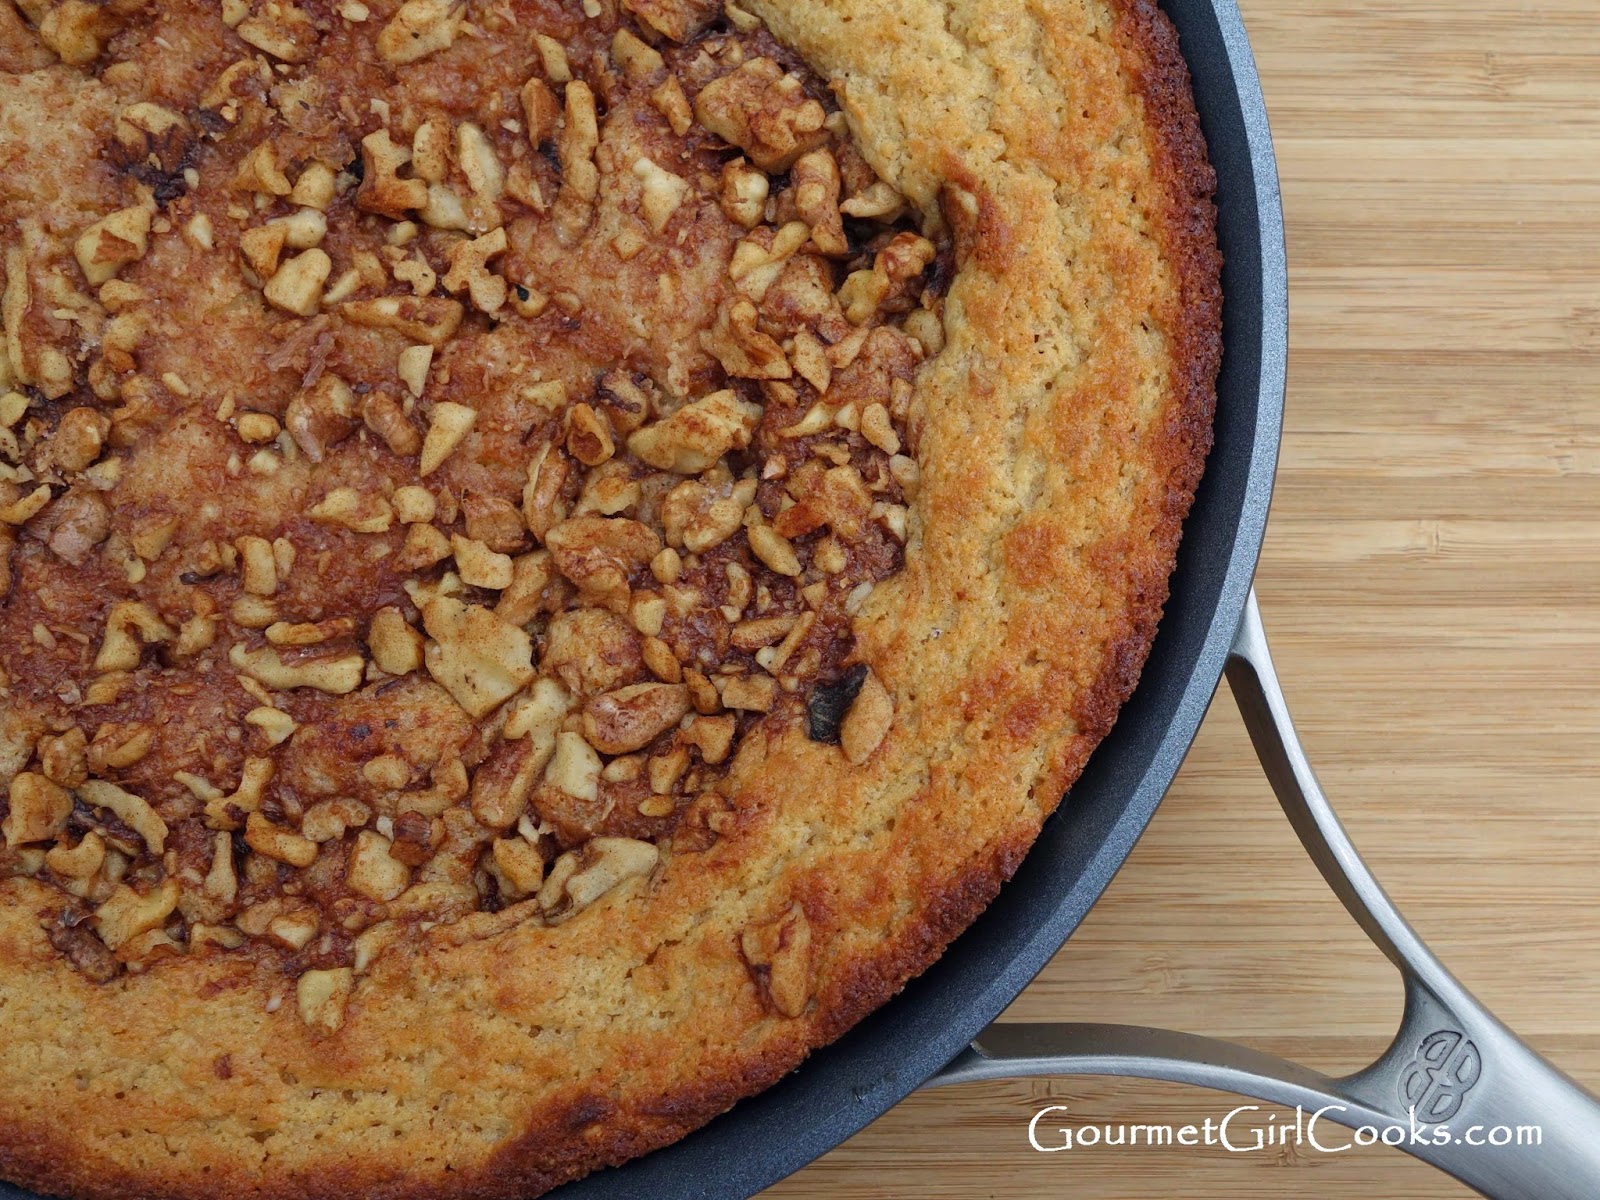
Skillet Sour Cream Coffee Cake - Topped w/ Walnut Streusel

Here's a re-post of a grain free adaptation I created for one of my favorite old recipes for sour cream coffee cake with cinnamon, sugar, and walnut streusel. I created a grain-free version of that coffee cake that is also sugar-free thanks to one of my favorite sweeteners, Swerve. This cake turned out moist, dense, rich and delicious, just like the original version. The recipe is super simple and it is baked in an ovenproof skillet! You can find the easy recipe below. Enjoy!


Skillet Sour Cream Coffee Cake  

Ingredients:

For the Cake:
1/4 cup ground golden flaxseed
1/4 cup coconut flour
3/4 cup Swerve Sweetener (or other granular sweetener)
2 teaspoons baking powder
1 teaspoon baking soda
1/4 teaspoon sea salt
1/2 teaspoon ground cinnamon
3/4 cup buttermilk
3 large eggs
2 tablespoons butter, melted
1/2 cup sour cream
1 teaspoon vanilla extract
1/2 teaspoon pure maple flavor, optional (I like Boyajian)
Butter or coconut oil to grease skillet

For the Topping:
1/2 cup chopped walnuts
2 tablespoons Swerve Sweetener (or other granular sweetener)
1/2 teaspoon ground cinnamon

Directions:

Preheat oven to 350 degrees.

In a large bowl, combine almond flour, flax, coconut flour, 3/4 cup sweetener, baking powder, baking soda, salt, and 1/2 teaspoon cinnamon; whisk to combine and break up any lumps.

In a separate small bowl, beat buttermilk, eggs, melted butter, sour cream, vanilla and optional maple flavor together. Stir wet mixture into dry mixture; mix just until combined.

For the topping, in a small bowl, mix walnuts, 2 tablespoons sweetener and 1/2 teaspoon cinnamon together.

Generously brush or coat a 10-inch ovenproof or cast iron skillet with butter or coconut oil. Heat the skillet over medium high heat, just until hot; remove from heat. Pour batter into hot skillet; top with the cinnamon walnut mixture. Place skillet into preheated oven and bake for approximately 30 to 35 minutes, or until a toothpick inserted near the center comes out clean. Let cool in pan for approximately 30 minutes. Using a rubber spatula, gently loosen and carefully slide onto a plate or platter. Cut into wedges and serve. 


Saturday, June 24, 2017

Saturday Morning BOT Omelet - Sunshine on a Cloudy Day!

Happy Saturday! This morning we got up early; I'm not sure why that happens on the days when we could sleep in if we chose. Why doesn't this happen during the week I sometimes wonder. I was in the mood for an omelet...and not just any old omelet, but a BOT (Bacon, Onion & Tomato) omelet. I had a cluster of beautiful red ripe large cherry tomatoes on my tomato plant on the back deck that I tiptoed out on the rain covered deck to pick. I diced up a few strips of bacon, a small chunk of Vidalia onion and quartered my freshly picked tomatoes. I added a pat of Kerrygold butter to the pan and started out by sautéing the onions. When they began to soften, I added the bacon and allowed that to cook until the bacon became crispy and the Vidalia onions were nice and caramelized (about 5 minutes or so). I tossed in the tomatoes and cooked them for an additional minute until they just heated through, purposely not overcooking them so I could still enjoy the fresh tomato taste and texture. I added another pat of butter to a small nonstick skillet and beat 2 eggs, then poured them into the sizzling butter. Once my omelet was cooked, I added the bacon/onion/tomato mixture on top of the omelet as well as some diced spicy 3-alarm Colby-Jack cheese and then folded it in half and slid it onto the plate. The omelet was beautiful and added a bit of sunshine to this cloudy day! I grabbed a cup of coffee and headed out to the porch to enjoy a relaxing Saturday breakfast while we sat and enjoyed breakfast while listening to the rain fall. I snapped a few photos below. I think hubby and I will head out to DeKalb Farmers Market a little later when the rain slows down, but for now, hanging on the porch is the perfect place to be. Enjoy!


The smell of bacon and Vidalia onions cooking in the morning is heavenly


Awaiting the big "fold-over"


Sunday, May 28, 2017

Broccoli-White Cheddar Frittata - Low Carb Sunday Breakfast

Happy Sunday! This morning I woke up around 6:00 and the first thought that went through my mind was..."oh no, I forgot to cover the grill last night"...and rain was expected this morning. I ran out and quickly covered the grill and while doing so, the sky opened up and the wind came from nowhere and we had violent thunderstorms with lots of lightening and pounding rain. Since hubby and I got up so early, we made a cup of coffee and went out and sat on the screened porch and listened to and watched the storm. It lasted for over an hour and then changed over to just rain. By 11:00 this the sun actually popped out which should make for some nice humidity.

Since we were up early, I went ahead and made an early breakfast. I had about 1 cup of leftover steamed broccoli in the fridge and a wedge of Tillamook Limited Edition Extra Sharp White Cheddar Cheese I've been wanting to try so I decided a Broccoli-White Cheddar Frittata was in order. It was so simple to make and a great way to use up some leftover broccoli and try out the cheese at the same time. I used my Calphalon 8-inch nonstick oven safe skillet for the frittata. I like to start my frittatas on the stove top. I begin by letting a pat of Kerrygold butter begin to sizzle, then pour the frittata mixture into the skillet so it can immediately start forming a "crust" and then pop it into the oven for about 20 minutes to bake. I placed some bacon on a cookie sheet and popped it into the oven before the frittata came out so everything would come out together. I added a couple of big ripe organic Driscoll's strawberries to our plates and breakfast was served! We enjoyed it and I have enough leftover to reheat for breakfast tomorrow. I snapped a few photos and included the easy peasy recipe below. Enjoy!


Fresh out of the oven


Broccoli-White Cheddar Frittata 

Ingredients:

1 tablespoon butter
1 cup cooked broccoli florets, chopped
1 cup shredded sharp white cheddar cheese (I used Tillamook extra sharp)
8 large eggs
Sea salt and black pepper, to taste

Directions:

Preheat oven to 400 degrees F. Beat eggs in a medium bowl. Stir in broccoli and shredded cheese; add salt and pepper, to taste.

Melt butter in an 8-inch ovenproof non-stick skillet over medium-high heat. When butter begins to sizzle, pour egg mixture into skillet and cook for 2 to 3 minutes to allow outer edges to crust slightly. Place skillet in oven and bake for about 15 to 20 minutes until lightly golden on top and center of frittata doesn't jiggle when the skillet is shaken slightly. Allow frittata to sit for a few minutes. Use a rubber spatula to help slide the frittata onto a cutting board. Cut into wedges and serve.


Sunday, January 15, 2017

Happy Sunday - Instant Pot Greek Yogurt for Breakfast

Happy Sunday!  A number of you have told me that you are anxious for my Instant Pot recipes since many of you know that I purchased one a few months ago (I have the Instant Pot IP-DUO80 model which is their largest 8-quart version). So, while I haven't written up my Instant Pot recipes yet, I do want you to know that I have used it many times and have been enjoying experimenting with it and plan to start posting them in the near future.

While I don't have this yogurt recipe ready to share with you yet, I thought that since it is what I'm having for breakfast this morning, I'd take a quick photo for you since it just happens to be Greek yogurt that I made using my Instant Pot. I've made it numerous times already and while it is easy as pie to make, it's something that you probably want to make on a day when you are hanging around the house since you need to bring the milk up to a specific temp and often tweak it to get to the right temp. It then needs to cool down to a certain temp before you add starter (fancy word for adding "already made yogurt") and then let it ferment overnight in the Instant Pot. So, while very easy to do, it kind of keeps you close by your kitchen until you get to the fermentation stage which I do for 10 hours in the Instant Pot. I've made it using organic whole milk, 2% milk, etc. and I honestly can't tell much difference between using whole or 2% milk, so I'd use whatever you prefer. So far, every time I've made it, I have made it with 1 gallon of milk because after straining the yogurt to make Greek yogurt, you lose a lot of volume. It was quite shocking to me when I realized how much whey gets strained off; literally several cups of liquid. This batch I'm eating now is made with 2% milk. I swirled a scant tablespoon of no sugar added peach preserves and then topped it with some fresh blackberries. It was delicious. I promise to post my recipe and steps soon. Check out my home made yogurt below. Enjoy!


Saturday, November 5, 2016

November Morning's Breakfast - Easy Low Carb

Happy first Saturday in November! This morning we awoke to temps in the 50s for a change. It finally feels like fall. The leaves are changing colors and falling and hopefully our unseasonably hot weather is behind us. We've had temps in the 80s, near 90 this past week which is entirely too hot for this time of year. The poor little trick or treaters were sweating as they ran from house to house this past Monday night. When I awoke to a chill in the air, I was actually in the mood to make a hot breakfast. Last night hubby and I went to Costco after work and picked up bags of fresh cranberries and baby brussels sprouts. So, the only logical thing to make for breakfast this morning was Brussels-Bacon & Onion Hash, a red bell pepper and spicy cheese omelet and Cranberry Pecan Twirls! It was YUMMY! I snapped a quick photo of my plate this morning. This past week I made yogurt in my Instant Pot for the second time. I've got it straining in the fridge now to make it into Greek Yogurt, The first time I made vanilla bean yogurt and this time I made just plain. It turned out great but I've decided it is definitely not a weeknight project for me and next time I will make it on the weekend.

Now that the temps are cool today, we've got one more crape myrtle to plant outside and we are done with yard work for the season. I have all winter long to ponder what to plant in the spring!  We are finally settling into the new house after 3 months. We actually have pictures on the wall and it's beginning to look and feel like home. It is still a work in progress. I thought I had the last kitchen project done a few weeks ago (or so I thought). We replaced the old white kitchen sink with a huge single bowl black cast iron sink and new faucet (my granite counters are black with silver, gray and copper flecks). Unfortunately we found the sink was cracked on one corner after it was installed, so we've got a new one on order. Check out my first November weekend breakfast. It has all my favorite things in it!


Friday, September 23, 2016

Apple Cinnamon Walnut Muffins - Happy Fall Y'all!

Happy Friday & Happy Fall! I've got a new muffin recipe featuring two of my favorite fall flavors and aromas; apples and cinnamon! Since my favorite Honeycrisp apples are now available, I thought what better way to help usher in fall than with a recipe for Apple Cinnamon Walnut Muffins. You can use whatever kind of apple that is your own personal favorite. This entire batch of 3 dozen muffins (40 to be exact) used only 1 medium apple (adding approximately 16 grams of net carbs and 14 grams of sugar to the entire recipe). Divided between the 40 mini muffins that I got from this recipe, it added less than 1/2 gram of net carbs (.4) and about 1/3 of a gram of sugar (.35) per muffin. 

I prefer leaving the skin on my apples for both fiber and color, but peeling them is probably what most folks prefer to do. These muffins are moist and lightly sweetened and each little piece of apple still retains a little crunch with the kind of apple I used. They were delicious warm, spread with a bit of softened butter and would be great eaten as a snack, spread with a little smear of peanut butter, too. My favorite way to eat them though is “as is” just popped into my mouth (in two bites). The aroma they created while baking was amazing. There is just something about the smell of apples and cinnamon wafting through the kitchen while you are baking on a cool fall morning. 

I'm going to make another batch of them this weekend. I think they taste even better the next day after the apple flavor and moistness has worked its way throughout the muffin. I recommend you cut your apples into small dice (1/4" or so) so the apples get distributed evenly throughout all the muffins and you get a bit of apple in each bite. Also, I want to share one interesting thing that I noted. I baked 2 dozen muffins at a time and refrigerated the batter uncovered until I was ready to put the 2nd batch in the oven and I to. I noticed that the 2nd batch of muffins that's batter had sat for about 25 minutes rose higher and were fluffier than the first batch baked right after mixing (they had nice rounded crowns). It was noticeable enough for me to purposely place the entire bowl of batter in the fridge to sit for 20 minutes or so before scooping and baking all of them next time. The recipe and photos are below. Enjoy!


Apple Cinnamon Walnut Muffins

INGREDIENTS:

1-1/4 cups Honeyville Blanched Amond Flour
2 tablespoons coconut flour 
2 teaspoons baking powder
1 cup Swerve Sweetener (or preferred granular sweetener)
1 teaspoon ground cinnamon
3 large eggs
1/4 cup extra light olive oil or melted coconut oil
1 teaspoon vanilla extract
3/4 cup buttermilk
1 medium apple, peeled, cored and finely diced
1/2 cup chopped walnuts
Olive oil spray or coconut oil spray for greasing muffin tins

DIRECTIONS:

Preheat oven to 350 degrees F. Lightly spray mini muffin pans with oil and set aside. In a large bowl, whisk together almond flour, ground flax, coconut flour, baking powder and 1 cup sweetener until combined.


In a separate medium bowl, beat eggs, oil, vanilla extract, and buttermilk until well combined. Stir wet mixture into dry mixture, stirring just until combined. Fold in diced apples and walnuts. Spoon batter into muffin cups; fill almost to the top. Bake for 18-21 minutes, or until a toothpick inserted in the center comes out clean. Cool 5 minutes in pan; flip and cool completely on a wire rack. Makes approximately 3 dozen mini-muffins.


Apple Cinnamon Walnut Muffins - Happy Fall Y'all!

Happy Friday & Happy Fall! I've got a new muffin recipe featuring two of my favorite fall flavors and aromas; apples and cinnamon! Since my favorite Honeycrisp apples are now available, I thought what better way to help usher in fall than with a recipe for Apple Cinnamon Walnut Muffins. You can use whatever kind of apple that is your own personal favorite. This entire batch of 3 dozen muffins (40 to be exact) used only 1 medium apple (adding approximately 16 grams of net carbs and 14 grams of sugar to the entire recipe). Divided between the 40 mini muffins that I got from this recipe, it added less than 1/2 gram of net carbs (.4) and about 1/3 of a gram of sugar (.35). 

I prefer leaving the skin on my apples for both fiber and color, but peeling them is probably what most folks prefer to do. These muffins are moist and lightly sweetened and each little piece of apple still retains a little crunch with the kind of apple I used. They were delicious warm, spread with a bit of softened butter and would be great eaten as a snack, spread with a little smear of peanut butter, too. My favorite way to eat them though is “as is” just popped into my mouth (in two bites). The aroma they created while baking was amazing. There is just something about the smell of apples and cinnamon wafting through the kitchen while you are baking on a cool fall morning. 

I'm going to make another batch of them this weekend. I think they taste even better the next day after the apple flavor and moistness has worked its way throughout the muffin. I recommend you cut your apples into small dice (1/4" or so) so the apples get distributed evenly throughout all the muffins and you get a bit of apple in each bite. Also, I want to share one interesting thing that I noted. I baked 2 dozen muffins at a time and refrigerated the batter uncovered until I was ready to put the 2nd batch in the oven and I to. I noticed that the 2nd batch of muffins that's batter had sat for about 25 minutes rose higher and were fluffier than the first batch baked right after mixing (they had nice rounded crowns). It was noticeable enough for me to purposely place the entire bowl of batter in the fridge to sit for 20 minutes or so before scooping and baking all of them next time. The recipe and photos are below. Enjoy!


Apple Cinnamon Walnut Muffins

INGREDIENTS:

1-1/4 cups Honeyville Blanched Amond Flour
2 tablespoons coconut flour 
2 teaspoons baking powder
1 cup Swerve Sweetener (or preferred granular sweetener)
1 teaspoon ground cinnamon
3 large eggs
1/4 cup extra light olive oil or melted coconut oil
1 teaspoon vanilla extract
3/4 cup buttermilk
1 medium apple, peeled, cored and finely diced
1/2 cup chopped walnuts
Olive oil spray or coconut oil spray for greasing muffin tins

DIRECTIONS:

Preheat oven to 350 degrees F. Lightly spray mini muffin pans with oil and set aside. In a large bowl, whisk together almond flour, ground flax, coconut flour, baking powder and 1 cup sweetener until combined.


In a separate medium bowl, beat eggs, oil, vanilla extract, and buttermilk until well combined. Stir wet mixture into dry mixture, stirring just until combined. Fold in diced apples and walnuts. Spoon batter into muffin cups; fill almost to the top. Bake for 18-21 minutes, or until a toothpick inserted in the center comes out clean. Cool 5 minutes in pan; flip and cool completely on a wire rack. Makes approximately 3 dozen mini-muffins.