Saturday, March 24, 2012

Chicken and Spinach Manicotti (and my Saturday Food Finds)

It's Saturday and today was an absolutely gorgeous, sunny day here.  Hubby and I ran a bunch of errands.  While we were out, I found some absolutely huge, gorgeous fresh strawberries on my excursion to Costco.  I absolutely love their produce...not only is it priced good, but it is really beautiful too.  I also picked up a couple bags of "Cuties" (California mandarin oranges)...I love them!  Costco also had some beautiful colorful bell peppers that I bought.  I have always wanted to try Kerrygold "Dubliner" cheese.  I've read some great reviews about it, so today I decided to pick some up to try.  I snapped a few pics of some of today's food finds and will share them with you below.

Look at the beautiful strawberries I found today
Check out the "Cuties"
I've always wanted to try this cheese...so I finally picked some up!
Also picked up this beautiful bag of colorful peppers

Tonight, I decided to make my Chicken and Spinach Manicotti for dinner....I love it.  The only thing I'm not real crazy about is actually filling the manicotti because it can be a bit tricky (messy).  For those of you that have never made it before, manicotti are large fluted pasta "tubes"...sort of like pasta pipes.  The best way to fill them is with a pastry bag fitted with a large plain tip, but I couldn't find mine...so instead, I put the filling in a large gallon size Ziploc bag and cut the corner off which made sort of a make-shift pastry bag.  Unfortunately, I cut too big of a corner off my bag so it was a bit messy.  Everything else about this recipe is easy.

If you want the same results and taste and less frustration assembling it, I suggest you either use a pastry bag with a large plain tip which works great to fill the manicotti, or you could substitute jumbo pasta shells for the manicotti noodles and just fill them with a spoon.  Also, don't worry if you accidentally tear or split your manicotti noodles while you are filling them...just place that side down in your casserole dish and nobody will every know!  It all gets covered with sauce and cheese.  One suggestion is to not overcook your manicotti noodles...if anything, I cook mine a minute less,  Instead of 7 minutes, I cook them for 6 and then immediately drain and rinse with cold water and lay them out in a single layer on wax paper to cool and keep them from sticking to each other.

This manicotti recipe makes a mild, delicate filling made with shredded chicken breast, chopped spinach, ricotta cheese, half-n-half, bread crumbs and herbs and spices, all mixed together and then stuffed into the manicotti.  The filled manicotti are then covered with marinara sauce mixed with half-n-half and then sprinkled with mozzarella cheese and popped into the oven to bake for about 30-35 minutes.  I ran mine under the broiler for a few minutes at the end of cooking to give the cheese topping a little golden color.  I like to sprinkle some fresh chopped Italian parsley on top when it comes out of the even.  Below are a few pictures as well as the recipe.

The basic ingredients
Manicotti...the "stars" of the show
All stuffed and waiting to be covered in sauce
All covered in sauce, now waiting for cheese
Sprinkled with mozzarella cheese, ready to be popped in the oven
Fresh out of the oven
Here, take a closer look...you can almost smell it, can't you
Voila!
BOOM!
BOOM! BOOM!


Chicken and Spinach Manicotti

1 8-oz package (14 count) manicotti shells, cooked and drained
1-1/2 cups shredded cooked chicken breast
1 15-oz container ricotta cheese
1 10-oz package frozen chopped spinach, cooked (squeezed well of liquid)
1-1/4 cups half-n-half (divided into 1/2 cup and 3/4 cup)
1/2 cup plain bread crumbs
1 teaspoon garlic powder
1/2 teaspoon dried oregano
1/2 teaspoon dried basil, crushed
1/2 teaspoon salt
1/4 teaspoon black pepper
2 cups (16 oz) marinara sauce
8-oz shredded mozzarella cheese

1.  Preheat oven to 350 degrees.  Lightly grease or spray a 13x9 inch baking dish.

2.  In a large bowl, combine chicken, ricotta cheese, spinach, 1/2 cup half-n-half, bread crumbs, garlic powder, oregano, basil, salt and pepper; mix well.

3.  Stuff chicken-spinach mixture into the cooked manicotti; place in a 13x9 inch baking dish.

4.  Combine marinara sauce with remaining 3/4 cup half-n-half and pour over the manicotti.  Top with mozzarella cheese.

5.  Bake for 30-35 minutes or until heated.  If desired, place under broiler for a couple of minutes until bubbly and lightly browned.  Let sit for about 10 minutes before serving.  Optional: sprinkle with fresh chopped parsley. 


Friday, March 23, 2012

Friday Night's Rant...

Okay...it's Friday night and I haven't posted anything since our Saturday night's stuffed cabbage rolls and I feel like a blog slacker.  One of the main reasons I haven't posted anything else is....we have been eating STUFFED CABBAGE ROLLS...for almost a week now!  These were not tiny little rolls, they were pretty big -- 2 were actually more than enough for a meal...and I made 15 or 16 of those suckers, and there is only 2 of us here to eat them.   

< WHAT WAS I THINKING??? > 

So, as much as I really liked them, I must say that I did not shed any tears when we finally finished the last ones!!!  We had stuffed cabbage for like 4 days.  Tonight I made pizza with Publix fresh pizza dough...I was so excited to be having something other than cabbage rolls, I forgot to snap a few pics!   I plan to return to cooking new and exciting meals again tomorrow...completely cabbage free meals!  :-)  Part of my problem is that for most of my life, I have cooked for at least 5 people (3 kids)...and now that my kids are grown, I have a hard time re-adjusting.  In the beginning, I cooked for 5 people because there were 5 people living at home....then I continued cooking for 5 people because I never knew if one of them might stop by unexpectedly to eat and I would never EVER want to miss an opportunity to make sure they had a good home cooked "Mommy meal"...kind of dorky, I know.  But now, I just don't really know how to cook for only two...and as I have told you before on this blog, the hubby isn't overly fond of eating leftover ANYTHING.  I don't want to throw it away...so I try to modify it, or spruce it up, etc.

I know I should freeze some meals when I have extra...but I would be lying if I didn't admit that for some odd reason, most meals that I actually have frozen in my life, thinking that some day I would pull them out and heat them up....well, it just never happens.  For the most part, any dish or meal that goes into my freezer is the equivalent of giving it a death sentence...after entering a cold, dark tomb (the freezer)...and then waiting for months to go by before it finally gets tossed into the trash can, pitifully covered with no less than 1/2 inch of ice crystals!  Ewwwww!  Then I feel guilty...you know, all the starving people in the world and all -- and here I am, just tossing food into the trash.  It just isn't a good scenario.  I need to work on that.

This week we have had record pollen counts here in Atlanta -- Tuesday was 9,369...yes -- it is awful.  Fortunately this morning it was down to 1,009 which is still awful....but a far cry from over 9,000.  It makes me feel sleepy, itchy...and yes, occasionally....even a little bit bitchy (imagine that)...LOL.  So...if you wondered if I had died...I didn't....I am here alive and kicking and feeling thankful.  Thankful that it is Friday, of course....thankful that the pollen is going down, of course....but mostly what I am thankful for is not having to eat any more stuffed cabbage rolls this week!!!  Amen.  (P.S.-- I used to have a boss -- he was great -- and if he were to have read what I just blogged above -- I guarantee you that he would have asked me if I would like some cheese to go with that "whine" -- he was always good like that!).  Have a great Friday night and stay tuned for tomorrow's food adventures!!!

Saturday, March 17, 2012

St. Patrick's Day Stuffed Cabbage Rolls...

Top of the Morning (or Evening) to you...Happy St. Patrick's Day!  Well, today I decided it was a good day to make stuffed cabbage.  I've been wanting to make it for a while now.  There are so many variations of stuffed cabbage recipes out there....and almost every country in Europe, the Middle East and elsewhere has their own style of how to make it.  The ones I made for dinner tonight are "my style"...which means a melange of styles "rolled into one"...hahaha (otherwise known as a mish-mosh of recipes that looked good to me)!  At least I managed to get "green" into our dinner so hubby and I didn't have to sit there and keep pinching each other while we ate!!!

I started with a gorgeous head of cabbage -- there were so many more to choose from at the grocery store today since it is St. Patrick's Day.  I wanted to use Savoy cabbage (it is the darker green cabbage with all the little light veins running through the leaves) because I think it is prettier, but the Publix I stopped at only had mountains of traditional green cabbage...so that is what I got.  I am not sure why it took me so long to prepare them and get my rolls into the pot to cook, but I believe it took me about an hour, maybe a little more.  It is simmering away now for the next hour or two.  I debated whether to cook them in a dutch oven in my oven and I had actually pulled out my beautiful green oval Le Creuset dutch oven to use that my daughter gave me several years ago when she was working summers at Williams Sonoma.  But, as I made my cabbage rolls, it became clear very quickly that it wasn't going to be large enough to hold all of them...which was a bummer.  So, I placed them in 2 layers in a large stockpot on the stove.  Hint: It is helpful to use a larger head of cabbage so the leaves are large and easier to roll.


This is what I had hoped to put my cabbage rolls in!
The "star" of the show
Sauteed onions and garlic
Here are the dried spices in this recipe
Dill, paprika & allspice that get added to the onions and garlic
Spices have been added to the cooked onions and garlic
Cooked cabbage leaves, waiting to be stuffed and rolled
Ground meat, rice and other ingredients for the meat filling
Meat mixture is mixed and divided to fill the cabbage leaves
Meat filling placed in the center of the cabbage leaf
Rolled into a perfect cabbage roll
Cabbage rolls layered into the pot
Tomato sauce and additional broth to almost cover the rolls
Covered with a large cabbage leaf before cooking
Voila!
Come, take a closer look...
BOOM!
BOOM! BOOM!


Stuffed Cabbage Rolls

Ingredients (Cabbage Rolls):
15 medium-large cabbage leaves (more or less depending on how large you like them)
1-1/4 pounds lean ground beef (I used ground sirloin)
1-1/2 cups "par-cooked" long grain rice (cooked about 15 minutes, not fully done)
1/4 cup sour cream (or plain yogurt), optional
1 teaspoon sea salt
3/4 teaspoon black pepper, freshly ground, or to taste
2 tablespoons olive oil
1 medium onion, finely chopped
3-4 cloves of garlic, minced
1 teaspoon sweet paprika (I used Hungarian sweet paprika)
1/2 teaspoon dill weed
1/4 teaspoon ground allspice (I used Jamaican allspice)
1/4 cup fresh Italian parsley, chopped
Pinch red pepper flakes (optional)

Ingredients (Tomato Sauce):
1 28-oz can crushed tomatoes
1 cup low sodium chicken broth
Juice from 1/2 lemon, freshly squeezed (approximate 2 tablespoons)
1 tablespoon brown sugar, optional
2 bay leaves (I used Turkish bay leaves)
1/2 teaspoon sea salt (or to taste)
1/2 teaspoon black pepper, freshly ground (or to taste)

Directions:
Bring a large pot of salted water to a boil.  Remove the core of the cabbage and immerse it in the pot of boiling water.  After 5-10 minutes or so, the leaves will begin to soften and separate from the head; remove the loosened cooked, tender leaves with tongs to a platter and place in a colander in the sink to drain (make sure they are soft and pliable or you won't be able to fold and roll them). When you've cooked and removed enough leaves for your cabbage rolls, set them aside and reserve the remaining cabbage to be chopped and used in the cooking pot.

In a medium skillet, saute the onion and garlic in the olive oil until translucent; add dried spices (paprika, dill weed, allspice, optional pinch of red pepper), stirring over low heat 1-2 minutes until fragrant.  Remove from heat; stir in the fresh parsley and set aside.

In a large bowl, combine ground beef, rice, sour cream, cooked onion mixture, salt and pepper.  Mix together thoroughly and divide with a knife while in the bowl into the number of cabbage leaves you plan to make (approximately 15).  Rough chop the remaining head of cooked cabbage to line the bottom of your cooking pot with, making a bed to sit your cabbage rolls on while they cook,  Once you've put a layer of the leftover chopped, cooked cabbage in the bottom of your pan, begin making your cabbage rolls.  Lay a cabbage leaf on a cutting board or work surface and place a portion of the ground beef filling in the center of your cabbage leaf (either remove the tough vein by cutting a small "v" and discarding the thick white core/vein, or slice a thin layer off of the tough portion so it is flexible enough to roll up).  With the ground meat filling in the center of your trimmed cabbage leaf, begin rolling the cabbage leaf over the beef mixture, tucking and folding in both sides while continuing to roll forward until snugly closed.  Place seam side down in your pot on top of the bed of chopped cabbage.  Repeat rolling and placing your cabbage rolls in your pot.  As you fill up the first layer, scatter more of the leftover chopped cooked cabbage around the rolls and continue layering the cabbage rolls until all have been filled and rolled.  If you have any leftover cabbage leaves or cooked cabbage, scatter and tuck it around your cabbage rolls.

In a saucepan, add the crushed tomatoes, chicken broth, lemon juice, brown sugar, bay leaves, salt and pepper to taste.  Bring to a boil and taste to adjust seasoning.  Carefully pour the heated tomato sauce over the cabbage rolls.  Depending on the pot you use, you may need to add additional chicken broth or water to your pot to almost cover the rolls with liquid while they cook (I had to add about 3 more cups of broth to mine).  Bring to a light boil; turn heat to low, cover and simmer approximately 1-1/2 to 2 hours.  Cook gently so you don't rupture your cabbage rolls during the cooking process.  Carefully remove them to your serving platter or dish.  Enjoy!

Friday, March 16, 2012

It's Friday Night and We're Having Breakfast for Dinner!

Well, it is finally Friday night and hubby and I are both tired...it has been a long week and with the unseasonable heat all week (80's), I was ready to spend a quiet Friday night at home and relax.  Oh, I forgot to mention that the pollen count today was 2,979...can you believe that?  And it is only mid-March!  Of course, hubby wanted to go "out to eat"...and I just wanted to "chill at home"....so I told him that if we ate dinner in, I would make him an awesome breakfast for dinner in less than 30 minutes!  He conceded...and I proceeded...to put together an amazing "breakfast dinner".  We rarely ever eat a breakfast like this anyway...I can count the number of times in a year on one hand and still have fingers left!  Christmas morning is always a big breakfast morning and maybe a couple of other times during the year...so for us, this kind of breakfast-dinner really is a treat.

On our dinner menu tonight was:  Scrambled eggs w/ cheddar cheese (I mixed half real eggs and half Egg Beaters and scrambled with "fat-free" half-n-half & stirred in shredded cheddar cheese right at the end of cooking); turkey sausage links (by Jimmy Dean...they are lean and delicious - if you haven't tried them, you should); hash browns (fresh shredded potatoes made by Simply Potatoes, browned in some olive oil, seasoned with sea salt and fresh ground black pepper); toast (grainy Health Nut bread made by Arnold); cinnamon chip scones (refrigerated baking dough by Immaculate Baking Co.)...and some fresh clementine (a variety of mandarin orange) slices.  We had coffee with our "dinner" and hubby had juice too.

The scones took 18 minutes to bake.  While they baked, I started my hash browns on the stove...and they take about 7-8 minutes per side to brown and cook; scrambled and cooked the eggs in another pan, popped the toast into the toaster, peeled the clementines, and as I began plating the food, popped the sausage (that are found in the refrigerated section of your grocery store) into the microwave for about 1 minute...and Boom...breakfast-dinner is served!  Literally the meal was ready in just under 30 minutes.  Oh how I love breakfast for dinner!  Check out the pictures below...before I baked the scones, I sprinkled them with cinnamon sugar...they are not very sweet, which is perfect with coffee!

Voila
Here's a closer look...
BOOM!
P,S. -- One thing I wanted to share with you is one of my obsessions.  I self admittedly have a "dish fetish"...I just can't help myself when I see beautiful dishes.  I have so many "complete sets" of dishes...and numerous other "odds & ends" that I have bought over the years.  Unfortunately, I just don't have the space any more to store any more dish sets.  So now, I limit myself to buying only the pieces I like best.  I have had my eye on "Fiestaware" for years now.  If you know anything about Fiestaware, you know that they are large, heavy dishes that come in a vast array of beautiful colors....lots of bright colors.  I have never been able to decide on a particular color which is why I haven't bought them before now..  Well...finally, I thought to myself one day...why just choose one color....and suddenly the light bulb came on and a couple of weeks ago, I ordered 10 dinner plates...one of each of my favorite colors!  I'd like to share them with you below.  Check them out....aren't they beautiful???
Colors from top to bottom:  Marigold, Peacock, Shamrock, Scarlet, Plum, Turquoise, Lemongrass, Tangerine, Sunflower, Cobalt

Wednesday, March 14, 2012

World's "So Much Better Than Best" Lasagna

First of all, I did not make this lasagna for dinner tonight!  LOL  It takes way too long to make on a work night.  But I wanted to share my lasagna recipe -- this is the lasagna I made for Christmas this year.  I have made and modified many different lasagna recipes over the years...and I must say, I think this is one of my best!

I typically make lasagna only a few times per year, one of them being at Christmas time.  I have tried many recipes and altered so many over the years...but this past Christmas, I hit the "lasagna jackpot" with my lasagna creation.  I had found a recipe that claimed, as many of them do, to be "the world's best".  Well, from all the years of making various lasagna recipes, I knew that this recipe really needed a major overhaul.  One of the very first things that struck me about it was that I had never seen a lasagna recipe that was so chintzy with the cheese!  Also, many of the ingredient amounts were just way out of whack.  Most lasagna recipes are fairly similar but the amount of ingredients can vary greatly.  So, with my experience, I have concocted what I truly believe to be the "World's So Much Better Than Best Lasagna"...because it really is.  Now, if you are looking for "diet" lasagna, this is definitely not the recipe for you, although you can reduce the calories and fat by substituting some lower fat ingredients (I use part-skim ricotta cheese, part-skim shredded mozzarella cheese, for example).  If you wanted to, you could substitute ground turkey for the ground beef and turkey Italian sausage for the regular Italian sausage. But, if you are like me and only make it for special occasions or you want the "real deal"...then this is the recipe for you!  I made this lasagna this past Christmas, and in my house, that meal must have "red and green" in it...period, end of discussion!  ;-)

Also, some lasagna recipes, including the one that I re-worked here, have directions that are just plain horrible and tedious to follow, particularly when it comes to assembling the lasagna.  You have to go back and re-read them over and over again as you assemble the layers.  Well, that all ends here with this recipe.  This recipe is clear and concise and easy to follow.  I will say, though, that it is a bit more time consuming than other recipes because you are making your own meat sauce instead of just using a jarred sauce with ground meat (not that there is anything wrong with doing that at all).  My suggestion to make it easier for you on the day you actually plan to cook and eat it would be to make your meat sauce ahead of time, either the day before or a couple of days beforehand.  Making your sauce ahead of time would greatly reduce your prep work and prep time on the day you actually assemble, cook and serve it...and that is always a good thing!

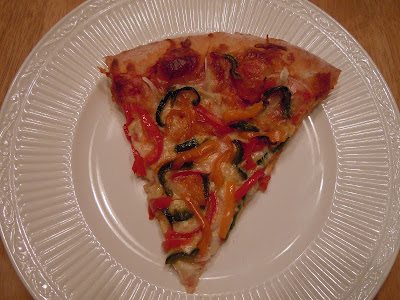
One last thing...most lasagna recipes call for using a  9x13 inch casserole dish or pan, which can be used.  However, I do believe that if you use a basic 9x13 inch baking dish, that it will very likely bubble over into your oven which I absolutely can not stand.  My suggestion would be to use either a deeper lasagna dish or pan , or you could use a stainless steel roasting pan that was approximately 9x13 or larger to put your lasagna in (I used to use a roasting pan that was approximately 10x15 that worked perfectly).  If your pan is slightly larger, then just add a couple of extra noodles to each noodle layer (there is plenty of filling, cheese and sauce).  I actually purchased and use a special porcelain covered cast iron lasagna dish made by Mario Batali that is approximately 3 inches deep and is perfect for making deeper lasagnas (it really weighs a lot before putting the lasagna in it and it weighs a ton after the lasagna is actually in it)...but, I absolutely love this pan and wish I would have purchased it a long time ago.  I've included a photo of the lasagna below as well as a picture of the lasagna pan I use, and last but not least...the recipe.  I promise you that you will find the assembly instructions concise and easy to follow and you won't end up wanting to tear your hair out trying to follow it.  Enjoy!

World's "So Much Better Than Best" Lasagna
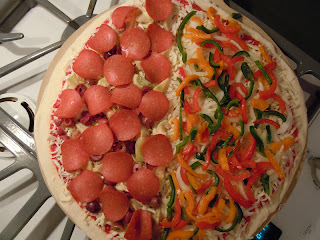
A red & green theme is a must for our Christmas meal (the spinach layer adds additional green inside too, along with the fresh basil and Italian parsley).
This is the kind of lasagna pan I use...and it's one of the best investments I've ever made!

Here is a picture of the pan (I store it in the box to protect it).

Here's another perspective...I love this lasagna pan!
One more thing...to further help you see how important the "red & green" meal requirement is at our house at Christmas...below is a picture of the veggie side dish, Green Bean Almondine I served with my lasagna at Christmas.  Actually, this is a beautiful vegetable dish to serve any time of year!
Green Bean Almondine
These are haricots verts, which are fresh and tender French green beans.  To prepare them, I blanch in boiling water for a few minutes and then plunge into a large bowl of ice water filled with ice to immediately stop the cooking and retain their bright green color.  Once cooled, I drain the water and set the beans aside on paper towels to drain and dry off.  I then dice and saute red bell pepper until crisp-tender and toast slivered almonds in the oven until golden brown.  I set everything aside and when it is close to dinner time, I get a large non-stick skillet and melt a few tablespoons of butter and place the blanched green beans in the pan and stir them around heating them up and lightly stir-frying them; then add the cooked diced red bell pepper and toss until everything is heated and the beans are still slightly crisp and also still bright green.  I season with sea salt and cracked black pepper, add the toasted slivered almonds and toss together and put in a serving bowl right before serving.  They are not only beautiful and "Christmasy" but they are really good too.  They make a perfect accompaniment to the lasagna or any other meal no matter what time of year or occasion you serve it.


World’s So Much Better than Best Lasagna

Ingredients:
1 pound Italian sausage (use sweet, mild or hot depending on preference)
1 pound lean ground beef
1 cup finely chopped onion
4 cloves garlic, crushed
1 (28-oz can) crushed tomatoes
1 (12-oz can) tomato paste
1 (15-oz can) tomato sauce
1/2 cup water (optional, substitute red wine for water)
1 tablespoon sugar, optional
1/2 cup fresh basil, thinly sliced (or substitute 1-1/2 teaspoons dried basil)
1/2 teaspoon fennel seeds
1 teaspoon Italian seasoning
1/2 teaspoon salt, optional
1/2 teaspoon fresh ground black pepper
2 tablespoons chopped fresh Italian flat leaf parsley
***********************************************************
2 boxes Barilla no boil lasagna noodles (to accommodate your pan size)
1 16-oz bag frozen spinach, thawed and squeezed dry
1-1/2 pounds ricotta cheese (16-oz plus an 8-oz container)
1 egg, beaten
2 tablespoons chopped fresh Italian flat leaf parsley
1/2 teaspoon salt, optional
1 pound mozzarella cheese, shredded
1 pound fresh mozzarella cheese, sliced in 1/4-inch slices
1 cup grated or shredded Parmesan cheese
Extra fresh parsley and fresh basil for garnishing, optional

Directions:
1.      In a Dutch oven, brown sausage and ground beef; add onion, and garlic and continue to cook over medium heat until meat is well browned and onion and garlic are tender. Stir in crushed tomatoes, tomato paste, tomato sauce, and water (or optional red wine).  Add:  optional sugar, basil (fresh or dried), fennel seeds, Italian seasoning, optional 1/2 teaspoon salt, black pepper, and 2 tablespoons fresh parsley. Simmer, covered, for approximately 1-1/2 hours, stirring occasionally.

2.      In a large mixing bowl, combine ricotta cheese with egg, remaining 2 tablespoons fresh parsley, and optional 1/2 teaspoon salt.

3.      Preheat oven to 375 degrees.  Lightly spray baking dish or pan with cooking spray (like Pam).  While you can use a 9x13 inch baking dish, it will more than likely bubble over because it isn’t quite deep enough to hold all the ingredients.  I actually use a 3-inch deep lasagna baking dish that I bought just for making lasagna.  I’ve also used a stainless steel roasting pan that is approximately 9x13, but much deeper than a tradition 9x13 glass casserole dish.  Either of these might work better and spare you extra time cleaning out your oven!
  
4.      To assemble the lasagna, see the easy to follow layer order below: 

*       Spread 1-1/2 cups of meat sauce in the bottom of your baking dish or pan;
·        *       Arrange 1 layer of noodles lengthwise over the meat sauce (approximately 6-8 noodles, slightly overlapping depending on the size of your pan/dish);
·        *       Layer with half of the ricotta cheese mixture;
·        *            Top with a third of the shredded mozzarella cheese;
·        *       Spread half of the fresh mozzarella slices next, kind of breaking them up with your fingers as you spread out;
·       *        Scatter all of the squeezed and drained spinach next (make sure all the liquid is squeezed out well so it doesn’t make the lasagna soggy); 
·        *       Spoon another 1-1/2 cups meat sauce on top of the ricotta/mozzarella/spinach;
·        *       Sprinkle with 1/2 cup Parmesan cheese.   

Next, repeat layers as follows:  
·        *       Noodle layer (6-8 noodles, overlapped slightly);
·        *       Remaining half of the ricotta cheese mixture;
·        *       A third of the shredded mozzarella cheese;
·        *       Remaining half of the fresh mozzarella slices (broken up with your fingers as you spread)
·        *       Spoon another 1-1/2 cups of meat sauce over the ricotta/mozzarella layer;
*       Top with the remaining third of the shredded mozzarella and remaining 1/2 cup Parmesan cheese.

5.      Cover lasagna with foil: to prevent sticking, either spray foil with cooking spray, or use Reynolds non-stick foil.

6.      Bake covered in a preheated 375 degree oven for 35 minutes. Remove foil, and bake an additional 25-30 minutes or until heated through and lightly golden brown and bubbly.  Cool for 15-20 minutes before serving to allow cheeses to set before cutting.  Optional: Sprinkle with fresh parsley and fresh basil to garnish before serving.

Monday, March 12, 2012

Monday Night Pizza...Quick, Easy & Pretty!

Tonight I got home late from work and decided to make it a "pizza night".  I used Publix's fresh pizza dough that they make fresh daily in their bakery.  Tonight, the only thing I really did differently was try to work the dough out with my hands (pizzeria style).  Previously, I've always rolled it out with a rolling pin.  If you've ever worked with fresh pizza dough...you know that the one really annoying thing about it is that it keeps shrinking back over and over again.  It's a battle to finally get it rolled out to the size you want it to be.  I know that pizzerias stretch it out by hand, using their knuckles and backs of their hands to stretch it out as they go around and around in a circular pattern.  So...I decided that tonight, regardless of how it might turn out or how I might mess it up...that I was going to do it the way THEY (pizzerias) do it. 

I must say with a rather shocked and puzzled look on my face....it turned out absolutely fabulous!  I couldn't believe it....and then suddenly, I realized what a dork I was standing there in my kitchen so excited that I was able to stretch it out the way you are supposed to.  It made the pizza much bigger around and the dough/crust thinner (which I like).  Maybe next time I will actually toss it up in the air....hahaha!  If I made it any larger, it wouldn't fit on my already ginormous pizza stone.  This pizza is obscenely huge!

I put our usual favorite toppings on it -- his was turkey pepperoni, Kalamata olives and artichoke hearts...mine was a trio of colorful peppers and onions.  I just ran and took a peek at it baking in the oven...I must say it is absolutely gorgeous.  I think it is one of the prettiest pizzas I have ever made!!!  Of course, I've snapped a few photos to share with you below.  It looks like a masterpiece to me!  Abbondanza!  ;-) 

The beginnings of something good to come!
Ready to pop this big boy into the oven (if it was any bigger I'd need a forklift to move it to the oven)!
His side (pre-baked)
My side (pre-baked) -- much prettier!
One last glimpse before it goes into the oven!
The baking begins
Fresh out of the even...25 minutes later
Another glimpse

Looking down on dinner...yummy!
My pizza masterpiece...Abbondanza!
BOOM!
Mine
His
Well...I have to tell you that it tasted as good as it looked.  We both have plenty of pizza left for tomorrow too, which makes it taste even better!