Tuesday, April 24, 2012

Tuesday's Linguine w/ Meat & Veggie Sauce

This evening I decided to make whole wheat linguine with a meat and veggie sauce.  Since I worked a little late, I used a jarred sauce to speed things up a bit.  I doctored up the sauce enough, though, that you could really call it "semi-homemade".   The funny thing is that I usually don't cook or eat much in the way of beef or any red meat.  It is a very occasional thing for us.  It isn't any kind of political statement, doctor imposed health mandate or anything of the sort.  It all basically comes down to personal preference...period.  I've been that way since the beginning of time!  ;-)

When I did my grocery shopping this weekend, I picked up a package of ground sirloin to make a meat sauce to put on pasta.  Now, as infrequently as I use beef...what are the odds that as I am making dinner tonight, the news is talking about "mad cow disease" in California...first case in four years or something random like that.  Seriously???  Well, back to dinner.  While my ground sirloin was browning, I diced 1/4 of a large Vidalia onion, 1/2 of a red bell pepper and 3 small zucchinis.  If you haven't already noticed while reading my blog, we eat a lot of fresh veggies in this house!

I have to say, I was so excited to see the Vidalia onions in the store this weekend...they are one of my favorite onions to use.  When the meat was almost done browning, I added the onion and bell pepper and covered it to let it cook together until the onions and peppers were almost tender.  I then added the diced zucchini, covered it and continued cooking until the zucchini was done.  I dumped a jar of Bertolli Fire Roasted Sauce in with the meat and veggies and then poured in a few splashes of Pinot Noir, red pepper flakes and cayenne pepper for a little zing.  I covered it and simmered the sauce on low for about 30 minutes so everything would mingle.

While the sauce simmered, I cooked my linguine and then tossed it with some extra virgin olive oil that was a gift from one of the sweetest people I know..."Ms. B".  It came in a beautiful slim bottle that is unbelievably easy to handle with one hand.  The absolute coolest thing about it though is that it has a little spout that pops up when you unscrew the lid and then goes back down in the bottle when you close the cap.  I can actually DRIZZLE oil now without fear of dumping in too much!  I found myself literally talking to my new bottle of olive oil...asking it repeatedly "Where have you been all my life???".  I can't tell you how much I enjoyed using it compared to the industrial sized bulky bottle I usually purchase mine in (it is over 2 quarts and heavy).  My olive oil comes in those clunky bottles that take 2 hands to handle.  I've included a few pics of our meal below (as well as the bottle of olive oil for you to see what I am talking about).  Enjoy!

Zucchini, Vidalia onion, red bell pepper
Meat and veggies cooking together, waiting to be sauced!

Whole wheat linguine, Bertolli sauce & the world's most awesome olive oil
Check out the spout that pops up when you remove the lid and recedes when you close the lid
This olive oil deserved a portrait of its own -- thanks again "Ms. B"
Voila!
BOOM!
BOOM! BOOM!

Monday, April 23, 2012

Monday's Dijon Balsamic Grilled Chicken

We woke up to a totally frigid morning here this morning -- 39 degrees!  We went from too hot for April and flipped the switch to too cold.  While I was cooking Sunday dinner yesterday afternoon, I decided to get a jump start on tonight's dinner too.  A couple weeks ago, I found a recipe on Pinterest for Dijon Balsamic Grilled Chicken.  It looked good and since I was already making a different marinade for my salmon fillets we had last night, I decided to whip this one together too and marinate some boneless chicken breasts overnight, which allows the marinade to really permeate the chicken a lot better.  Doing that simple step ahead of time (marinating the chicken) made putting dinner together tonight a snap.  When I got home from work, I peeled and sliced some fresh carrots and put them on the stove to cook.  We had plenty of leftover macaroni and cheese leftover from last night that just needed a quick zap in the microwave...so all hubby had to do when he got home was grill the chicken.  I must say, the chicken marinade really turned out to be very flavorful...the zing of the dijon mustard, coupled with the tang of balsamic vinegar and tartness of fresh lemon juice was a really good combination.  Hubby and I really enjoyed it.  Since youngest son wasn't here for dinner tonight, we were able to let loose and make some really nice grill lines on the chicken (youngest son surgically removes the grill lines from his chicken...but we love him anyway).  ;-)

Below are a few pictures of our dinner as well as the recipe for the Dijon Balsamic Marinade.  Enjoy!

The only thing missing from the picture is the olive oil (forgot to pull it out before snapping the pic)
I love marinating in a Ziploc bag...so much easier than a baking dish or bowl.
Grilled to perfection!
Voila!
BOOM!
BOOM! BOOM!
BOOM! BOOM! BOOM!

Dijon Balsamic Grilled Chicken

1/8 cup dijon mustard
1/8 cup balsamic vinegar
1/8 cup lemon juice
3 cloves garlic, minced
1 tsp dried rosemary (or 1 tablespoon fresh, if available)
1/4 tsp salt
1/2 tsp pepper
1/4 cup olive oil
4 boneless chicken breasts

Mix all ingredients together. Pour over chicken and marinate in the refrigerator 2 hours or longer (overnight is even better). Grill until done.


Sunday, April 22, 2012

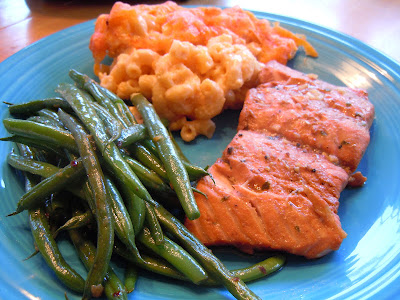
Sunday Dinner - Grilled Salmon, Macaroni & Cheese and Spicy Green Beans w/ Peach Cobbler for Dessert

Well, today was an absolutely gorgeous day here.  It was bright, sunny and breezy and cooler than it has been recently.  This afternoon the wind became pretty gusty too.  Hubby and I did our usual Costco run this morning as well as our Kroger and Publix stops this afternoon, too.  Since the weather was so gorgeous, we decided to grill out for dinner.  Hubby worked out in the yard while I cooked this afternoon.

I purchased a large 2+ pound salmon fillet and cut it into individual portions and marinated it for about 4 hours.  I reviewed many different marinade recipes and decided to make my own concoction that turned out extremely well...it was actually the Best Salmon Marinade Ever, so that is what I'm calling it!  To cook the salmon, I put each individual serving in a tightly sealed foil tent with a tablespoon of the marinade and crimped the foil tents tightly and placed the foil wrapped salmon fillets directly onto the grill and cooked for about 12-15 minutes (keeping the grill at 400 degrees).  This produced a steamed, delicate and extremely flavorful piece of salmon.  An additional bonus was the house didn't smell like fish afterwards.

I served the salmon with home made Extra Cheesy Mac-n-Cheese and Stir Fried Spicy Green Beans.  Costco had some beautiful fresh Haricots Verts (long, thin, tender French green beans) that I thought would be perfect to use for our dinner this evening.  Since youngest son was coming for dinner, I decided to make dessert too.  I made a Quick & Easy Peach Cobbler and served it with a scoop of low fat frozen vanilla yogurt.  It was delicious!  I snapped a few pics of our meal below as well as the recipes for Best Salmon Marinade Ever, Extra Cheesy Mac-n-Cheese and Stir Fried Spicy Green Beans.  I will also post the recipe for Quick & Easy Peach Cobbler too....whew, that's a LOT of recipes for one day...4 recipes to be exact!!!

These are the Haricots Verts French Green Beans
The salmon fillets are marinating in a large Ziploc bag

Mac-n-Cheese is out of the oven
Take a peek inside the Mac-n-Cheese casserole
Voila!
Here, take a closer look
BOOM!
Peach Cobbler is out of the oven...look how the batter encased the peach slices as it baked
Voila!
BOOM!

The Best Salmon Marinade Ever

2 pounds salmon fillets, cut into 5 to 6 portions
1/3 cup fresh lemon juice
2 cloves garlic, minced
1/2 teaspoon freshly ground black pepper
1/3 cup brown sugar
1/3 cup lite soy sauce (or regular if you like a saltier flavor)
1/8 cup olive oil
1/4 cup water
1/2 teaspoon dried parsley
Pinch of cayenne pepper, optional

Place salmon fillets in a large Ziploc or re-sealable bag.  In a small bowl, whisk together the remaining ingredients and pour over salmon.  Seal bag, removing as much air as possible.  Refrigerate for approximately 2 to 4 hours, turning over occasionally.

Grill directly on a lightly oiled grill for approximately 5 to 7 minutes per side, depending on thickness.  Alternatively, you can place each individual salmon fillet in a piece of heavy duty aluminum foil (large enough to fold and close tightly), spoon on a tablespoon of marinade; fold and seal, crimping tight to make a little tent.  Place your foil packets of salmon on a hot grill (approximately 400 degrees) for about 12-15 minutes.  Cooking them in the foil tents steams the salmon and keeps it extremely moist.  Grilling the salmon directly on the grill or over hot coals produces more of a glazed surface as the sugar in the marinade browns.  
___________________________________

Extra Cheesy Macaroni-n-Cheese

1 stick (1/2 cup) butter or margarine (I reduce to approx 6 tablespoons)
3/4 cup finely chopped Vidalia onion
2 tablespoons  all-purpose flour
1 14-oz. can of evaporated milk (I use the low fat version)
1/4 cup of milk (additional to the canned milk above)
8 oz. Velveeta Cheese, cubed
16 oz. (4 cups) shredded sharp cheddar cheese (reserving 1 cup for top)
12 oz. elbow macaroni (approximately 3 cups of uncooked)
1/8 teaspoon black pepper
Paprika

Cook macaroni according to package directions (do not overcook).  In large saucepan, melt margarine and cook onion until soft and translucent.  Add flour and stir constantly, cooking 1 minute.  Add all milk and stir over low-medium heat until thickened.  Add black pepper, Velveeta cheese and 3 cups of the shredded cheese (reserving 1 cup for the top) to the mixture.  Stir constantly until cheese sauce is melted and smooth.  Stir in cooked elbow macaroni and pour into a 3-quart lightly greased baking dish.

Bake uncovered at 350 degrees for 15-20 minutes.  Remove from oven and spread remaining cup of shredded cheese on top; sprinkle with paprika. Return to oven and bake for an additional 5-10 minutes, until cheese on top is melted and bubbly.  Let casserole sit for 5-10 minutes before serving.   Serves 8 to 10.
___________________________________

Quick & Easy Peach Cobbler

14-1/2 ounce can sliced peaches in heavy syrup
14-1/2 ounce can sliced peaches in lite syrup  
* (You can substitute 4 cups sliced & peeled fresh peaches, if in season)
1 stick butter, melted
1-1/2 cups all-purpose flour
2 teaspoons baking powder
1/4 teaspoon salt
1 cup sugar
1-1/2 cups milk
Cinnamon Sugar

In a 9 x 13 inch baking dish, pour melted butter.   In a medium bowl, mix flour, baking powder, salt, sugar and milk; whisking to make a smooth batter. Pour batter over melted butter.  Place peaches on top, including syrup (do not stir batter and fruit).  Sprinkle top with cinnamon sugar before baking.

Bake in a 350 degree oven for about 45-50 minutes or until top begins to lightly brown.  Let sit for at least 10 to 15 minutes before serving.  Makes approximately 10 servings.  Serving Suggestion:  Serve warm with a scoop of vanilla ice cream or frozen yogurt.

* If using fresh peaches, mix peaches with about 1/2 cup extra sugar
___________________________________

Stir Fried Spicy Green Beans

1 pound Haricot Verts French green beans (or regular fresh green beans)
2 large cloves of garlic, minced
Crushed red pepper flakes, to taste (I use about 1/2 teaspoon)
Sea salt, to taste
1 to 2 tablespoons peanut oil

Steam the green beans for approximately 4 minutes to soften and cook lightly (par-cook).  Add 1 to 2 tablespoons peanut oil to a hot wok; add minced garlic and stir fry until very lightly browned and cooked; add crushed red pepper flakes and stir another minute or so before adding beans.  Toss lightly steamed green beans into the wok and stir fry for about 5 minutes; season with sea salt and continue cooking to desired tenderness.  They are excellent when slightly crisp-tender. 

Saturday, April 21, 2012

Grilled Smokehouse Maple Chicken, Oven Roasted Red Potatoes & Green Beans w/ Almonds

Well, it is Saturday night and we are grilling chicken.  It was supposed to rain today and it looked like it would almost all day long...but we didn't get a drop!  When it hadn't rained by 4:00, I went ahead and rubbed 3 boneless chicken breasts with my new McCormick Smokehouse Maple rub (after beating them with a meat mallet to make them even thickness).  I put them back in the fridge for a couple of hours and then sprayed them with some Pam cooking spray before hubby put them on the grill.  I don't know how they will taste but they smell wonderful.  I also made oven roasted red potatoes and green beans w/ almonds.  Youngest son came for dinner so I baked some brownies as well.  The roasted potatoes are simple, easy and delicious and don't take much time to make.  I like to squeeze fresh lemon juice on them half way through their cooking...it gives them a flavor similar to Greek potatoes.  You could also use thyme or oregano instead of rosemary if you prefer. I prefer them browned a little darker than below, but youngest son doesn't like his food too dark, so I pulled them out sooner than I normally would have (he also doesn't like too many grill lines on his chicken...go figure)!  I've included a few pics below as well as the recipe for my oven roasted potatoes.  Enjoy!

Oven roasted red potatoes w/ rosemary and lemon
Grilled Chicken w/ Smokehouse Maple Rub
Voila!
BOOM!
BOOM! BOOM!
Oven Roasted Red Potatoes

3 pounds red potatoes, unpeeled and well scrubbed, cut into chunks
4 tablespoons of olive oil (or enough to coat the potatoes)
Freshly ground black pepper
Salt, Kosher or sea salt (I used sea salt)
1/2 to 1 teaspoon dried rosemary (or 3 tablespoons of fresh rosemary)
1/2 of a lemon, optional (to squeeze over potatoes)

Preheat oven to 425 degrees.  Line a large baking sheet with heavy duty foil and spread the potato chunks in a single layer.  Drizzle with olive oil and spread the rosemary; toss well until potatoes are evenly coated.  Season with salt and pepper.  Bake at 425 degrees about 30-40 minutes (tossing around half way through cooking).  When you remove the potatoes to toss half way through, squeeze the juice of half a fresh lemon over the potatoes and toss well before returning to the oven for the remainder of cooking.  Depending on the size of your potatoes, you may need to increase or decrease the cooking time.  They should be lightly browned and tender inside.

***Note:  I prefer to use fresh rosemary, but the fresh rosemary didn't look good in the store today so I used dry.

Wednesday, April 18, 2012

Grilled Chicken & Mozzarella Ravioli Alfredo w/ Fresh Tomatoes & Broccoli

This evening I decided to try the new ravioli I bought over the weekend...fresh Grilled Chicken & Mozzarella filled ravioli.  It came in a 2-pound package (2 individually wrapped 1 pound packs).  I made one of the packs this evening -- it only takes 3-4 minutes to boil.  I also seeded and diced fresh Campari tomatoes and halved and seeded the little yellow Zima tomatoes and lightly sauteed them in a little bit of olive oil.  While all that was cooking, I steamed some fresh broccoli florets.

A couple of weeks ago I had also picked up a new Classico "Light" Alfredo sauce that I decided to use in this dish.  After the ravioli were cooked, I heated about 1/2 the jar of sauce and tossed in the lightly sauteed fresh tomatoes, the steamed broccoli and seasoned it with some fresh ground black pepper.  I then tossed it with the ravioli and served with a sprinkling of fresh Italian parsley and some freshly grated Parmigiano Reggiano.  It was really delicious.  We had it with a small salad and some whole grain baguette bread.  The entire meal took less than 30 minutes to put together, and it was better than any gourmet ravioli meal I've ever eaten in any Italian restaurant.  It was quick and easy...but more importantly, it was delicious -- REALLY delicious!  Below are a few photos.  Enjoy!


These large triangular ravioli were stuffed full of grilled chicken and mozzarella
This sauce was flavorful and not too rich
Sauteed Campari and Zima tomatoes
Steamed broccoli florets
Voila!
A closer look...
BOOM!
BOOM! BOOM!

Monday, April 16, 2012

Calzones -- Pepperoni & Fresh Tomato ("Take 2")

Tonight I decided to take a crack at making calzones again (for the 2nd time this year).  The first time I made them, I overstuffed them...BIG TIME!  I made spinach and cheese calzones and used a recipe that was supposed to make 4 calzones, but I thought I'd squeeze the filling into only 2 instead...big mistake!  It was way too much filling proportionate to the crust and they looked like they wanted to explode.  They were tasty, just out of proportion.

So tonight, I decided to keep it simple...real simple.  I got a ball of Publix fresh pizza dough and decided to make one large calzone for hubby and I to share.  I stretched out the dough, stuffed it with turkey pepperoni, sliced & seeded fresh Campari tomatoes (that I picked up this weekend) along with shredded mozzarella cheese.  I sprinkled it with a dash of Italian seasoning and red pepper flakes before folding it over.  I must say it turned out SO much better this time!  I served it with a side of our favorite Dei Fratelli pizza sauce for dipping.  It was such a big calzone that hubby and I shared only half of it and we still have the other half to eat tomorrow.  I must admit, this calzone turned out much better than the overstuffed calzones I made the first time around.  Below are a few pics.  Enjoy!

Fresh out of the oven
Another shot fresh out of the oven
Waiting to be cut and served
Freshly cut in half...take a peek inside
BOOM!
BOOM! BOOM!
P.S. -- Just in case you were wondering...it tasted as good as it looked!  ;-)

Sunday, April 15, 2012

Lemon Yogurt Cake Topped w/ Fresh Strawberries

Saturday night I made a Lemon Yogurt Cake that was an Ina Garten recipe.  The only changes I made was that I halved the glaze you put on the top at the end and substituted lemon extract instead of vanilla to give it a more intense lemon flavor.  I also sliced fresh strawberries and tossed them with a few tablespoons of sugar and let them macerate a bit in the fridge to make a light strawberry syrup to spoon over the cake.  I sliced and served the cake topped with the fresh strawberries and drizzled with a little bit of the syrup that they created after being tossed with sugar.  It was a beautiful and fresh tasting dessert.  The lemon and strawberries really complimented each other.  I've snapped a few pictures to share below, as well as the recipe.  Enjoy!

The whisked wet ingredients and fresh lemon zest
Voila!
So pretty!
It was as delicious as it was beautiful.
BOOM!
BOOM! BOOM!
BOOM! BOOM! BOOM!

Lemon Yogurt Cake

Ingredients:

  • 1-1/2 cups all-purpose flour
  • 2 teaspoons baking powder
  • 1/2 teaspoon kosher salt
  • 1 cup plain whole-milk yogurt
  • 1 1/3 cups sugar, divided
  • 3 extra-large eggs (I used large eggs instead)
  • 2 teaspoons grated lemon zest (2 lemons)
  • 1/2 teaspoon pure lemon extract (instead of the vanilla originally called for)
  • 1/2 cup vegetable oil
  • 1/3 cup freshly squeezed lemon juice

For the glaze:

  • 1/2 cup confectioners' sugar (instead of 1 cup)
  • 1 tablespoons freshly squeezed lemon juice (instead of 2 tablespoons)

Strawberry Topping: 

  • 2 cups fresh sliced strawberries; tossed with 3 tablespoons of sugar; set aside

Directions:

Preheat the oven to 350 degrees F. Grease an 8-1/2 by 4-1/4 by 2-1/2-inch loaf pan. Line the bottom with parchment paper. Grease and flour the pan.

Sift together the flour, baking powder, and salt into 1 bowl. In another bowl, whisk together the yogurt, 1 cup sugar, the eggs, lemon zest, and vanilla. Slowly whisk the dry ingredients into the wet ingredients. With a rubber spatula, fold the vegetable oil into the batter, making sure it's all incorporated. Pour the batter into the prepared pan and bake for about 50 minutes, or until a cake tester placed in the center of the loaf comes out clean.

Meanwhile, cook the 1/3 cup lemon juice and remaining 1/3 cup sugar in a small pan until the sugar dissolves and the mixture is clear. Set aside.

When the cake is done, allow it to cool in the pan for 10 minutes. Carefully place on a baking rack over a sheet pan. While the cake is still warm, pour the lemon-sugar mixture over the cake and allow it to soak in (I poked holes in the top of the cake to help some of the lemon syrup to soak in better). Cool completely.

For the glaze, combine the confectioners' sugar and lemon juice and pour over the cake. (The original recipe called for double the glaze amount ingredient listed above, but I found that 1/2 the recipe was enough so that is what I posted).  I also very lightly dusted the top of the cake with a little confectioner's sugar after adding the lemon syrup and before drizzling with the glaze.

I like to serve it by slicing and plating the cake and spooning the sweetened fresh strawberries on top, along with drizzling a little of the fresh strawberry syrup created by macerating the berries.