Thursday, December 6, 2012

Fire Roasted Red Pepper Sausage & Zucchini Pasta Bowl

This evening I made a quick and easy dinner.  I sliced and browned a couple of organic Fire Roasted Red Pepper Chicken & Turkey Sausages and tossed in some diced zucchini to saute along with them and then simmered it in spicy marinara sauce for about 20 minutes.  I served it over zucchini pasta that I made with my julienne peeler.  The diced zucchini that was in the sauce was the leftover center portions that I didn't shred...so nothing went to waste.  I topped it off with some shredded Parmigiano Reggiano.  It was delicious, simple and quick.  Enjoy!

Voila!
BOOM!
      

Wednesday, December 5, 2012

Stroganoff (Beef or Chicken) - Wheat/Grain Free

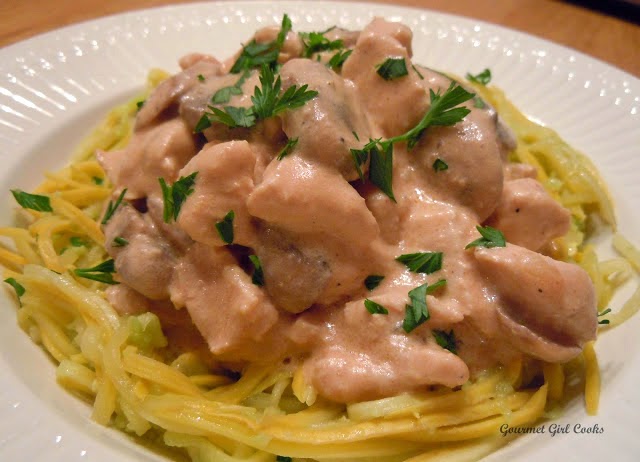
Tonight, I decided to revise the Chicken Stroganoff recipe that I have made at least a buzzillion times over the years.  I made several modifications to the original recipe, one of which was removing the wheat flour and then a few other minor changes as well.  I also served it on a bed of "hot buttered yellow squash noodles" instead of the wide egg noodles that I used to serve it over.  It was absolutely delicious!  I used almond flour to make the roux instead of wheat flour for the base of the sauce but it didn't thicken up quite as much as I wanted it to, so I added 1/4 teaspoon of xanthum gum (1/8 teaspoon at a time) to thicken it up just a tiny bit to make it the consistency I was looking for without being able to notice that it was in there.  It turned out exactly the way I remember it being.  For those that don't have or want to use xanthum gum, 1 or 2 tablespoons of brick style cream cheese should thicken it up enough (I'd start with one first).  If you are making this recipe for the first time and don't really have anything to compare it to, you might even enjoy it without adding any additional thickening agent...but I was looking to recreate a recipe that I have made a lot over the years...so I knew exactly what the original version's consistency and taste was and that is what I was looking to duplicate.  I suggest tasting your sauce for salt and pepper and adjust as needed to suit your taste.  This recipe was a success...hubby said he couldn't tell the difference at all between the original version and the new revised version.  I served mine over yellow squash noodles that I made with my julienne peeler and hubby ate his over regular noodles.  I've snapped a few photos below as well as the recipe.  Enjoy!


Stroganoff (Beef or Chicken)

Ingredients:

  • 1 lb. sirloin steak or boneless chicken breast, cut into thin strips or small cubes
  • 1/2 teaspoon salt, or to taste
  • Freshly ground black pepper, to taste
  • 2 Tablespoons butter or oil
  • 2 cups sliced fresh mushrooms, cooked
  • 1/2 cup onion, diced
  • 1 clove garlic, minced
  • 2 Tablespoons butter
  • 1/4 cup almond flour
  • 1 Tablespoon tomato paste
  • 1 cup beef or chicken broth
  • 1/4 teaspoon xanthum gum, optional (if desired, substitute 1 - 2 tablespoons brick style cream cheese)
  • 1 cup sour cream
  • 2 tablespoons dry white wine
  • Hot buttered yellow squash noodles
Directions:

Season beef or chicken with salt and freshly ground black pepper.   Saute seasoned beef or chicken in large skillet with 2 Tablespoons butter or oil until cooked and slightly browned.

Add onion and garlic to meat mixture; continue to cook until tender, about 5 to 6 minutes; add cooked mushrooms.  Transfer meat and vegetables from skillet to a bowl or platter; set aside.

Add 2 Tablespoons butter to the pan drippings, blend in 1/4 cup almond flour; cook 1-2 minutes.   Add tomato paste and beef or chicken broth; cook and stir over medium heat until thickened and bubbly.   If additional thickening is desired, quickly stir in 1/4 teaspoon xanthum gum (or cream cheese).   Add meat and vegetables back to the skillet; mix well.   Stir in sour cream and dry white wine; cook slowly until heated through (DO NOT BOIL).   Serve over hot buttered yellow squash noodles. 

Monday, December 3, 2012

Parmesan Crusted Chicken & Garlic Herb Squash w/ Baby Arugula

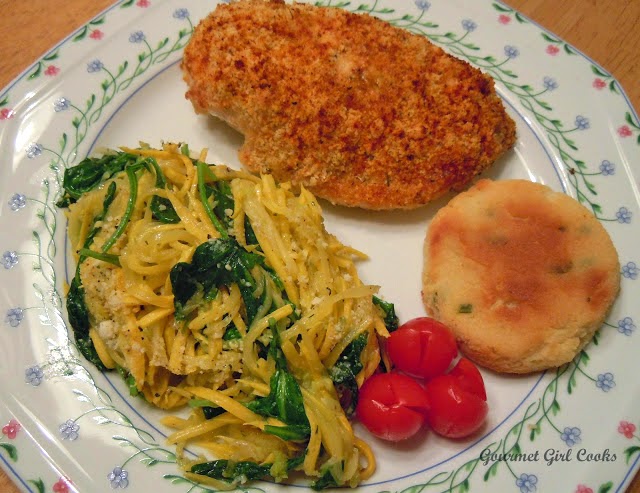
This evening I made a really simple, but tasty dinner.  Our Publix grocery store usually has a dinner idea in each weekly sale flyer.  Of course, they usually contain wheat.  I decided to make a wheat and grain free version of their meal suggestion for this week.  I served our meal with a sour cream and chive biscuit that I made last night (recipe to come soon after perfecting).

I placed 3 boneless chicken breasts on a baking sheet and brushed the tops of them with a mixture of 4 tablespoons of mayonnaise mixed with 1/4 cup grated Parmesan cheese.  Next, I mixed together about 1/4 cup of almond flour, a couple tablespoons of grated Parmesan, 1 teaspoon of Italian seasoning and a dash of cayenne to make "Italian herb bread crumbs".  I sprinkled the seasoned crumbs on top of the coated chicken breasts and then baked them at 400 degrees F for about 25 minutes until they were done (the cooking time may need to be increased or decreased a little depending on the size and thickness of your chicken breasts).  The mayonnaise keeps the boneless skinless chicken breasts very moist and tender while you bake them.  When the chicken is done, I sprinkle it with a bit of paprika. 

While the chicken was baking, I finely julienned a few yellow squash (using my julienne peeler) and lightly sauteed them in a little olive oil in a non-stick skillet.  I then added a big handful of baby arugula, the zest of 1/2 of a fresh lemon and tossed until the arugula wilted.  I added a couple tablespoons of Kerrygold Garlic and Herb Butter, a few dashes of sea salt and generous grinds of black pepper and then sprinkled on about 1/4 cup of grated Parmesan cheese and tossed it all together.  The natural sweetness of the yellow squash, combined with the slight bitterness of the baby arugula, the fresh taste of the lemon zest and saltiness of the Parmesan made a delicious combination of flavors for this side dish.  I snapped a couple of photos below for you to see.  Enjoy!


Sunday, December 2, 2012

Sunday Night's Pan Seared Salmon & Roasted Asparagus

Today was a pretty day here -- it got up to around 70 degrees this afternoon and tomorrow is supposed to get up to 73, which is pretty warm for this time of year!   This evening, youngest son came over for dinner.  I just quickly pan seared some salmon filets and roasted asparagus in the oven.  I also made sour cream & chive biscuits to go with our meal.  They turned out good, but I won't post the recipe until I see if I can tweak them a bit to get a little more rise out of them first.  We all had a slice of cake for dessert.  I snapped a quick picture of our dinner below -- it was simple and nothing fancy, but it was good.  Enjoy!

BOOM!

Yellow Pound Cake w/ Rich Chocolate Almond Frosting/Glaze

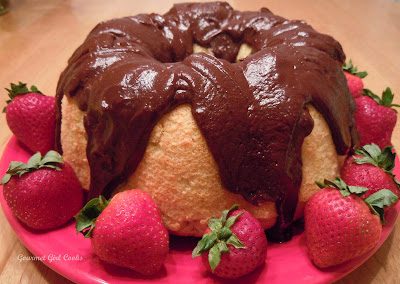
Last night I made my first grain and sugar free cake.  I made a Yellow Pound Cake w/ Rich Chocolate Almond Frosting/Glaze.  It turned out really good.  I baked it in a 6-cup Bundt pan and it was a little tricky getting it out of the pan because I forgot to flour the pan after greasing it...so next time I will make sure to do that.  I have lots of baking experience using regular wheat flour, but this was my first grain free alternative flour cake.  I basically made the recipe up as I went along and kept my fingers crossed that it would turn out good -- and I'm happy to report that it did.  I intentionally did not make it overly sweet since I don't like things very sweet any more.  I would describe this cake as a yellow cake with a texture very similar to pound cake.  The frosting/glaze is thick and rich with a very deep dark chocolate flavor and not overly sweet, although you could easily sweeten it more if you wanted to.  Hubby and I enjoyed a piece after dinner last night with a cup of strong Italian Roast coffee and it was delicious.  Based on the size of the slices we ate tonight, we should get about 20 slices from the cake -- that is a LOT!  Our slices were about 1-inch thick.

Below is the recipe as well as a number of photos at various stages.  I wanted to make sure the cake wasn't overly heavy or dense since I was using almond flour which tends to be a bit heavier and oilier.  I also wanted to get some rise in the cake -- and I surely got plenty of rise (you will see what I'm talking about in the photos below).  I got so much rise that while it was in the oven baking, I was actually worried that it would rise right out of the pan and all over my oven -- but thankfully, it did not.  Note that I used "extra light" olive oil in this cake recipe which has no discernible olive taste -- do not substitute the stronger tasting extra virgin olive oil (you could substitute melted butter for the oil if you prefer).  If you prefer your cakes a bit sweeter, you can increase the sweetener in both the cake and the frosting/glaze recipes, if desired.  The amount of sweetness was perfect for my taste.  The frosting/glaze recipe makes a very rich, thick, and dark deep chocolate flavored frosting.  You could add additional sweetener if you prefer a sweeter frosting or glaze.  Check out the recipe and photos below.  Enjoy!

Voila!
I put 5 cups of batter in a 6-cup pan thinking it wouldn't rise much...
Guess I was wrong...the cake actually rose a lot!
As you can see, it almost rose right out of my bundt pan...yikes!
This is what it looked like on top after it came out of the oven
BOOM!


Yellow Pound Cake w/ Rich Chocolate Frosting/Glaze

Cake Ingredients:

3 cups almond flour (blanched)
1 cup Swerve sweetener (or equivalent to 1 cup sugar sweetness)
1/2 cup vanilla protein powder
2 teaspoons baking powder
1/2 teaspoon Celtic or sea salt
6 eggs (I used a combination of Egg Beaters and whole eggs)
1/2 cup PLUS 2 tablespoons "extra light" olive oil (do not use strong flavored extra  
      virgin olive oil)
1-1/2 teaspoons vanilla (I used concentrated double vanilla from Penzey's)
1 tablespoon apple cider vinegar
15 drops NuNaturals alcohol free stevia (or equivalent to 2 teaspoons sugar sweetness)
3/4 cup water

Rich Chocolate Almond Frosting/Glaze Ingredients:

5 - 6 tablespoons coconut oil
6 tablespoons unsweetened cocoa powder (I use Ghirardelli or Green & Blacks)
Dash of sea salt
6 tablespoons Swerve sweetener
22 drops NuNaturals alcohol free stevia (or equivalent to about 3 teaspoons sugar sweetness)
1 tablespoon unsalted butter
1/4 cup PLUS 2 tablespoons unsalted almond butter
1/4 cup heavy cream

Directions for Cake:

Preheat oven to 325 degrees F.  Grease a 6-cup Bundt type pan very well with butter and dust with flour; set aside.  In a large bowl, mix almond flour, Swerve sweetener, protein powder, baking powder and salt in a bowl; using a wire whisk, stir to mix and sift any lumps in the dry ingredients.  In a separate bowl, mix eggs, oil, vanilla, vinegar, stevia drops and water; beat with a whisk until well blended.  Add liquid mixture into dry ingredients and mix well; beat with a whisk or hand mixer until well blended and smooth (about 2-3 minutes).  Pour batter into well greased AND floured baking pan.  This recipe makes approximately 5 cups of cake batter.  Place bundt cake in oven and bake approximately 50-55 minutes at 325 degrees or until a toothpick inserted in the cake comes out clean (begin checking cake for doneness after about 30 minutes or if making 2 layers begin to check after 20 minutes).  Let cool approximately 5 to 10 minutes; invert onto a plate and let cool completely (if necessary, gently use a rubber spatula to loosen the edges of the cake from the pan).  Frost or glaze as desired.  

***NoteThis recipe can also be used to bake two 8-inch round layers or a square or rectangular cake.  If making 2 separate layers, the cooking time would need to be reduced, so check baking times. If using a Bundt pan, make sure to liberally grease pan and flour well so it doesn't stick when removing from pan.  Taste batter for sweetness after mixing and before pouring into pan (add up to an additional 1/2 cup of Swerve or sweetener of choice if a sweeter cake is desired).

Directions for Rich Chocolate Almond Frosting/Glaze

In a medium saucepan on low, melt coconut oil; add cocoa powder and stir until blended and smooth.  Add dash of salt and Swerve sweetener and stir until completely dissolved into the mixture.  Add almond butter, stevia, and butter, stirring or whisking until melted and smooth.  Add cream and whisk in well.  Taste to adjust desired sweetness, adding more sweetener, if necessary.  If a thinner frosting/glaze is desired, add a little additional cream to thin out; if a thicker consistency is desired, add additional almond butter.  Pour warm frosting/glaze on top of bundt cake, allowing it to run down the sides.  If spreading as a frosting on top of a cake layer, allow to cool and thicken a bit first. 


Saturday, December 1, 2012

It's Saturday Night...and We're having Pizza & Cake!!!

Today we ran a bunch of errands and got a lot done.  I hope to begin decorating for Christmas tomorrow.  Since it's Saturday, it seemed like a good night to have pizza for dinner.  Hubby was busy watching football, so I thought it would be a good time for me to experiment some in the kitchen with baking a grain and sugar free cake for the first time.  I wasn't sure how it would turn out since I sort of made it up as I went...LOL (sometimes those are the scariest adventures for me).  I have lots of "regular baking experience" but very limited experience when it comes to grain free baking -- and there's quite a bit of difference baking with alternative flours.  I am pleased to report that the cake turned out great!  I decided to use almond flour and didn't want the cake to be overly dense -- I wanted to get some "rise" with it -- and rise it did!!!  I held my breath for a minute or two because I actually thought it might just rise right out of the Bundt pan I baked it in.  Thankfully, it stayed in the pan and didn't spill over.  I made a basic pound cake/yellow cake and wanted to cover it with some type of frosting or glaze -- preferably one with chocolate.  I made a thick dark chocolate almond frosting/glaze.  Below is a picture of the pizza (and crust recipe) we had for dinner -- it is topped with red and yellow bell peppers, onions, mushrooms and turkey pepperoni.  You will also find a picture of the cake I baked.  I'll post the recipe for the cake separately because I still need to write it up first and translate my chicken scratch that I jotted down as I went along.  I'll post the cake recipe either later this evening or tomorrow.  Enjoy!

Voila!
BOOM!
TA-DA!

Below is the pizza crust recipe...cake recipe to follow soon!

Saturday's Breakfast...Biscuits, Eggs & Sausage

Happy Saturday!  It's a beautiful bright and sunny morning today -- and a chilly 39 degrees.  I decided after a long and emotionally draining week that a good "comfort" breakfast might just be the best way to start my morning.  I made myself a fried organic cage free egg along with a couple of Applegate's chicken & apple breakfast sausage links and enjoyed them with one of my lightly toasted Black Pepper Cheddar Herb Biscuits that I made a few days ago.  That, along with a strong cup of coffee, gave me the great start I needed for this beautiful day.

I snapped a few photos for you to see below and hope it allows you to see that it is still possible to enjoy a delicious, absolutely grain free breakfast, much like the breakfasts most of enjoyed when we still consumed wheat and grains.  Enjoy!

Biscuits, eggs & sausage...


BOOM!
The only thing absent from this delicious breakfast is the wheat and grains -- who needs them -- I surely don't!

Wednesday, November 28, 2012

Black Pepper Cheddar Herb Biscuits (Rolled Style)

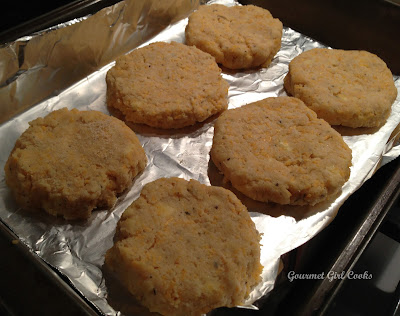
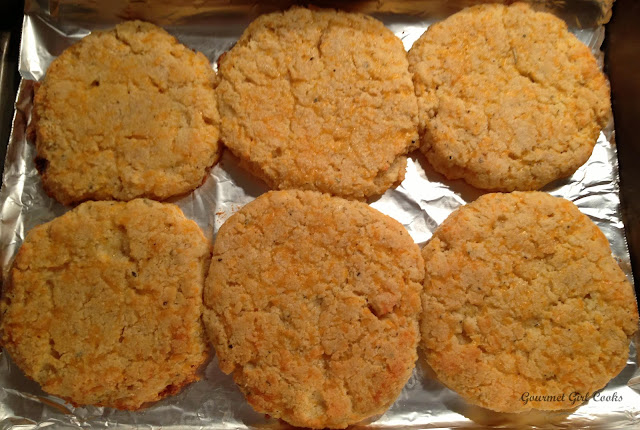
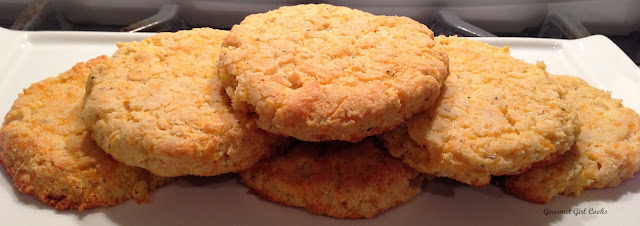
This week has been a fairly stressful week, so tonight I decided I needed some comfort food for dinner.  I had 2 leftover cooked breaded chicken breast cutlets from last night's meal that I was planning to make Chicken Parmesan with...but I decided that I really NEEDED comfort food tonight instead and for whatever reason, biscuits just seemed to be calling my name!  I decided to give wheat/grain free biscuit making another stab so I could have a "chicken biscuit" sandwich for dinner.  I tried making biscuits once before and they tasted good, but were more "cookie like" than biscuit like.  So, this evening I am giving it another stab -- I made 6 "Black Pepper Cheddar Herb Biscuits" with the hopes of getting a more biscuit like feel and texture.  Well...I would like to share with you that it was a huge success!!!  These had a VERY "biscuity" texture.  I wasn't sure if or how much they would rise, so I rolled mine between 2 sheets of parchment paper to about 1/2-inch thickness and spaced them about 1 inch apart hoping they might swell as they baked and touch each other to stay moister.  These definitely expanded and touched, but not so much in height.  Next time I will roll them out to 3/4 inch thick to give them just a little more thickness.  Even though they didn't get taller/thicker -- I was still able to slice them in half with a sharp knife after they cooled a bit by laying them flat on a cutting board and keeping my hand on top with slight firmness, using a very sharp serrated knife, cut them in half so I could make the "chicken biscuit" sandwich that I was craving.  I was SO happy and excited...LOL.  They always say "it's the little things" that make us happy....and these biscuits did just that!  These were soft, moist and tender and just the texture I had hoped for.  I was a little concerned that by slicing them in half and making them thinner that they might become too fragile and break apart while we ate our sandwiches.  That was not the case -- these stayed and held together perfectly from the first bite to the last for both hubby and I.  Tomorrow I look forward to making myself an egg sandwich for lunch with one of the biscuits.  Also, if you do not own a biscuit cutter or don't like to waste the scraps you get when cutting round biscuits, simply cut them into a square shape with a knife and bake -- I promise you that the biscuit police won't show up at your door and make a "non-round biscuit arrest".  ;-)  My overall review for these biscuits was "very good" and VERY close to traditional tender "southern style" biscuits.  I would consider and rate my previous attempt as "good"....so these were definitely an improvement.  I think if I made them 3/4" thick next time, they might just be rated as "perfect".  I served our Chicken & Biscuit sandwiches with green beans and almonds and some Cheddar Cauliflower Mash.  I snapped a few photos below for you to see as well as my new and improved biscuit recipe.  Enjoy!
Voila!
Ready to pop in the oven
Fresh out of the oven

BOOM!

Black Pepper Cheddar Herb Biscuits (Improved)

INGREDIENTS:

2 cups almond flour
3 tablespoons "cold" butter, diced
1 egg (or 1/4 cup Egg Beaters)
1 cup sharp cheddar cheese, shredded
1/2 teaspoon Italian seasoning
1/2 teaspoon salt, or to taste
1/2 - 1 teaspoon freshly ground black pepper, or to taste
Dash of cayenne, optional
2 teaspoons baking powder (aluminum free)
1/4 cup cream or half and half

DIRECTIONS:

Preheat oven to 350 degrees F.  Lightly grease a baking pan or line with non-stick foil or parchment paper.  

In a medium bowl, add all the ingredients except the cream; cut in with a pastry cutter until crumbly and all flour is moistened and cheese is pulverized into the mixture. Stir in cream and mix in lightly.  Press dough together in a ball and place on a sheet of parchment paper and flatten out lightly into a circular shape; cover with another piece of parchment paper and roll out to about 1/2 - 3/4 inch thickness (these do not rise much).  Cut with a biscuit cutter and place on a lightly greased baking pan (I used non-stick foil) about 1 to 2 inches apart, being careful not to handle the dough too much with your hands (you don't want to heat up or melt the butter in the dough, you want it to remain firm).  Bake at 350 degrees F for approximately 20 minutes or until golden brown; be careful not to overcook.   Remove from oven; brush tops with melted butter, if desired.

***NoteIf you don't have a biscuit cutter, you can simply cut the dough into squares with a knife and bake them (there is no law I have seen that requires biscuits to be round).  


Tuesday, November 27, 2012

Quick & Easy Chicken Cutlets and Julienned Vegetable Medley

This evening I had a number of projects that I needed to work on...so dinner was simple, quick and easy.  I lightly breaded some chicken cutlets in a mixture of 1 cup almond flour mixed with 1/4 cup finely grated Parmesan cheese, sea salt, black pepper, cayenne and paprika.  I dipped the cutlets in an egg that I beat with a little water, salt and pepper and then rolled them in the flour/cheese mixture and quickly browned them in a non-stick saute pan with a little extra virgin coconut oil.  For our veggie, I julienne cut 1 carrot, 2 yellow squash and 2 zucchinis into thin strips with my julienne vegetable peeler and lightly sauteed them in a little olive oil with sea salt and black pepper and topped them with some shredded Parmigiano Reggiano.  It was quick, easy and delicious.  I snapped a quick photo to share below.  Enjoy!

BOOM!

Monday, November 26, 2012

"Zucchini Pasta" Layered w/ Spicy Beef, Sweet Peppers & Mushrooms, Topped with Creamy Vodka Marinara

This evening I made a simple and quick dinner.  Using my julienne vegetable peeler, I made thin zucchini pasta strands that I lightly sauteed in a little olive oil.  I browned a pound of ground beef very well adding sea salt, lots of freshly ground black pepper, garlic powder, cayenne pepper, sage and a pinch or two of red pepper flakes to make a quick spicy beef sausage mixture to layer on my zucchini pasta.  I purposely did not put the spicy beef mixture into the sauce to keep the flavors from simmering out into the sauce.  I wanted to keep all the flavors separate and enjoy them layered in my bowl.  I diced and sauteed sweet red, yellow and orange bell peppers and set them aside while I quickly sauteed some fresh sliced mushrooms.  This evening I decided to try Mezzetta Napa Valley Bistro "Creamy Vodka Style Marinara" (it's made with all natural ingredients and no added sugar).  I heated the sauce until hot and then began layering my pasta bowl.  I placed the zucchini pasta in the bottom and then topped it with the spicy beef mixture, then the diced sweet peppers and mushrooms, and topped it all with the creamy vodka marinara sauce and sprinkled with Parmigiano Reggiano.  It was delicious and full of different flavors and textures -- different than if I had simmered those very same ingredients in the sauce where the flavors would have combined and melded together.  This dish retained the distinct flavors of the different ingredients and turned out delicious!  I snapped a quick photo below.  Enjoy!

BOOM!
      

Sunday, November 25, 2012

Turkey Pot Pie w/ Cheddar Herb Almond Crust

Happy Sunday!  Well, today we are officially saying goodbye to our Thanksgiving turkey leftovers with the grand finale..."Turkey Pot Pie w/ Cheddar Herb Almond Crust".  This is it...the end...it's over...sayonara (well, until next Thanksgiving anyway).  I decided to make my chicken pot pie recipe substituting the leftover turkey instead of chicken as well as a few other changes. 

Since youngest son was coming for dinner to help bid farewell to our Thanksgiving turkey too, I decided to double the "filling part only" of my chicken pot pie recipe and keep the crust recipe the same.  I used a bigger casserole dish and rolled the crust out a bit thinner to cover the extra surface area.  Also, since I fiddled around and worked with the dough longer than I probably should have while trying to get it into "just the perfect shape" for my casserole dish (please, don't be like me)...it was a tiny bit trickier to move over this time because the dough got a little warmer and gave me some trouble separating it from the parchment paper fast enough to transfer it without a little breakage.  No worries though -- even though it doesn't look as perfect as my other crust did -- it is still absolutely delicious and beautiful!  So, don't fret if your crust doesn't turn out completely seamless, it will just allow a little of the sauce to bubble out which happens most of the time with pot pies anyway.  I had even considered making a lattice top crust instead this time, but wanted to get it into the oven quickly.  I will try that another time and make a rectangular shaped pot pie.  On another note; when I doubled the filling, I did not double the xanthum gum amount (I still only added the 1 teaspoon) because I wanted plenty of gravy for all the meat and veggies to swim around in.  To give it a little bit more viscosity or thickening, I instead added slightly over 1/2 cup of shredded cheddar cheese and melted it into the sauce and then tasted it for seasoning.  It turned out really good.  If you don't have or don't want to use xanthum gum, you can substitute it by adding some cream cheese and melt it into the sauce mixture to obtain your desired thickness.  Below, I am posting the Turkey Pot Pie w/ Cheddar Herb Almond Crust recipe (that I doubled and modified for a larger version of my chicken pot pie recipe) along with the modifications I made and a few photos.  Enjoy!

Voila!
A snapshot of the filling before adding the crust to the top
The crust has been added (you can see where it cracked in a few places while transferring)
Here is a picture fresh out of the oven -- you can see where the sauce bubbled out a bit
BOOM!

Turkey Pot Pie w/ Cheddar Herb Almond Crust

Ingredients: 

Filling

4 cups diced cooked turkey breast
4 cups chicken or turkey broth (plus extra to use as necessary to adjust sauce 
   thickness)
1 tablespoon butter or olive oil
1 stalk celery, finely diced
1/2 small onion, diced (about 1/2 cup)
3 - 4 carrots, sliced thinly
2 cup fresh green beans cut into 1-inch pieces
4 tablespoons fresh parsley, chopped
1/2 cup half-n-half
1 - 2 teaspoons Italian seasoning
Salt & Pepper, to taste  
1 teaspoon xanthum gum (to be added gradually, 1/2 teaspoon at a time)
1/2 - 3/4 cup shredded cheddar cheese

Crust
2 cups almond flour
3 tablespoons "cold" butter, diced
1 egg (or 1/4 cup Egg Beaters)
1 cup sharp cheddar cheese, shredded
1/2 to 1 teaspoon Italian seasoning
1/2 - 1 teaspoon salt, or to taste
1/2 - 1 teaspoon pepper, or to taste

Directions:


Preheat oven to 350 F.  Lightly spray/grease a 3 quart casserole dish and set aside.  In a medium saucepan, melt butter and saute celery and onion until tender; add chicken or turkey broth, carrots, green beans; cover and simmer until carrots and green beans are tender.  Add parsley, Italian seasoning, salt and pepper to taste.  Bring broth and veggie mixture to a light boil/simmer while stirring in the xanthum gum 1/2 teaspoon at a time, whisking vigorously until well blended.  Sprinkle the next 1/2 teaspoon xanthum gum a little bit at a time, whisking briskly until the broth begins to thicken.  Once it has reached the thickness you like, add the half-n-half and stir well.  If you accidentally thicken it a bit more than you wanted, thin the sauce with additional broth.  Check seasoning (salt and pepper) and make any necessary adjustments.  Stir in 1/2-3/4 cup cheddar cheese until melted.  Add chicken to the sauce and mix well.  Simmer on low for a few minutes to just to keep hot.  

In a medium bowl, add all crust ingredients and cut in with a pastry cutter until crumbly and all flour is moistened and cheese is pulverized into the mixture. Press dough together in a ball and place on a sheet of parchment paper and flatten out lightly into a circle shape (or the shape of the top of your casserole); cover with another piece of parchment paper and roll out to about 1/4 inch thickness to the size of your casserole dish.  Handle the dough minimally with your hands (you don't want to heat up or melt the butter in the dough, you want it to remain stiff).  Once dough is rolled out evenly and the size of your casserole dish, pour hot filling mixture into casserole dish.  Gently and carefully lift the dough and move it on top of the filling in the casserole (it is important to choose the right size casserole so your filling will be within an inch or so of the top when filled and the crust will fit and lay nicely on top).  If it cracks a little, gently press it back together.  You can use any leftover scraps of dough that you have left to build a crust around the edge of your casserole dish.  Put chicken pot pie in a 350 degree oven for 15 minutes; lower oven temperature to 325 degrees and bake an additional 15-20 minutes until crust is golden brown and done (you can tell by touching the top of the crust).  


If you want to see additional photos as well as the original recipe, here is the link:   Chicken Pot Pie w/ Cheddar Herb Almond Crust 


Saturday, November 24, 2012

Happy Saturday!

We awoke to a chilly morning this morning -- it was 37 degrees when we woke up, but it's bright, sunny and gorgeous out.  This is a drastic change for us since yesterday was a warm 72 degrees here.  The weather forecast for tonight is a frosty 28 degrees.  Guess it's time to put away the shorts and flip flops!  I decided to make us a good breakfast to start this chilly morning with.  We had fried organic cage free eggs, oven baked crisp nitrite free bacon along with a piece of plain "bagel toast" to go with our eggs and bacon.  We enjoyed big mugs of smoky dark Italian roast coffee to go with our breakfast.  Now we have the energy to seize this gorgeous day!  :-)

BOOM!