Saturday, May 18, 2013

Happy Saturday...It's Breakfast Time!

Happy Saturday!  This morning I was able to sleep in late.  I don't get to do that often and I feel so refreshed this morning.  Hubby and I took our walk quite late last night -- it was 10:00 and we didn't finish up until close to 11:00 after taking Spike for his walk, too.  It was cloudy and overcast when I opened my eyes this morning, but I decided to get up and make myself a good breakfast of an organic cage free egg, 2 Applegate chicken sausage links (of which hubby ate one of them), one of my Golden Cheddar Biscuits and some big fresh blueberries that I picked up yesterday.  We had rain overnight because everything was soaked this morning.  When I stepped out onto the patio to snap a couple quick photos, the sun suddenly popped out and everything looked so beautiful with the lush rain soaked plants and flowers and the sun twinkling on their rain coated leaves.

What makes today even more special for me is that, as of this morning, I am now down 62 pounds since beginning my wheat/grain free journey. I wish I had known what a difference removing wheat, grains and added sugar would make for me a long time ago. To think that all this time I feared eating fat and instead followed the dietary advice of consuming plenty of "whole grains" and eating "low fat" and never understood why it was such an effort to lose weight and keep it off.  I also thought that losing weight required hours of exercise every day...WHO KNEW that all that advice was incorrect!!! When I began Dr. Davis' Wheat Belly program, I intentionally put it to the test, because I was a huge skeptic -- you could not have been any more skeptical than I was!  I did not exercise...but I followed the eating plan and made an effort to take advantage of making the most out of what I "could eat" and did not focus at all on what I "could not eat."  Without exercise, 55 pounds dropped off effortlessly and quickly.

A couple of months ago, I began walking because I wanted to and I enjoy it, not because I had to in order to lose weight.  I have since lost an additional 7 pounds during the last couple months bringing my total lost to 62 pounds as of this morning!  My triglycerides have gone from 546 to 115 during this journey and I hope they will continue going down, even though they are considered well in the normal range now (I have never, ever had normal triglycerides before beginning this program due to genetic predisposition).  I wish I knew then what I know now!  Wheat and grains are not my friend and never were....fat is not my enemy...it has been a complete and total revelation.  I don't tell you this to brag whatsoever, because I am actually a very private person...but instead I say this to inspire those that may be on the fence about whether this program really works.  On my blog, there is an almost daily pictorial diary of what I made and ate for dinner, because most of my breakfasts are pretty consistent and my lunches typically consist of leftovers from dinner the night before.  I snapped a couple photos of this morning's breakfast below -- it's one that I would have never eaten while following any diet I had ever been on before...life is good!  Enjoy!

Voila!
BOOM!

Friday, May 17, 2013

Pan Seared Wild Pacific Halibut Topped w/ a Mandarin Butter Reduction & Grilled Baby Bok Choy

Both hubby and I were off today and it turned out to be such a beautiful day to be off...sunny, breezy and warm. We took our little bichon, Spike, to the vet for his annual check up and vaccine early in the morning and then headed out to do our Costco run and some other errands so we could take advantage of missing the weekend traffic and crowds.  We began our adventure at the Penzeys Spices Store.  If you have one nearby, it's worth going to.  I came home with a bag of new spices to try.  One of the items I picked up was Ceylon cinnamon...it is absolutely my favorite cinnamon.  Most cinnamon sold in grocery stores is Cassia cinnamon...Ceylon is a much more delicate cinnamon...I like to use it in my Greek yogurt with a little bit of stevia every morning for breakfast during the week.  Our next stop was Trader Joe's which just happened to be in the same shopping center.  I don't shop there very often because it is on the other side of town and just not convenient.  I picked up some baby Bok Choy there to grill for dinner tonight...I have always wanted to try grilling it.  I picked up a few other items and then we headed to the Costco that was up in the same area.  I lucked out and hit the "fish lottery" again this afternoon, because they had beautiful wild Pacific halibut that I picked up to make for tonight's dinner.

Dinner was simple, fresh and delicious.  I made a simple marinade for the baby Bok Choy by zesting and juicing a lemon and lime and then mixing it with about 1/4 cup of olive oil, sea salt, pepper and some Tamari sauce.  I brushed it on the Bok Choy before grilling and then again after it was cooked and I then pulled it off the grill...well, only 2 of the 4 baby Bok Choy's survived...hubby dropped the other 2 on the ground when pulling them off the grill. I pan seared the halibut after patting dry with paper towels, seasoning both sides with sea salt and black pepper and then cooking it in a hot skillet in a little olive oil for about 3 minutes on each side.  I then transferred them to a plate and covered with foil while I prepared the simple sauce.  I decided to give the sauce a little Asian flair.  I zested and juiced 2 mandarin oranges which produced about 6 tablespoons of juice and then reduced it in a small saucepan by almost half; added a splash of Tamari sauce; then removed it from the heat and whisked in 1 to 2 tablespoons of Kerrygold butter.  I drizzled the sauce over the halibut fillets, sprinkled with a little mandarin zest, toasted sesame seeds and a few sliced green onion tops.  I sprinkled the Bok Choy with toasted sesame seeds and a little lemon and lime zest...and "Boom"...dinner was served!  I snapped a few photos for you to see below.  Enjoy!

Voila!


BOOM!

Thursday, May 16, 2013

Sausage, Roasted Red Pepper and Black Olive Frittata with Golden Cheddar Biscuits

This evening I was in the mood to make a frittata for dinner...quick, easy and delicious.  I browned some Italian chicken sausage that I removed from the casings and broke it up as it browned.  I transferred the cooked sausage to a paper towel lined plate and let it drain.  I melted 1 tablespoon of butter in an oven-safe nonstick skillet over medium heat and then placed the cooked sausage in the bottom of the skillet.  I added about 1/2 cup of diced roasted red bell pepper (from a jar), a couple tablespoons of sliced black olives and then poured 5 beaten eggs (3 whole, 2 whites) seasoned with salt, black pepper and a pinch of Italian seasoning.  I cooked it on the stove top, lifting the edges and letting the liquidy uncooked eggs run underneath to cook.  Once it was done, I topped it with some diced fresh mozzarella cheese and shredded Parmigiano Reggiano and placed it under the preheated broiler for about 4 to 5 minutes until it was golden brown and puffed around the edges.  I sprinkled it with some fresh chopped Italian parsley, cut it into wedges and served with simple Golden Cheddar Biscuits.  It was a substantial, but not too heavy, meal and super simple to make.  I snapped a couple photos below as well as my recipe for the simple Golden Cheddar Biscuits.  Enjoy!

Voila!


BOOM!

Golden Cheddar Biscuits

INGREDIENTS:

2 cups blanched almond flour
2 teaspoons baking powder
1/4 teaspoon baking soda
1/4 teaspoon sea salt
1/4 teaspoon ground black pepper
2 tablespoons chilled butter, small diced
4 ounces (1 cup) shredded sharp cheddar cheese, divided
1/4 cup plus 2 tablespoons cold buttermilk (or cream)
1 egg

DIRECTIONS:

Preheat oven to 350 degrees F.  Place flour, baking powder, soda, salt and black pepper in a medium mixing bowl and whisk to mix well.  Add diced chilled butter; using a pastry cutter/blender, cut butter into dry ingredients until it appears crumbly.  Stir in the shredded cheese and make a well in the center of the mixture; add buttermilk and egg; stir to mix well. The dough will be thick and somewhat stiff and slightly fluffy.   On a parchment paper lined baking sheet, use a cookie scoop or retractable ice cream scoop to make 8 equal sized mounds or balls of dough; space evenly apart.  Don't tamp down mounds of dough, they will spread slightly as they bake.  Bake at 350 degrees for about 18-20 minutes or until light golden brown.  Makes 8 medium sized biscuits.


Wednesday, May 15, 2013

Chipotle Dusted Grilled NY Strip Steaks & Tri-Color Veggie Ribbons

This evening, I stopped to pick up a couple of steaks on my way home from work to toss on the grill for dinner.  It actually got pretty hot here today...in the upper 80s.  Dinner was so easy to put together.  I patted my NY strip steaks with paper towels until dry, then lightly coated them with olive oil and dusted both sides with some ground Chipotle Chile pepper, Celtic sea salt and freshly ground black pepper.  I grilled them on a hot grill for about 4 minutes on each side and then placed them on a plate and covered them with foil while I prepared the super simple and beautiful Tri-Color Veggie Ribbons.  Using a regular vegetable peeler, I made thin ribbon strips with 2 carrots, 3 small yellow squash and 3 small zucchini and then quickly sauteed them in a little butter and extra virgin olive oil. I put the carrots in the pan first and sauteed for a minute or two since they are a harder vegetable...then added the zucchini and yellow squash strips and sauteed another 3 minutes or so and then seasoned lightly with salt and pepper.  I also sauteed some sliced fresh mushrooms in a little butter and seasoned them with a splash of sherry, salt and pepper.  I sliced the rest of my mini San Marzano tomatoes and tossed them in a tiny bit of extra virgin olive oil and a little fresh basil and seasoned with a dash of salt and pepper.  It was a simple, fresh meal made from fresh whole foods...there was nothing processed whatsoever on my plate!  I snapped a few photos below for you to see.  Enjoy!

Voila!
BOOM!

Tuesday, May 14, 2013

Crustless Greek Style Spinach-Feta Pie

This evening I was in the mood for my Greek Style Spinach-Feta Pie, but I decided to put a different twist on it by making it crustless...."sort of".   Rather than make the almond flour crust I typically make for this (which is super easy to make, by the way)...I decided to add some almond flour and Parmesan cheese inside the pie filling instead and make it a crustless pie.  I also bumped up the egg and half-n-half a little to balance the almond flour and Parmesan cheese that was going to go inside the filling.  It turned out good -- lighter than the regular crusted kind. I will admit, though, that I still prefer it with the crust...but this version was a nice and lighter change.  I also added a lot more spinach than the recipe below calls for because I had a 16-ounce container of organic fresh baby spinach that I need to use -- so I just added the entire container...which is a LOT of spinach.  If you are a spinach lover it's a good thing -- if not, well...stick with the 10 ounces listed in the recipe (especially if your pie dish isn't very deep, because it will create extra volume and might not fit into your pie dish).  If I would have added another tablespoon of filling to my large 10" pie dish, it would have overflowed -- it was that full with the extra spinach. Hubby and I are going to go and get our walk in now since it's such a beautiful evening.  I snapped a few photos below as well as the modified recipe for the crustless version.  Enjoy!

Voila!


BOOM!

Crustless Greek Style Spinach-Feta Pie

Ingredients:

Filling
10 oz. fresh spinach, (cooked and squeezed dry), coarsely chopped
2 tablespoons olive oil or butter
6 to 8 oz. feta cheese, crumbled
1/2 cup onion, chopped
2 to 3 cloves garlic, minced
1/2 teaspoon dill (or 1 to 2 teaspoons if using fresh)
1 teaspoon grated lemon peel (I bumped it up to 2 teaspoons because I love the flavor)
Freshly ground black pepper and sea salt, to taste
6 eggs (or 1-1/2 cups Egg Beaters) - you can also use a combination of both
2/3 cup half-n-half, cream or milk
2/3 cup blanched almond flour
1/4 cup finely grated Parmesan cheese

Directions:


Preheat oven to 350 F degrees.  Lightly spray a pie dish or tart pan (I used a 10" pyrex pie dish) with olive oil spray.  

In a non-stick skillet, saute onions and garlic in olive oil until translucent; remove and set aside.  In the same skillet, saute spinach just until wilted.  Drain and press as much of the liquid out of the spinach as possible (I use a mesh strainer and press it with the back of a spoon).  Place well drained spinach in a medium bowl; add cooked onions and garlic, feta, dill, lemon peel, pepper, eggs, half-n-half, almond flour and Parmesan cheese.  Mix until well combined.  Pour mixture into the lightly greased pie dish and bake at 350 F for 40 to 45 minutes, or until filling and eggs are set and cooked through to the center of the pie.  If the center still seems a little jiggly, cook an additional few minutes.


Tuesday's Big Beautiful Salad for Lunch

This afternoon I decided to make a big beautiful salad for lunch using last night's leftover Chipotle Lime Grilled Chicken Breast.  I sliced it and placed it on a bed of romaine lettuce and added sliced mini San Marzano tomatoes, half of a diced avocado...drizzled on a little ranch dressing...and BOOM, I had an awesome quick and easy salad for lunch!  It was so nice outside that I decided to have lunch outside on the back patio before heading back to work.  I snapped a couple photos below to show you how beautiful leftovers can really be!  Enjoy!


Monday, May 13, 2013

Grilled Chipotle Lime Chicken, Chipotle Lime Squash & Cheddar Chipotle Cauliflower Mash

This evening I had 3 boneless chicken breasts I wanted to use.  I decided to do a quick little marinade packed with lots of flavor. I placed my chicken in a Ziploc bag and beat them with my meat mallet until they were flattened a bit. I placed them in a small shallow casserole dish and grated the zest and squeezed the juice of 1-1/2 limes over the 3 breasts.  I poured a few tablespoons of extra virgin olive oil on top and turned them over to completely coat with the olive oil, lime juice and zest and then sprinkled both sides with sea salt and ground Chipotle Chile powder and set them aside to marinate for about 30 minutes while I sliced and prepared my squash and preheated the grill.  I sliced 5 small yellow summer squash and then quickly sauteed them in about 1 tablespoon of butter.  While they were cooking, I added 1 sliced green onion, sliced fresh mini San Marzano tomatoes and a little sea salt.  When the squash was almost done and slightly golden brown, I seasoned it with Chipotle chile powder and squeezed 1/2 of a lime over it while still in the pan and stirred in a pinch of fresh lime zest.  I used the leftover Cheddar Cauliflower Mash from the other night and seasoned it with Chipotle Chile powder before reheating it.  While my squash was cooking, I placed the chicken on the grill and cooked it for 4 to 5 minutes per side.  It was a quick, simple and fresh dinner to put together.  I snapped a few photos below for you to see.  Enjoy!

Voila!


BOOM!

Saturday, May 11, 2013

Saturday Night's Grilled Zucchini Lasagna...

Today was a beautiful day out, although it clouded up and began raining later this evening.  Hubby and I ran our errands and did our Costco run and then went for a long walk since it was so nice; we walked for over an hour and then came home and took Spike for his walk, too.  Since we've had so much rain recently, the flowers in the yard are particularly beautiful, so I snapped a few photos.  Both boys came for dinner tonight so I made Zucchini Lasagna for dinner.  Hubby grilled the zucchini slices for me -- when possible I prefer to grill them to give them extra flavor.  It was simple to make. I sliced 5 large zucchinis lengthwise into 1/4" thick strips and then brushed with olive oil and seasoned them with salt and pepper and hubby grilled them until fork tender.  I decided to add meat to the lasagna tonight.  I browned 1 pound of ground sirloin with some diced onion and seasoned it generously with salt, lots of black pepper and a dash of cayenne and then added fennel seeds to give it a sausage-like flavor.  I snapped a few photos of our meal along with a few photos of my flowers. The recipe for the lasagna is below -- the amounts of ingredients are according to your own taste; you can add more or less cheese.  I used 1 pound of ground sirloin, 1 pound of ricotta, 1 pound of fresh mozzarella, and 6 large slices of provolone.  I topped the lasagna with about 1/2 cup of Parmigiano Reggiano before baking.

This is the order I layered everything:
  • Thin layer of sauce in the bottom of the casserole dish;
  • Layer of zucchini
  • Layer of sliced provolone cheese
  • Layer of browned ground sirloin and onion (seasoned with salt, pepper, cayenne and fennel seeds)
  • Layer of sauce
  • Layer of ricotta cheese
  • Layer of sliced fresh mozzarella cheese
  • Layer of zucchini
  • Layer of sauce
  • Topped with shredded Parmigiano Reggiano cheese
I baked it in a 375 degree F oven for about 35 minutes.  I used one of my favorite jarred pasta sauces by DelGrosso and used the entire jar since it was a larger pan of lasagna.  It's important not to make the lasagna too saucy since the zucchini noodles don't absorb sauce the way traditional noodles do, and you don't want it to be too sloppy when you cut it.  You should let it sit for about 30 minutes for the cheeses to cool down a bit so it isn't super hot and it can set so your lasagna doesn't slide all over the place when cut (we only waited about 20 minutes so it didn't cut quite as cleanly as it usually does).

Voila!
Before adding the Parmigiano Reggiano and popping into the oven...


BOOM!


Happy little Spike going for his walk this afternoon...


Friday, May 10, 2013

Friday Night's Calzones...

I am SO glad that today is Friday -- it seemed like a long week for some reason.  This evening I was torn about what to make for dinner.  It was either going to be something with chicken or something like pizza or calzones...and the calzones won!  I have made calzones many times before -- both the traditional dough type as well as the recipe I created for the wheat/grain free dough version.  The difficulty in making them wheat/grain free is that the dough is harder to work with since you don't have the elasticity normally found in traditional pizza dough. It is easy to spread a wheat/grain free crust out flat for a pizza, but flipping that raw dough over to make a calzone is a bit more tricky -- not hard, just tricky.  I went back through my wheat/grain free calzone recipes and decided to make the dough a bit thicker and easier to work with, so I reduced the water a little and added a bit more Parmesan cheese (the finely ground/powdery textured kind to soak up the liquid and add flavor).  I also decided that rather than flip it over with a rubber spatula that I would spread the dough circle out on one side of my baking pan with the idea to flip it from the outer edge of the pan inward towards the center, thereby making the calzone end up smack in the center of the pan.  To make it super easy to flip the calzone over, I used parchment paper, lightly sprayed or brushed with oil and then placed my filling ingredients on one half of my dough circle (the half closest to the center of the pan), leaving the outer half near the end of the pan empty for flipping over.  I simply slipped my hand under the parchment paper of the outer empty dough half and flipped it towards the center, covering my ingredients and then peeling the parchment paper back and laying it back down on the pan.  I then used my hands and fingers to gently press and seal the edges of the calzone.  It was SO simple to flip over this way.  I find that the more you experiment, the more creative shortcuts and techniques you come up with.  The most important advice I can give you is to not overstuff your calzone or it will be hard to keep the filling from poking through the top of your calzone.  I have made that mistake before, both with regular dough and the wheat/grain free dough.  Also, it is imperative to pre-cook your toppings -- no raw veggies or uncooked meats or you will have super soggy calzones.  Tonight, my calzone was filled with red peppers, onions, mushrooms, diced turkey pepperoni and diced fresh mozzarella cheese.  To make my Friday evening even more special than just calzones...I get to have the chocolate chip cookies I made a couple nights ago for dessert!  I snapped a few photos and posted my revised recipe for calzones below.  Enjoy!
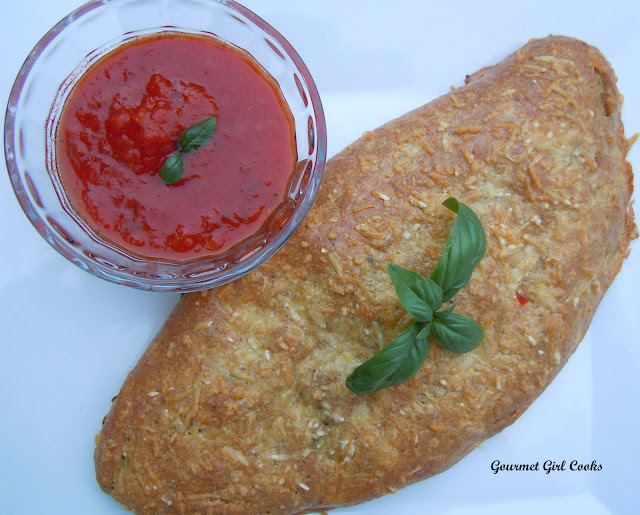
Voila!


BOOM!
Just flipped over and sealed...waiting for egg wash 
Brushed with egg wash and sprinkled with shredded cheese; ready to pop in the oven


Calzones (Wheat/Grain Free)

INGREDIENTS:

Dry Ingredients:
1/2 cup golden flax seed meal (organic golden flax has a milder taste than brown)
2/3 teaspoon baking powder (aluminum free)
3/4 teaspoon dried Italian seasoning
1/4 teaspoon garlic powder
1/4 teaspoon onion powder 
Dash cayenne pepper, optional
1/4 - 1/2 teaspoon sea salt (more or less, to taste)
5 - 6 tablespoons Parmesan cheese, finely grated

Wet Ingredients:
1 egg (or 1/4 cup egg substitute such as Egg Beaters)
1 tablespoon olive oil (a little more, if desired)
2 tablespoons water

Calzone Filling:
Favorite shredded cheese (Italian blend, mozzarella, cheddar, Parmesan, etc.)
Favorite pre-cooked toppings (pepperoni, sausage, onions, peppers, mushrooms, etc.)
Pinch red pepper flakes, optional

DIRECTIONS:

Preheat oven to 400 degrees F.  Mix dry ingredients together; make a well in the center of the bowl and add wet ingredients; mix well until a dough forms.  If your dough is still too wet, add additional grated Parmesan cheese until dough is stiffer (it will be a bit sticky).  Let the dough sit for about 5 minutes to thicken. Place dough on a baking sheet or cookie sheet lined with greased parchment paper or foil (I use either Reynolds non-stick foil or parchment paper, lightly brushed with olive oil).  If you use parchment paper, it will make it easier to flip the dough over to make the calzone. 

Press the dough out with a rubber spatula (to keep it from sticking) into an approximate 10-11" circle (try to make the circle on one side of the baking pan so you can flip it over towards the center of the pan).  Sprinkle shredded cheese of your choice evenly over the top of 1 half of the dough; top with pre-cooked toppings, a little more shredded cheese and red pepper flakes (optional).  Carefully slide your hand under the parchment paper under the half of the crust nearest the outer end/edge of the pan and gently but quickly fold over the dough towards the center of the pan.  Lay the parchment paper or foil back down and press the edges of the dough to seal so filling ingredients won't melt out while baking.  If desired, lightly brush top of calzone with egg wash to help brown the crust and sprinkle with additional shredded cheese.

Bake for approximately 20 minutes or until calzone looks and feels done.  Remove from oven and let cool about 5 minutes.  Serve with pizza sauce on the side for dipping, if desired.


Wednesday, May 8, 2013

Slow Cooker Pot Roast, Cheddar Cauliflower Mash...and Chocolate Chip Cookies w/ Toasted Walnuts & Ricotta

We finally saw the sunshine today and it was such a welcome sight!  This evening I was in the mood to bake chocolate chip cookies...so I made a batch of my Chocolate Chip Cookies w/ Toasted Walnuts & Ricotta since I didn't have much to do to prepare dinner since our dinner was cooked in the crock pot.  I put a small pot roast in the crock pot when I came home at lunch time today, along with some onions, mushrooms and carrots -- I added some red wine (Pinot Noir), Celtic salt, Chipotle Chile Powder, fresh parsley and covered it to cook all afternoon.  I served it alongside Cheddar Cauliflower Mash.  It was really nice to come home to dinner already cooked (except for the cauliflower).  Below are a couple pictures of our dinner as well as the delicious cookies I made.  The recipe for the cookies is embedded in the link above.  Photographed alongside the cookies, check out the beautiful flowers my youngest son sent me at work today to get an early start on Mother's Day! Thank you so much my grown up "baby boy" -- they are absolutely beautiful!!!  Without question, the greatest gifts in my life are my 3 children and I love them more than words could ever say.  Being a Mom is the single most important job I have ever had or will ever have and I hope you all know how proud I am of each and every one of you.  Check out the pictures below.  Enjoy!


Tuesday, May 7, 2013

Sunflower Seed Bagel Toast Topped w/ Chicken Salad

This evening we had leftovers that needed to be used, so I didn't have to cook dinner.  However, I was in the mood to bake!  Friday night I didn't feel like cooking, so we had picked up a rotisserie chicken to have for dinner along with a salad. I still had leftover chicken that needed to be used.  We also had leftover Poblano Pepper, Beef & Cheese Pie that needed to be used from Sunday, too.  So, hubby had the leftover pie for his dinner and I made myself some chicken salad (diced chicken, mayo, celery and green onions) with the leftover chicken.  I felt like having my chicken salad on some toast, and I've wanted to make a batch of my Bagel/Squagel bread as "bagel toast" topped with sunflower seeds ever since one of my readers, Annette, told me she had used that as a topping for it once.  I absolutely love sunflower seeds and just happened to have a bunch leftover from when I made my grainy seedy bars not too long ago.  So, I made a half batch of my bagel bread and topped them with sunflower seeds and baked them -- I pulled them out about 10 minutes before they were finished and brushed the top of the bread and seeds with melted Kerrygold butter and then popped it back in the oven for about 8 to 10 minutes to finish baking.  When I pulled it out, I sprinkled it lightly with some Kosher salt and let it cool and then cut it into squares.  Instead of using a spatula to spread the batter out evenly in the pan, I used lightly sprayed parchment paper placed on top of the dough and used a flat edge (small box) to spread it out to an even 1/2-inch or so thickness.  In this batch of bagel bread, I omitted the Italian seasoning and garlic powder and only used the onion powder with salt and pepper to season it...I wanted to TASTE the sunflower seeds!   I topped my little Sunflower Seed Bagel Toasts with a scoop of chicken salad...and it was absolutely delicious!  I was going to bake some chocolate chip cookies, too...but decided to make those later this week!   :-)   I snapped a couple photos of the Sunflower Seed Bagel Toast as well as my simple dinner below.  The recipe for my Bagels/Squagels is embedded in a link above.  Enjoy!

Voila!
Sunflower Seed Bagel Toast
BOOM!
BOOM! BOOM!
      

Monday, May 6, 2013

Pan Seared Wild Pacific Halibut w/ Lemon Wine Caper Sauce

When I got home from work this evening, it looked like it was going to rain...again.  So, I began trying to figure out how I would fix the wild caught halibut I picked up from Costco on Sunday -- it was an unusually beautiful piece that I cut into 2 fillets.  While I was pondering dinner...the sun suddenly peeked out, so I hurried up and put on my walking shoes and scooted out the door.  I managed to get a brisk 45 minute walk in before dinner -- I was thrilled!  I continued my "pondering about how to cook the halibut" while walking.  I decided to pan sear the halibut in a little olive oil and make a simple, quick and fresh lemon, wine, caper sauce to put on top of it.  The entire dinner only took about 15 minutes to put together and within 20 minutes, we were sitting down eating.  I heated my skillet with a little olive oil on medium-high heat, seasoned my 2 halibut fillets with a little sea salt and black pepper and cooked them for 3 minutes on each side until lightly browned and then transferred them to a plate and covered them with foil.  I added 1 large clove of finely minced garlic to the pan and sauteed it for about 1 minute, then poured about 1/4 cup of dry white wine (Chardonnay) into my hot skillet and reduced it by half (about 1 to 2 minutes).  After the wine had reduced, I whisked in about 2 tablespoons of butter until melted; then added salt and pepper to taste, 1 tablespoon capers, 1 teaspoon fresh lemon juice, 1/2 teaspoon finely minced fresh parsley, about 1/3 cup of sliced miniature San Marzano tomatoes and 1/2 teaspoon finely grated lemon zest and then heated it about 2 minutes while swirling the sauce in the pan.  I placed the halibut on the plate and topped it with the sauce and sprinkled with a little more fresh parsley and lemon zest.  The fish was cooked perfectly and was extremely tender and moist and the sauce added lots of fresh flavor.  I served our fish with a big green salad...it was delicious!  I snapped a few photos for you to see below. Enjoy!


Sunday, May 5, 2013

It's Cinco de Mayo and We're Having -- Poblano Pepper, Beef & Cheese Pie

Since today was Cinco de Mayo (the 5th of May), I decided to make something with a Mexican theme.  One of hubby's favorite things to order in a Mexican restaurant is stuffed Poblano peppers. Sometimes he gets them stuffed with cheese and sometimes with beef.  Traditionally they are stuffed, battered and fried.  Initially, I had planned to buy some Poblano peppers and stuff them with beef and cheese and bake them...but believe it or not, I couldn't find decent Poblano peppers for stuffing.  I finally found a few small ones...so I decided instead to make a Poblano Pepper, Beef & Cheese Pie. It would include a lot of the flavors and ingredients...simply in a different presentation.  After we got done running our errands, our Costco run, and grocery shopping...we decided to squeeze our walk in since the sun came out for a couple of hours in between storms late this afternoon.  We actually were able to get in over 5 miles and still return with the sun shining.  We took our Bichon, Spike, for his walk when we were done so we could take full advantage of the sunshine.  When we were done and everyone got their walk in,  I began working on dinner.  While out shopping today, I picked up some chorizo sausage and ground sirloin to use for my pie.  I diced the Poblano peppers and onions and cooked them along with the sausage and beef and added some home made taco seasoning.  I made a quiche-like filling of eggs, cream and cheddar cheese -- but only enough to act as a binder to hold the filling together -- I didn't want it to be a quiche.  I seasoned my almond pie crust with a little chipotle chile powder to keep with the Mexican theme.  It turned out delicious!  You couldn't see any egg/quiche stuff -- only meat and the veggies I used...so it worked perfectly as a binder to hold the ingredients together so the pie didn't crumble and fall apart when cut.  I served it topped with a dollop of sour cream, diced tomatoes and alongside a sliced avocado.  It was absolutely delicious and we didn't miss going out to a Mexican restaurant like we usually do for Cinco de Mayo.  Hubby made himself a margarita and I made myself a big glass of fresh lemonade to go with our meal.  Below are a few photos I snapped as well as the recipe.  Enjoy!

Voila!
Fresh out of the oven...
It actually began to rain again as I was taking this picture...
So pretty...
BOOM!

Poblano Pepper, Beef & Cheese Pie

Ingredients:

Crust
2 cups almond flour
2 tablespoons cold butter, diced into small cubes
1 egg
1/2 teaspoon ground Chipotle Chile Powder, optional

Filling

1 to 2 small links of chorizo sausage, removed from casing (about 1/2 pound)
1 pound ground sirloin (or preferred beef)
1/2 cup diced onion
1 Poblano pepper, diced
1/4 cup salsa
1/2 batch Taco Seasoning Recipe (or entire recipe if not using chorizo sausage)1
4 eggs (or 1 cup Egg Beaters)
1/3 cup cream or half-n-half
1 cup shredded sharp cheddar cheese
1/2 cup shredded pepper jack cheese, optional

Directions:


Preheat oven to 325 degrees F.  Place all crust ingredients in a medium bowl.  Cut butter and egg into flour with a pastry cutter until mixture resembles small pebbles and the flour is thoroughly moistened (the same way you prepare a pie crust).  Press crust mixture into pie dish or tart pan (I used a 10" pyrex pie dish).  Bake for approximately 15 minutes or until lightly browned; remove from oven and set aside.

Increase oven temp to 350 F degrees.  In a large non-stick skillet, saute chorizo sausage until browned; add ground beef, onions and Poblano pepper, breaking beef up as it browns.  Cook uncovered until onions are translucent and peppers are tender.  Add salsa and taco seasoning and cook until all liquid has evaporated; set aside.  In a medium bowl; beat eggs and cream or half-n-half and stir in shredded cheddar cheese.  Place beef mixture into the lightly baked crust; pour egg and cheese mixture over the beef; top with shredded pepper jack cheese, if desired.  Bake at 350 F for 30 to 35 minutes
; until filling and eggs are set and cooked (lower oven temp to 325 F if edge of crust begins to over brown during the baking).  If center still seems a little jiggly, cook an additional few minutes.