Tuesday, January 24, 2017

Eggplant Parmesan - Easy Low Carb

This evening I decided to make Eggplant Parmesan for dinner. Eggplant is one of my favorites and was one of my Dad's favorites as well. While I was at Sprouts yesterday, I picked up some of the most beautiful eggplants that I've seen in quite a while and they were on sale for 98 cents each, regardless of size. I bought 5 large ones; not ones that were huge around (since they can be more seedy), but more full and longer shaped. These did not have a lot of seeds and the seeds that they did have were tender and light colored (the best in my opinion). When an eggplant is too large or getting old, they are loaded with brown colored seeds that can sometimes be bitter. I like to take a strip of skin off lengthwise every inch or so, so they look striped before slicing. It allows you to still enjoy the flavor and beauty of the purple skin but it's not too much skin.

Tonight's Eggplant Parmesan was probably one of my best. I kept it very simple. As many of you that have either made it or eaten it prepared the classic way, the eggplant is typically breaded and fried before layering in a casserole. I simply sliced my eggplant in 1/2-inch thick circles, brushed it with olive oil and seasoned with a bit of sea salt, then baked it for about 25 minutes in the oven (flipping it about half way through and then brushing again with olive oil). You simply layer a single layer of eggplant sauce, cheese (mozzarella and provolone), top with more eggplant, sauce and cheese (mozzarella and Parmesan) and bake. I used one of my favorite pasta sauces; Rao's Arrabbiata sauce because it's nice and spicy and flavorful, but you can use your own personal favorite or homemade sauce if you have it handy. After it gets layered in a casserole dish, it gets baked for 20 to 30 minutes and then I allow it to sit a bit so the cheeses set up. It was amazing. This recipe made enough for 5 to 6 generous servings. I snapped a number of photos below and included the easy peasy recipe. You will never EVER miss the breading or the frying (and surely not the clean up that's required after frying eggplant on the stove...if you've ever done that before, you know what I mean). If you like eggplant, you will absolutely love this dish. Enjoy!


Eggplant Parmesan - Low Carb

Ingredients:

3 large eggplants, cut into 1/2-inch thick round slices
1/3 cup olive oil (more, if needed)
Sea salt, to taste
1 24-ounce jar pasta sauce (I used Rao's Arrabbiata Sauce)
12-ounces (about 3 cups) shredded mozzarella cheese (more, if desired)
5 to 6 slices provolone cheese
1/2 cup shredded Parmesan cheese

Directions:

Preheat oven to 425 degrees F. Brush both sides of eggplant slices with olive oil and place on a parchment lined baking sheet or in a single layer in a nonstick roasting pan. Season with salt, to taste. Bake for 15 minutes; turn slices over, brush with additional olive oil, and bake for an additional 10 minutes, or until tender when pierced with a fork. 

Spread about 1/2 cup of pasta sauce in the bottom of a 2 to 3 quart casserole dish. Place half of the eggplant slices on top of sauce. Top and spread each slice with a spoonful (about 1 tablespoon) of sauce. Top with half of the mozzarella cheese. Fold slices of provolone cheese in half, then half again to break into fourths. Place 1/4 slice of provolone on top of each eggplant/mozzarella mound. Top with remaining half of eggplant slices. Spoon remaining pasta sauce on top of each eggplant stack. Top with remaining half of mozzarella cheese, then with final layer of Parmesan cheese. Bake for 20 to 30 minutes or until hot and bubbly. If desired, run under the broiler for a few minutes to brown cheese. Allow to sit for about 10 to 15 minutes before serving so cheese can set up. 


Monday, January 23, 2017

Easy Chicken-Apple Sausage & Cabbage Stir-Fry - Easy Low Carb

This evening I made a quick and easy meal using just a few simple ingredients. I stopped by Sprouts and picked up a 1-pound package of their fresh made bulk (not links) Chicken French-Apple Sausage. They make it with ground chicken thighs, spices, applesauce and apples so it has a slight sweet flavor. I also picked up a 3-pound head of savoy cabbage (it's a bit more delicate than regular green cabbage and has a crinkly leaf). I browned the sausage in a bit of olive oil until it was golden brown and broke it up as it cooked. While it was cooking, I cored, cut up, and thinly sliced my head of cabbage and added it to the browned sausage along with some sea salt and black pepper and a few tablespoons of butter. I turned the heat up, covered the pot (no water added) and let it heat up and steam a bit to wilt the cabbage using only what moisture was left on the shredded cabbage. I uncovered it after a bit and as the cabbage cooked down I kept stirring it and turned the heat up to medium-high so it would begin browning in the butter. In the last 5 minutes I added 3 sliced green spring onions and stirred it around and then served. You'll be surprised at how much the cabbage cooks down and shrinks. It was so delicious and so simple to make. Sausage and cabbage go so well together. I snapped a quick photo below and included the easy peasy recipe. Enjoy!


Chicken-Apple Sausage & Cabbage Stir-Fry

Ingredients:

1 tablespoon olive oil
1 pound ground bulk style sausage (I used chicken-apple sausage)
2 to 3 pound head of cabbage, cored and thinly sliced (I used savoy cabbage)
Sea salt and black pepper, to taste
2 to 3 tablespoons butter (I used Kerrygold)
3 green spring onions, sliced

Directions:

In a large skillet or wok, heat oil over medium heat. Add sausage and cook until browned and cooked through, breaking it up into small pieces with a spoon as it cooks. When sausage is browned and fully cooked, add shredded cabbage; cover pan and cook until cabbage begins to wilt, about 5 minutes. 

Uncover pan and stir, continuing to cook uncovered for about 5 minutes until cabbage begins to cook down. Season with salt and pepper. Add butter and increase heat to medium-high, stirring sausage and cabbage frequently until cabbage has begun to brown and cooked to desired consistency. Stir in sliced green onions and cook an additional 3 to 5 minutes.

*Note: To save time, bagged fresh coleslaw mix can be used in place of the head of cabbage. Use whatever type sausage is your favorite (Italian sausage, etc.). You could also use ground beef in place of the sausage and just season it a bit more.


Monday, January 16, 2017

Pan Seared Filet Mignon & Roasted Butternut Squash

This evening I kept dinner pretty simple. I'm still feeling a bit under the weather and don't have my usual energy back yet. Yesterday, we had picked up some beautiful filet mignon steaks to make for dinner but I didn't have the appetite or desire to make them yesterday. I'm so happy I waited until this evening because I actually enjoyed the meal. The only seasoning I used for both the steaks and the roasted butternut squash was sea salt and freshly ground black pepper. I used olive oil and butter to cook the steaks with and just olive oil to coat the squash before roasting.

To prepare the squash, I tossed 1-inch cubes of fresh butternut squash with olive oil and spread them out on a parchment lined large baking pan and then seasoned them with sea salt and black pepper. I popped them into a 400 degree oven for about 30 minutes and then raised the oven temp to 425 degrees and cooked them for about another 10 minutes so they would get nice and brown and caramelized.

While the squash was in the oven, I seasoned my steaks with sea salt and black pepper on both sides. I added a couple tablespoons olive oil and couple tablespoons butter to a heavy dutch oven (you could also use an ovenproof skillet or cast iron skillet since it gets finished in the oven). I heated the oil and butter over medium-high heat and added the 1-1/2" thick steaks and cooked them for approximately 8 minutes on one side until they were nice and browned, then turned them over and cooked for about 5 minutes on the other side. I then placed them in a 425 degree oven to cook for approximately 10 minutes and turned the heat off and let them sit for about 5 minutes or so in the hot oven. They came out cooked medium to medium-well (a thin line of pink inside). I'm not crazy about rare meat but don't mind a little pink inside. Simply increase or decrease the cooking time depending on whether you like your steak more or less done and also depending on the thickness of your steaks. These steaks turned out so tender and juicy.

I snapped a couple of quick photos of tonight's meal below. Enjoy!


Sunday, January 15, 2017

Happy Sunday - Instant Pot Greek Yogurt for Breakfast

Happy Sunday!  A number of you have told me that you are anxious for my Instant Pot recipes since many of you know that I purchased one a few months ago (I have the Instant Pot IP-DUO80 model which is their largest 8-quart version). So, while I haven't written up my Instant Pot recipes yet, I do want you to know that I have used it many times and have been enjoying experimenting with it and plan to start posting them in the near future.

While I don't have this yogurt recipe ready to share with you yet, I thought that since it is what I'm having for breakfast this morning, I'd take a quick photo for you since it just happens to be Greek yogurt that I made using my Instant Pot. I've made it numerous times already and while it is easy as pie to make, it's something that you probably want to make on a day when you are hanging around the house since you need to bring the milk up to a specific temp and often tweak it to get to the right temp. It then needs to cool down to a certain temp before you add starter (fancy word for adding "already made yogurt") and then let it ferment overnight in the Instant Pot. So, while very easy to do, it kind of keeps you close by your kitchen until you get to the fermentation stage which I do for 10 hours in the Instant Pot. I've made it using organic whole milk, 2% milk, etc. and I honestly can't tell much difference between using whole or 2% milk, so I'd use whatever you prefer. So far, every time I've made it, I have made it with 1 gallon of milk because after straining the yogurt to make Greek yogurt, you lose a lot of volume. It was quite shocking to me when I realized how much whey gets strained off; literally several cups of liquid. This batch I'm eating now is made with 2% milk. I swirled a scant tablespoon of no sugar added peach preserves and then topped it with some fresh blackberries. It was delicious. I promise to post my recipe and steps soon. Check out my home made yogurt below. Enjoy!


Saturday, January 14, 2017

Happy 2017 - Saturday Night's Cheese Head Pizza

Greetings and Happy New Year! Long time, no see, right? I've really, really, REALLY missed blogging, but I took a much needed break and, like it or not...I'm back! If you contacted me and I didn't respond, I apologize because as most of my regular followers know, for the past 4-1/2 years, I have been steadfast in posting almost daily and responding to everyone promptly. 

As some of you know, this past year has been difficult for a multitude of reasons. It's been a year filled with loss, a lot of change, and a whole lot of work. No matter how much we have in front of us to do...we only have 24 hours in a single day to do it. I essentially burned myself out and was just plain exhausted, both physically and emotionally. Unfortunately, I am one of those people that rarely (if ever) says no, and I have the tendency to take on more than I should and still maintain some sense of sanity. As many of you know I lost my mother a year ago, and we also moved, which involved both selling a home and purchasing a new home and all of the projects that we had done in the new home once we got moved in. Not to mention, something that I detest immensely...MOVING! I feel like all I did every single day was work, pack, clean and try to keep my home looking like nobody lived there. There was only one little problem was....we did live there! 

As a food blogger, one of the things you understand is what havoc blogging does to your kitchen. Basically, by the time you get done cooking, photographing, writing up your recipe and your blog post...oh, and actually get the chance to eat what you prepared...it looks like a bomb went off in your kitchen; a really big bomb at that. And that scenario repeats itself almost EVERY...SINGLE...DAY! I also work full time and am gone for almost 10 hours a day, so all of this goes on in my "spare time". I have to squeeze a little sleep in there as well and more often than not, never got more than about 4 hours on any given night. Throw in the little fact I also take on various other food projects...some small and some large. Regardless of how much work all of this is, for me it is a labor of love and I really enjoy it. I couldn't or wouldn't have invested this much time in this for all these years in this if I didn't. But this past year, with the addition of both selling my home and buying a new one, and all that entailed just pushed me to my limits and something had to give. But, we are now pretty well settled in and are finally beginning to feel like we don't just work here, but actually live here. 

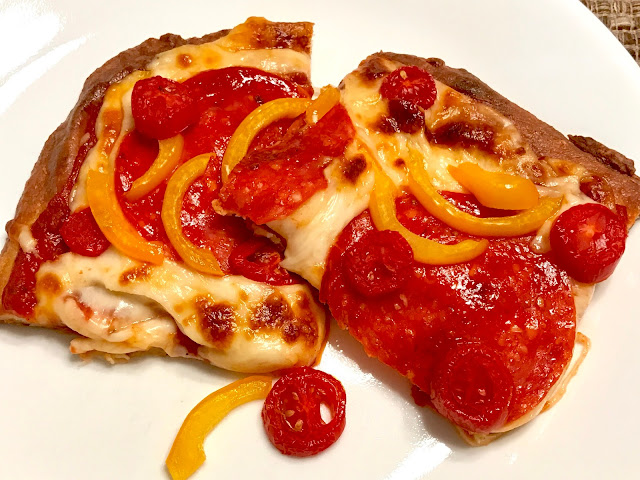
I decided to start my first post of 2017 off with what I made for dinner this evening and what also happens to be one of my absolute favorite recipes...Cheese Head Pizza! It's one of those recipes that you can serve to all of your friends and family that aren't grain or gluten free as well because you honestly can't tell that it is grain and gluten free. I've made it so frequently now that I can usually make it and bake it and have it on the table in about 30 minutes. I topped tonight's pizza with large sandwich-sized slices of Boar's Head pepperoni, sliced yellow bell peppers and sliced fresh mini San Marzano tomatoes. I've been sick this past week with some kind of virus and am still not feeling too snappy, but tonight's pizza is about the only thing that has actually tasted good to me all week. I actually enjoyed it. I've included the recipe below and a few photos I snapped as well. Oh, and if you didn't already read between the lines...I really missed all of you and wish all of you a very happy and healthy new year! Enjoy! 


Ready for the oven...baked crust 11 minutes, then topped and baked another 10 minutes
Fresh out of the oven
CHEESE HEAD PIZZA – My Take on Fat Head Pizza

INGREDIENTS:

8 ounces (2 cups) shredded mozzarella (whole milk or part skim)
3 ounces brick style cream cheese
1 cup almond flour
1/4 cup finely grated Parmesan (powdery style)
1/8 teaspoon salt
Dash garlic powder
1/2 teaspoon dried Italian seasoning
1 large egg
1 tablespoon olive oil (to oil hands before pressing out dough)
Desired toppings (pizza sauce, pepperoni, cooked peppers, onions, mushrooms, additional cheese, etc.)

DIRECTIONS:

Preheat oven to 425 degrees F. Line a large baking sheet or pizza pan with parchment paper

Place mozzarella and cream cheese in a medium bowl. Heat cheese in microwave on high for 45 seconds; stir and heat an additional 30 to 45 seconds or until a hot melty mass of cheese is formed.

While cheese is melting in microwave, stir almond flour, Parmesan, salt, garlic powder and Italian seasoning together in a small bowl. Add flour mixture and egg to bowl of hot melted cheese. Working quickly, fold and stir mixture together with a rubber spatula until a ball of dough is formed (make sure cheese mixture is hot before adding flour and egg).   

Place ball of dough in center of parchment lined baking sheet (or on a non-stick baking sheet or pizza pan). Oil hands with olive oil (*see note/updated instructions below) and press dough out into desired shape (round, oval or rectangular) until about ¼-inch thick or pour the tablespoon of olive oil on top of the dough after placing it in the center of baking sheet and use a rubber spatula to press and spread the dough out evenly. Prick holes all over crust surface with a fork to prevent crust from bubbling up. Bake for 10 to 15 minutes or until golden brown (rotate pan half way through for even browning). Remove crust and top with pizza sauce, additional cheese, and any desired toppings. Bake an additional 5 to 7 minutes or until heated through. Run briefly under the broiler, if browning is desired.

*Note/Update: Rather than oiling hands with olive oil to press dough out, a much easier (and less messy) way to press it out is to pour the tablespoon of olive oil on top of the dough after placing it in the center of baking sheet and use a rubber spatula to press and spread the dough out evenly. If necessary, lightly oil the rubber spatula to keep from sticking.