Thursday, January 31, 2013

Spicy Stir-Fried Chicken with Broccoli

It was a cold and blustery day here today -- it only got up to the low-mid 40s (after a few unseasonably warm days in the 70s).  Tomorrow's high is only supposed to be 39...yikes!  Tonight I was in the mood for some stir-fry.  Normally I like to use diced boneless chicken breast for my stir-fries, but I have used boneless chicken thighs a couple of times now and really enjoy it for a change (as long as I am doing the trimming).  I just don't particularly care for cutting it up because there is a lot more trimming to do and I am fastidious about trimming.  I never ever order dark meat chicken in any Chinese food I have eaten out because it is typically not well trimmed...and well, it just frightens and disgusts me.  ;-)   Tonight's meal was simple and delicious.  Hubby had his over rice and I had mine as is, by itself.  I topped it with roasted peanuts.  I snapped a few photos below and you can find the recipe link for Spicy Stir-Fried Chicken with Broccoli embedded here.  Enjoy!

Voila!

BOOM!

Tuesday, January 29, 2013

Simple Chicken and Roasted Brussel Sprouts w/ Bacon & Apple Cider Vinegar

Tonight I didn't have a lot of time to prepare dinner so I put together a quick, simple and easy meal. Hubby picked up a rotisserie chicken on his way home (a plain one that I sprinkled some paprika, sea salt and pepper on since hubby likes the skin).  I roasted a pound of small fresh brussel sprouts and tossed them with some bacon left from Sunday's breakfast along with a splash of apple cider vinegar for a bit of zing.  It was really delicious. I also served Black Pepper Cheddar Herb Biscuits leftover from Sunday's breakfast and "BOOM"...dinner was made! I have to confess that I loved the brussel sprouts so much that I put my biscuit back and had a second helping of brussel sprouts instead! Below is a picture as well as the super simple recipe for my brussel sprouts. Enjoy!


Roasted Brussel Sprouts Tossed w/ Bacon & Apple Cider Vinegar

INGREDIENTS:

1 pound fresh medium sized brussel sprouts, halved
2 to 3 tablespoons olive oil
1/4 teaspoon sea salt, or to taste
1/4 teaspoon freshly ground black pepper, or to taste
2 to 3 strips of cooked uncured bacon, crumbled
1 to 2 teaspoons apple cider vinegar, or to taste

DIRECTIONS:

Preheat oven to 400 degrees F.  Line a large baking sheet with foil.  Place brussel sprout halves on the baking pan and drizzle with olive oil.  Sprinkle with salt and pepper, to taste and toss to evenly distribute the oil and seasonings.  Spread brussel sprouts out in a single layer and roast for approximately 20 minutes until browned and desired doneness.  Slide brussel sprouts off of the baking pan into a large bowl and sprinkle with apple cider vinegar and toss. Top roasted sprouts with crumbled bacon.  Serves 3 to 4.  

***Note:  The dark and crispy little loose leaves that fall off the sprouts are really delicious -- they are actually my favorite part of the roasted brussel sprouts -- make sure you try them!

Sunday, January 27, 2013

Beef Stroganoff (Beef or Chicken) - Wheat/Grain Free

This afternoon we ran all our errands for the week.  I had to go to 4 different grocery stores just to get the produce I needed for the week.  For some reason it just didn't look very good anywhere today. Part of the problem might also be that I'm so darn picky, too!   :-)   I just don't like "fresh broccoli" that is limp and rubbery or "heads of cauliflower" the size of softballs!   So, we made our rounds until I got what I wanted...or at least close to it!  Tonight I made Beef Stroganoff and served it over "yellow summer squash noodles".  I used a regular vegetable peeler to make "thin ribbons of squash" and then quickly sauteed them in a nonstick skillet with a little olive oil, sea salt and black pepper for about 3 to 4 minutes.  I used thinly sliced sirloin steak in my stroganoff.  This recipe can easily be modified to make chicken stroganoff instead by simply substituting boneless chicken breasts for the steak and chicken stock in place of the beef stock.  This time I made the stroganoff without using any almond flour or xanthum gum and used 1 tablespoon of cream cheese melted into the sauce to get the consistency I like.  To thicken the sauce a little more, you can simply add additional cream cheese. Some people either don't like or want to use xanthum gum -- I don't have a problem using the tiny amount needed (only about 1/2 teaspoon).  Either way, if you don't have it or want to use it, cream cheese does the job beautifully in this recipe.  I snapped a couple photos below and there is a link to the recipe above.  Enjoy!

Voila!
BOOM!
Beef Stroganoff over Yellow Squash Ribbon "Noodles"

Happy Sunday...It's Breakfast Time!

It's a beautiful bright and sunny morning here -- but a bit chilly and only in the low-40s.  I decided to make us a big weekend breakfast/brunch this morning before we started our day and ran our errands. I made a batch of Black Pepper Cheddar Herb Biscuits, oven cooked uncured bacon and fried organic cage free eggs, along with some fresh berries.  I naively stepped out on the back patio to snap a quick picture and was shocked by how cold and windy it was out there.  The bright sun was deceiving and I thought it would be warmer than it was...so I literally "snapped and ran"...back into the house.  I decided to take a couple more pics from the warmth of my kitchen table while my hazelnut coffee was brewing.  Now we are fueled and ready to seize the day!  You can find a link taking you to the biscuit recipe embedded in the name above.  Enjoy!

Voila!
Much warmer here inside at the kitchen table!
BOOM!

Saturday, January 26, 2013

Lunch at Atlanta Fish Market

Today I took my youngest son out to lunch to celebrate his birthday.  We went to one of our favorite restaurants....Atlanta Fish Market for a late lunch.  We are planning a family birthday dinner celebration next weekend when we can get everyone together and have dinner, cake and sing to him while he blows out his candles.  But...since his birthday was this week, I wanted to make sure we got some celebrating in this week as well.  You can never celebrate your birthday too many times!  We shared a delicious appetizer of Jumbo Lump Crab Cocktail that was probably one of the best I've ever had in my entire life.  The "lumps of crab" where humongous and so delicate and sweet.

I had their broiled Atlantic Salmon with olive oil and lemon and a side of buttered thin green beans. He had their Pecan Crusted Idaho Salmon Trout with bourbon honey butter with whipped sweet potatoes and broccoli for his sides. Our meals were amazing, as usual. It was nice spending some one on one time with him this afternoon too. It's also nice to know that you can still eat out and enjoy a nice meal while avoiding wheat and grains if you know what to order and how it is prepared. I snapped a couple photos of our meals for you to see. Enjoy!

Mine:  Broiled Atlantic Salmon w/ Olive Oil & Lemon and Buttered Thin Green Beans
His:  Pecan Crusted Idaho Salmon Trout w/ Bourbon Honey Butter, Whipped Sweet Potatoes and Broccoli

Friday, January 25, 2013

Friday Night...Pizza Night

This evening, daughter came over to have "Friday Night Pizza" with us.  It's been a while since I've had pizza so it tasted unusually good tonight!  Hubby and daughter ordered calzones from Mellow Mushroom and I made myself an Almond/Flax/Parmesan Pizza Crust topped with diced turkey pepperoni, sauteed fresh mushroom and onions, lightly sauteed little tomatoes and some fresh basil. It was delicious!  I made a very thin crust 10-inch "pizza for one" sized crust. I snapped a few photos for you to see below. The recipe for the pizza crust is embedded in the name above. Enjoy!

Voila!
BOOM!
KA-BOOM!


Wednesday, January 23, 2013

Pecan Encrusted Chicken Breasts

This evening I made Pecan Encrusted Chicken Breasts for dinner. Thus far, I have coated and crusted chicken and fish with a variety of different nuts, cheeses, herbs and various combinations, but for some reason had not yet used pecans -- and I live in the south -- go figure!!! I just happened to stumble upon a bag of pecan meal at my local grocery store this past weekend and decided to give it a try. It turned out absolutely delicious. The pecan meal was somewhat coarsely ground and more like what you would expect a nut meal to be and not fine and powdery like the almond or coconut flour I typically use. I chose not to season the nut meal itself and instead seasoned the butter mixture I coated the chicken breast cutlets with and then lightly seasoned the cutlets as they cooked.

I melted a couple of tablespoons of butter in a small bowl in the microwave and then added 1 tablespoon of sugar free maple syrup (by Natures Hollow), a couple dashes of cayenne, a pinch of salt and black pepper and mixed it together. I brushed a thin coating of this mixture on both sides of about 5 chicken breast cutlets and then rolled them in the pecan meal. I cooked them on medium-high heat in a nonstick skillet in a tablespoon of butter and tablespoon of olive oil for several minutes on each side until lightly browned and then seasoned them with some sea salt, black pepper and a sprinkle of paprika. It was a quick and easy meal and I served it with the last of the Yellow Cheddar Squash Casserole and some green beans with almonds. I snapped a photo below for you to see. Enjoy!

BOOM!

Tuesday, January 22, 2013

Tuesday Night's "Leftover" Extravaganza!

Tonight we had a quick and easy dinner because I wanted to use up some of the odds and ends I had leftover in the fridge from cooking this past week.  I had a couple of leftover grilled boneless chicken breasts that I had cooked on Saturday for my son (since he has an aversion to eggplant and we were having Eggplant Ricotta Bake for dinner...I just tossed some chicken breasts on the grill for him and made him some veggies and brown rice to go with it and everyone was happy).  I also had some leftover fresh baby spinach that needed to be used from when I made my Greek Style Spinach-Feta Pie last week.  I lightly sauteed the spinach in a little olive oil with some salt and pepper and placed the chicken breast on top of a bed of wilted baby spinach.  I served it alongside some Yellow Cheddar Squash Casserole left from last night's dinner...and BOOM...dinner was ready in about 10 minutes.  I frequently cook extra servings at dinner time so I have enough left for a couple of lunches...or to make a quick dinner like the one we had tonight.  I snapped a quick picture of our dinner this evening so you can see how easy it is to use leftover odds and ends to create a simple, quick and easy meal.  Enjoy!


Monday, January 21, 2013

Pan Seared Fish with Yellow Cheddar Squash Casserole

This evening, youngest son came over to have dinner with us.  I made us a simple pan seared tilapia, Yellow Cheddar Squash Casserole and steamed fresh broccoli.  Everything turned out delicious!  It was nice having a long weekend off and we finally got all the Christmas decorations put away (they had been taken down...just not packed away in the attic yet).  The temperature has already begun to plunge and the winds really picked up this afternoon.  Tomorrow's high is supposed to be mid-40s and lows in the 20s -- it's hard to believe it was in the mid-70s here last weekend!

This evening we also decided to try out our new Cuisinart ice cream maker for the first time (we had to return the Kitchen Aid ice cream maker a couple of weeks ago that I had gotten for Christmas because it didn't work with my mixer.  We decided to make chocolate chip ice cream by making a basic vanilla ice cream and then added some chopped organic Green and Black's 85% cacao chocolate bar to make chocolate chip ice cream.  It was at the soft serve stage when it finished churning and it's now in the freezer to firm it up a bit more.  It tasted good...although it seemed a bit sweet for me (I used Swerve). Once it has firmed up so I can scoop it and and taste it frozen...I will review it.  I did have a little "situation" while pouring the liquid mixture into the machine -- it hit the side of the hole in the lid I was pouring it through and splattered and spilled all over the machine, counter and floor...LOL.  Fortunately hubby and my son were there and able to help clean it up while I continued pouring the rest of it into the machine.  This ice cream maker was so much easier to pour the mixture into than the Kitchen Aid version.  I just need to get a pitcher with a pour spout so I can better direct the liquid into the machine next time.  Below I snapped a couple photos of our dinner and the recipe for the Yellow Cheddar Squash Casserole is linked in the name in the first paragraph.  Enjoy!

Voila!
BOOM!

Saturday, January 19, 2013

Eggplant Ricotta Bake

Today was a beautiful bright and sunny day outside and the temperature made it up to about 54 degrees here.  I know we needed all the rain we got this week, but it sure was nice to see the sun again.  I was in the mood to make Eggplant Ricotta Bake for dinner tonight.  When we ran our errands today, I picked up a couple of large eggplants so I could make it tonight.  I was so excited to make an eggplant dish for a couple of reasons -- one is that it's delicious and eggplant is one of my favorite things.  But...the second (and probably goofy) reason I wanted to make eggplant tonight was so I could use my new 2.5 quart Le Creuset square casserole (with a lid) that I got for Christmas.  It came in a set along with a matching 3.5 quart round dutch oven in the color "Cassis" which is a beautiful deep "eggplant purple".  I absolutely love Le Creuset and if I had the space to store it I would probably get a piece in every color!  The Eggplant Ricotta Bake turned out delicious as usual...but it looked even more spectacular in an appropriate colored casserole dish!   ;-)   I snapped a couple photos for you to see below.  The link to the recipe is embedded in the name "Eggplant Ricotta Bake" where you can also see what it looks like on a plate -- if you click the link it will take you to one of my previous posts that includes the recipe.  Enjoy!

***P.S. -- I thought I would pass on some "deal alerts" -- in case your local Whole Foods happens to carry Swerve (like mine does) -- they have it on sale now for $8.99 per bag (their normal price is $11.99 each). That is a great price (if you order it directly from the Swerve site, it's $12.99 per bag plus a $5.00 flat shipping rate).  I stocked up and bought 8 bags!  Also -- if anyone might need to order or be interested in ordering Honeyville's blanched almond flour -- I received an email stating that they have 15% off all orders through Tuesday, January 22nd if you use the coupon code "RESOLVE".  

Voila!

BOOM!

Thursday, January 17, 2013

Barbecue Meatloaf

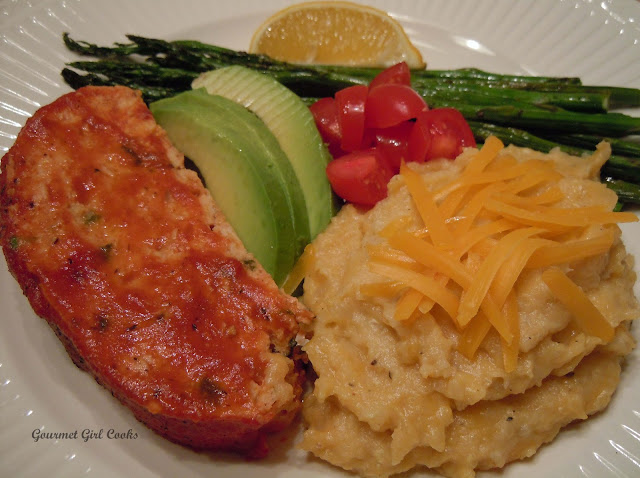
This evening I was in the mood to make Barbecue Meatloaf which is basically a meatloaf cooked with barbecue sauce on top.  Since most commercially prepared barbecue sauces contain sugar, high fructose corn syrup, etc., I tried making it by using Penzey's Spices "Barbecue of the Americas".  The directions say it can be used either as a dry rub or mixed with plain tomato sauce to make barbecue sauce...so that is what I did.  The ingredients in their barbecue spice mix are: salt, paprika, allspice, nutmeg, cayenne, black pepper, white pepper, cinnamon, thyme and ginger....WHEW, that's a lot of different spices!!!  My review of this barbecue sauce after tasting it is probably a 4 or 5 out of 10.  It wasn't awful but it wasn't the flavor I was hoping for and I just didn't care for that combination of spices.  Next time I will try making my own barbecue spice combo.  Most of Penzey's spice blends are really good -- this is the first one I haven't been crazy about.  Despite the "not so awesome" sauce...the meal turned out good.

My meatloaf turned out tender, juicy and good (after scraping the sauce off of it).  I made a small meatloaf using ground chicken breast.  I added lightly sauteed shallots and Poblano peppers, egg, a little shredded cheddar, splash of olive oil, tomato sauce and couple tablespoons of golden flaxmeal to help hold it together.  I served it along with Cheddar Cauliflower Mash and Roasted Asparagus that I added a squeeze of fresh Meyer Lemon juice to before serving to give it just a hint of sweet-tart citrusy flavor.  I love Meyer lemons -- and sadly their season is short.  For those that don't know what a Meyer lemon is, they're an orange colored lemon that is reportedly a cross between a lemon and mandarin orange. They are extremely fragrant too. I snapped a photo of our meal below. Enjoy!

BOOM!


Wednesday, January 16, 2013

Wednesday's Wonderful Leftovers...

This evening I didn't need to cook dinner because I still had plenty of leftover Greek Style Spinach-Feta Pie that I made last night.  I reheated a couple pieces for hubby and me and then tossed a little side salad...and "boom"...dinner was on the table in about 10 minutes. I actually had a piece for lunch today too and have one more left for tomorrow's lunch.  I have gotten a lot of "mileage" out of this one little pie!   I snapped a couple photos below.  Enjoy!

Voila!
BOOM!

Tuesday, January 15, 2013

Greek Style Spinach-Feta Pie

Tonight I was in the mood to make my Greek Style Spinach-Feta Pie -- I had all the ingredients to make it -- fresh organic baby spinach, fresh dill, lemon, feta cheese, eggs, etc.  I love this dish because it reminds me of one of my favorite foods, spanikopita.  It is both hearty and fresh tasting at the same time.  You can make it using whole eggs or Egg Beaters, depending on your preference or what you have on hand.  I used fresh dill tonight, but you could also use dried instead.  I also prefer using fresh spinach but you could easily substitute frozen too if that is what you have available.  My original recipe (linked above) calls for 3 cups of almond flour in the crust and it makes a nice thick sturdy crust.  Tonight I wanted the crust to be a little bit thinner so I reduced the almond flour to only 2 cups and the butter down to 3 tablespoons instead (everything else remained the same).  The dough covered my 10-inch Pyrex pie dish perfectly.  I have re-copied the recipe below or you can simply click on the link above (with additional photos); and of course, I snapped a couple photos for you to see too.  Enjoy!

Voila!

BOOM!

Greek Style Spinach-Feta Pie

INGREDIENTS:

Crust

3 cups almond flour (2 cups for thinner crust)
4 tablespoons cold butter, diced into small cubes (3 tablespoons for thinner crust)
1 egg
1 teaspoon Greek Seasoning (or Italian Seasoning), optional 

Filling

10 oz. fresh spinach, (cooked and squeezed dry), chopped coarsely
2 tablespoons olive oil or butter
8 oz. feta cheese, crumbled
1/2 cup onion, chopped
2 cloves garlic, minced
1/2 teaspoon dill (or 1 to 2 teaspoons if using fresh)
1 teaspoon grated lemon peel
Freshly ground black pepper, to taste
5 eggs (or 1-1/4 cups Egg Beaters)
1/2 cup half-n-half

DIRECTIONS:


Preheat oven to 325 degrees F.  Place all crust ingredients in a medium bowl.  Cut butter and egg into flour with a pastry cutter until mixture resembles small pebbles and the flour is thoroughly moistened (the same way you prepare a pie crust).  Press crust mixture into pie dish or tart pan (I used a 10" pyrex pie dish).  Bake for approximately 15 minutes or until lightly browned; remove from oven and set aside.

Increase oven temp to 350 F degrees.  In a non-stick skillet, saute onions and garlic in olive oil until translucent; remove and set aside.  In the same skillet, saute spinach just until wilted.  Drain and press as much of the liquid out of the spinach as possible (I use a mesh strainer and press it with the back of a spoon).  Place well drained spinach in a medium bowl; add cooked onions and garlic, feta, dill, lemon peel, pepper, eggs and half-n-half.  Mix until well combined.  Pour mixture into the lightly baked crust and bake at 350 F for 15 minutes; lower oven temp to 325 F (so edge of crust doesn't over brown); bake for an additional 15-20 minutes or until filling and eggs are set and cooked .  If center still seems a little jiggly, cook an additional few minutes.


Monday, January 14, 2013

Southwestern Chicken Salad

This evening I decided to finish up some leftovers from the last few dinners I've made.  I had the last little Mexican Turkey Slider for lunch today.  I still had a couple of grilled boneless chicken thighs left from Saturday's dinner so I decided to make a big main dish salad tonight with them.  I picked up some humongous avocados yesterday at the store that I wanted to use in my salad so I put together a quick and easy Southwestern Chicken Salad.  I chopped a head of fresh romaine lettuce and put it in a big bowl and then topped it with diced grilled chicken, quartered cherry tomatoes, sliced avocado, shredded sharp cheddar cheese and then a dollop of sour cream and fresh salsa. It was a fresh, quick and easy way to use up the leftover chicken. I snapped a couple photos below. Enjoy!

Voila!
BOOM!

Sunday, January 13, 2013

Sunday Night's "Pasta" Dinner

Today was another warm and muggy day.  We ran a number of errands and got ready for the work week ahead.  Both sons came over for dinner this evening so I decided to make us a pasta dinner.  I diced and sauteed boneless chicken breasts, yellow squash, zucchini and sliced fresh mushrooms in a little olive oil and then poured a jar of one of my favorite DelGrosso pasta sauces over everything and let it simmer together on low for about 30 minutes.  I stirred about 1/4 cup of grated Parmesan cheese into the sauce and then served it over lightly sauteed zucchini noodles and topped it with shredded Parmigiano Reggiano.  I lightly toasted some leftover Cheesy Pepperoni Baguette Bread I made a few days ago to go with our meal.  It was quick, simple and delicious.  I've posted a couple pictures below.  Enjoy!

Voila!
BOOM!
      

Saturday, January 12, 2013

Grilled Chicken, Cheddar Cauliflower Mash & Fresh Roasted Asparagus

Today started off overcast, warm and muggy because everything was soaked from all the rain we got last night -- but the sun finally popped out by noon time.  It was already in the mid-60s when we awoke and made it all the way up into the mid-70s this afternoon (we had at least one reading of 76).  It is the craziest January weather -- it felt more like a spring day than the typical cold January day smack in the middle of winter.  We decided to take advantage of the nice weather and thought it would be a great day to grill out for dinner.  I lightly sprayed some boneless chicken thighs with olive oil and then seasoned them with Spicy Montreal Steak Seasoning and hubby grilled them.  Meanwhile, I roasted some super thin stalks of fresh asparagus in the oven after seasoning them with olive oil, sea salt and black pepper.  I also made Cheddar Cauliflower Mash to go with our meal and halved a few cherry tomatoes and tossed them with a little olive oil, pomegranate vinegar and fresh dill.  It was a quick, fresh and simple dinner to put together and it was absolutely delicious.  Below is a picture of our dinner as well as the recipe for the Cheddar Cauliflower Mash.  Enjoy!


BOOM!

Cheddar Cauliflower Mash

INGREDIENTS:

1 large head of cauliflower, chopped into small pieces
1 cup chicken stock
1/4 teaspoon garlic powder
1/2 teaspoon Kosher salt, or to taste
1/2 teaspoon freshly ground black pepper, or to taste
1/4 cup cream or half-n-half
1 cup sharp cheddar cheese, grated
2 tablespoons sour cream (optional)
2 tablespoons snipped fresh chives (optional)

DIRECTIONS:


Place cauliflower and chicken stock in a medium sized saucepan.  Cover and bring to a simmer of medium-high heat and cook until completely tender (about 10-15 minutes).  Most of the chicken stock cooks down while the cauliflower cooks (I cook it until the bottom of the pan is dry to remove as much liquid).  Add garlic powder, salt and pepper, to taste; stir in cream and puree with an immersion blender until completely smooth (or use a food processor).  Stir in the cheese and mix well until melted and well blended.  Stir in sour cream and taste to adjust seasoning.  Sprinkle top with chives (optional), if desired.  Serves 4 to 6, depending on the size of your cauliflower head. 

Saturday Morning Breakfast...

Happy Saturday!  This morning I made myself a larger weekend style breakfast that will last me all day long until dinner time.  My breakfast consisted of a leftover lightly toasted "Southern Style Buttermilk Biscuit", a leftover "Mexican Turkey Slider" (as my sausage patty) and then an omelet filled with sauteed onions, mushrooms, red bell pepper and bits if sharp cheddar cheese.  It was a great way to start my morning and I'm ready to run my errands for the day.  The best part about this breakfast is it is totally and completely wheat, grain and deprivation free!   :-)   Enjoy!


BOOM!

Thursday, January 10, 2013

Mexican Turkey Sliders (or Burgers)

When I got home this evening, I didn't have any idea what to make for dinner...but I wanted to make something using the pound of ground turkey breast that I had in the fridge.  I also had some leftover buttermilk biscuits that I made earlier in the week and the little wheels began turning in my head.  For whatever reason, "sliders" came to my mind (probably because they would fit perfectly on the biscuits).  I thought about how I wanted to season them and decided to make them Mexican style, so I quickly made up a little batch of my taco seasoning to flavor them with (along with salsa and grated Monterey Jack cheese).  They turned out flavorful, juicy and delicious.  I decided to stay with the Mexican theme for my side dish of veggies too.  I lightly sauteed some sliced fresh yellow squash and zucchini in a little olive oil until crisp-tender and then seasoned it with some of the extra taco seasoning and tossed in some quartered cherry tomatoes and cooked for another minute or two.  I topped the veggies with some crumbled queso fresco cheese leftover from making the beef fajitas on New Year's eve...and presto, my delicious Mexican style meal came together!  Below you will find a few photos as well as the recipe for my Mexican Turkey Sliders.  Enjoy!

Voila!
BOOM!

Just beginning to sizzle...
Ta-Da!!!

Mexican Style Turkey Sliders

INGREDIENTS:

1 lb. ground turkey breast (or regular ground turkey or beef)
4 tablespoons olive oil (2 for the burgers if using turkey breast and 2 for the pan to saute them)
4 teaspoons of taco seasoning (recipe below)
1/4 cup salsa of your choice (I used fresh salsa)
1/3 cup shredded Monterey Jack cheese

DIRECTIONS:

Combine all ingredients in a medium bowl until thoroughly blended.  Divide into 6 equal portions and shape into small burgers (sliders).  In a large non-stick skillet, add 2 tablespoons of olive oil (or preferred oil) and heat to medium.  When the pan is hot, add the burgers and cook approximately 5 minutes or so on each side or until golden brown.  Flip and continue cooking on the other side until done (no pink remaining).  Remove when burgers are cooked through and golden brown.  If desired, serve topped with salsa, avocado, tomatoes or sour cream. 

*Note:  See taco seasoning ingredients below.

Taco Seasoning (blend all ingredients together in a small bowl):
    2 teaspoons chili powder
    1/4 teaspoon garlic powder
    1/4 teaspoon onion powder
    1/4 teaspoon cayenne pepper (or to taste)
    1/4 teaspoon dried oregano
    1/4 teaspoon paprika
    1 teaspoon ground cumin
    1/2 teaspoon sea salt
    1 teaspoon black pepper

Makes approximately 2 tablespoons of taco seasoning (enough to season approximately 1 pound of meat).

Wednesday, January 9, 2013

Cheesy Pepperoni Baguette Bread

This evening I didn't need to cook dinner because we had plenty of Chicken Mozzarella-Parmesan Casserole leftover from last night's meal that I just had to pop in the oven to reheat.  I was in the mood to do a little baking again and decided that a small loaf of Cheesy Pepperoni Baguette Bread would be good to have with our dinner.  I previously posted the recipe for the baguette bread back in October but wanted to see if I could make the dough a little easier to work with by stiffening it up a bit (to make it easier to roll up) and wanted to add a little pepperoni to the filling this time too.

So, the two little changes I made to the original recipe were:  1) I added 1 teaspoon of psyllium powder to the dry ingredients of the dough that it made it a little less sticky and more stiff (if you don't have psyllium or don't want to use it, just add additional finely grated Parmesan cheese); and 2) I also added about 6 or 7 slices of finely diced turkey pepperoni to the cheese mixture before rolling the dough. 

This dough can be a little tricky to roll into the baguette loaf but it gets easier to do after you have done it a time or two.  I always start by rolling the first edge over with a rubber spatula to get the "first flip over" of the dough and then I lift that edge of the foil to help roll it over (if it tears a little, just press it back together with your fingers.  I embedded the link to the original baguette recipe above when I mentioned making a small loaf.  I snapped a few photos of the plated leftover casserole as well as the baguette bread.  Enjoy!


Tuesday, January 8, 2013

Chicken Mozzarella-Parmesan Casserole

This evening I wanted to make a quick and easy dinner and decided to make a simple Chicken Mozzarella-Parmesan Casserole.  I quickly sauteed about 1 pound of boneless chicken breast cutlets (seasoned with sea salt and black pepper) in a little olive oil just until they turned white.  Then I layered the casserole dish and made 2 layers using my favorite DelGrosso pasta sauce, then the chicken cutlets, fresh mozzarella cheese, Parmigiano Reggiano, and repeated the layers again.  I ended with a layer of sauce on top and then added about 1/4 cup of Ricotta cheese dropped in little dabs on top and some shredded Parmigiano Reggiano.  I baked the casserole in a 350 degree F oven for about 20 minutes, covered.  I then uncovered the casserole and baked it for an additional 20 minutes, then ran it under the broiler for about 3 or 4 minutes to brown and bubble the cheese a bit before removing it from the oven.  I sprinkled the Chicken Mozzarella-Parmesan Casserole with some freshly chopped Italian parsley and served it over lightly sauteed zucchini noodles.  It was delicious!   Next time I will use a larger more shallow baking dish and make only one layer of chicken cutlets instead of 2 to make it easier to serve.  It was really delicious with all the fresh mozzarella cheese (1 pound) as well as the spicy sauce.  I snapped a photo below for you to see.  Enjoy!

BOOM!


Monday, January 7, 2013

Breakfast for Dinner Tonight & Gourmet Girl Cooks Turns 1 Year Old!

Today marks 1 year since I started my Gourmet Girl Cooks Blog.  It has been an interesting journey that has evolved and changed as the year went on.  Beginning this past July, I began my journey of eliminating all wheat, grains and sugar which meant having to learn how to cook and bake without using them.  What initially seemed like a daunting task has actually turned out to be challenge that I thoroughly enjoy.  I have proven to myself that it is possible to eat well and without deprivation with a few simple modifications.  Since I have always enjoyed cooking, this way of eating has also allowed me to expand my creativity in the kitchen by experimenting and using ingredients I was not familiar with.  And...the "sugar free icing" on the "wheat free cake" was that I also lost 52+ pounds in the process by simply eliminating those 3 items.  Who knew it could be this easy?  I look forward to seeing what this upcoming year will bring.  I would also like to thank all of you for your kind comments and support over this past year.  I hope that in some small way I have helped inspire and support you in your journeys too.

For whatever reason, tonight I wasn't in the mood for a typical dinner of meat, veggies, etc.  However, I was in the mood to bake (not cook).  :-)   After I got home from work, I made a batch of Apple Pecan Coconut Muffins using a modified version of the Cinnamon Spice Muffins that I made last week by substituting 1/2 cup of "no sugar added" applesauce for the buttermilk, increasing the cinnamon, removing the cloves, adding chopped pecans instead of walnuts and mixing in 1/4 cup of unsweetened grated coconut.  I was also in the mood to have breakfast for dinner which meant I needed to bake a batch of my Southern Style Buttermilk Biscuits to go along with the scrambled eggs & white cheddar cheese and chicken breakfast sausages (by Applegate).  I snapped a couple photos for you to see below.  Enjoy!


Sunday, January 6, 2013

Mint Chocolate Chip Frozen Greek Yogurt...Etc.

Today I ran a number of errands and did my grocery shopping to prepare for the work week ahead.  Youngest son came for dinner tonight and asked that I make my "Chicken Scampi-ish" that I made last week.  He had only looked at it on my blog but wasn't here when we had it and thought it looked good, so I made it for hm tonight...and he loved it!  Yesterday, I decided to try out the ice cream maker attachment for my Kitchenaid mixer that I got as a Christmas gift (from youngest son).  I was really excited to use it and pre-froze the freezer bowl several days ahead of time so it would be ready (you are supposed to freeze it for at least 15 hours before using it).  I decided to make mint chocolate chip frozen yogurt using full fat Greek yogurt.  My favorite Greek yogurt is Fage 2% that I eat for breakfast most days -- but I wanted to use a full fat Greek yogurt so it would be creamier.  I bought a larger container of Cabot Greek yogurt that contained 4 cups of yogurt.  I used peppermint extract, stevia equivalent to 1 cup of sugar, a little vanilla extract and made my own "chocolate chips" by shaving half of a 3.5 ounce Green and Black 85% cacao chocolate bar.  Everything seemed to be going good -- it looked like it was going to be "so easy" and in 20 minutes we'd have delicious, creamy frozen yogurt.  To begin with, the part that clamps on to the mixer itself and holds the "dasher" (the paddle that turns/churns the ice cream in the bowl) didn't really seem to fit my mixer head securely.  I've had my Kitchenaid mixer for probably 20 to 25 years now, but the directions indicated that it would fit all models...they lied because it didn't fit mine.  We attached it but it didn't feel like it was going to stay attached long.  But...that wasn't the biggest problem we had -- when people make ice cream, they are essentially pouring liquid (cream, etc.) into the bowl and the mixer is turning...but since we were making frozen yogurt, we were scooping a thick mixture into the bowl WHILE THE MIXER WAS TURNING (otherwise it freezes as soon as it hits the bowl and doesn't work).  There isn't much clearance to add your mixture to begin with and with the thicker yogurt mixture that can't just be poured in....well, it was almost impossible.  We had the biggest mess on our hands!!!  Hubby finally lifted the mixer head quickly and I dumped it in which took all of about 15 seconds...but as soon as it hit the bowl it froze and when we turned it back on, it sounded like it was going to either break the dasher that turns or burn my mixer motor out.  I decided at that point to cut my losses and turned off the mixer.  Believe it or not....hubby and I HAND MIXED the frozen yogurt in the freezer bowl at the same speed the mixer would have done for 20 minutes -- which felt like about 120 minutes because you feel like your arm will fall off.  Bottom line is we actually succeeded in making the frozen yogurt and it turned out like what you expected it would have with the mixer...but I knew there was no way I would EVER do this again because it just didn't fit our mixer head securely and I didn't want to destroy my mixer in the process.  So, we packed the ice cream maker attachment up (after cleaning it) and returned it and told them it didn't work with our mixer like the instructions said it would.  Instead, we bought a free standing stainless steel 2-quart Cuisinart Ice Cream Maker that has a much easier opening to add the thick mixture from the top of the machine.  We will try that one soon -- right now I am burned out on that whole process.  As far as the frozen yogurt itself, the instructions said that the sweetness decreases after freezing and we found that to be true.  The frozen yogurt is quite tart and not nearly anywhere as sweet as it was before freezing it, so I will remember that and adjust for it when we make ice cream or frozen yogurt in the future with our new ice cream maker.  I snapped a few photos though for you to see how it looked as well as a quick pic of our dinner tonight.  Enjoy!

This is the Greek yogurt I used
See how rich and creamy it is?

"Hand Churned"...but not by choice!

Chicken Scampi-ish (at youngest son's request)