 |
| Voila & BOOM! |

These are the ramblings of a self-described wheat, grain and gluten-free “gourmet girl” that loves to cook and eat good food. I love creating and sharing recipes and photographing “beautiful food”. In July 2012, I eliminated wheat, grains and added sugar from my diet and rediscovered real, whole fresh foods again and effortlessly lost 65+ pounds. Join me in my wheat, grain and gluten-free journey. See how easy it is to enjoy grain free gourmet, one meal at a time! Welcome to my blog. Enjoy!
Thursday, May 31, 2012
Rigatoni w/ Chicken & Eggplant
Well, I survived my first day back to work Wednesday after having 4 days off in a row. I was able to get some much needed rest and relaxation. It was so hot Wednesday with a high of 91 and I just didn't feel like heating up the kitchen by turning on the oven. I had been thinking about making Eggplant Parmesan but decided it would be too time consuming and I didn't want to use the oven and heat up the house. I had 4 small eggplants I picked up over the weekend that I wanted to use...so I decided to whip something up that I could make on the stove. I also had a leftover grilled chicken breast from the weekend that needed to be used. I cubed the eggplants and sauteed them in a little olive oil and then added a little water and steamed until tender. I diced and added the chicken breast and then poured a jar of DelGrosso Fireworks Sauce (which has a little kick to it) over the eggplant and chicken and then covered and simmered it for about 20 minutes. At the end I added 2-3 tablespoons of cream to the sauce to smooth it out and give a slight richness to the sauce without making it "creamy". I cooked a pot of rigatoni and served the sauce over the rigatoni and then sprinkled with shredded Parmesan cheese and some freshly torn basil. It tasted like a cross between eggplant parmesan and chicken parmesan, only not as rich or heavy. It tasted amazing. I snapped a pic below to share. Enjoy!
Wednesday, May 30, 2012
Easy Tri-Color Coleslaw
Below I am including the recipe for the Easy Tri-Color Coleslaw that I made for our Memorial Day Cookout this past weekend. It is cool and refreshing and full of crunch, which I love. I will definitely be making it again throughout the summer. I love the ease of having chilled pre-made dishes on hand to pull out for quick and cool meals during the summer. I also love making main dish salads like tuna macaroni salad in the summer where your entire meal is in one bowl. There is nothing better after a long day at work or a weekend of running errands then coming home on a hot summer day and just pulling a bowl out of the fridge and BOOM, you can just prop your feet up, have dinner and "chill". Below you will find both the recipe and a pic of my Tri-Color Coleslaw.
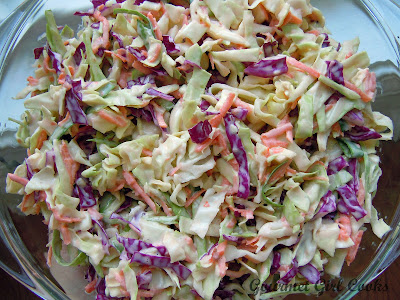
Easy Tri-Color Coleslaw
1 small head of green cabbage
1/2 small head of red cabbage
2 medium-large carrots, scraped and grated
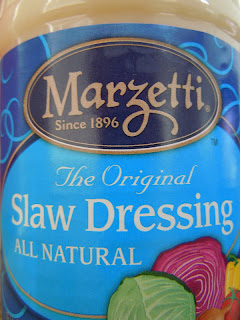
1 jar Marzetti Original Slaw Dressing
Cut both the green and red cabbage into wedges and then, with a sharp knife, thinly slice the cabbage into shreds and place in a large bowl. Add the grated carrots and pour about 1/2 the jar of Marzetti Original Slaw dressing (or to taste) and mix thoroughly; chill in the refrigerator for several hours before serving (the cabbage will wilt as it chills).
*Note: Hand cutting/slicing your own cabbage will give it the consistency of a cross between slaw and salad. I prefer slaw that isn't too finely shredded because it tends to get soggy, but you can cut or shred your cabbage to your own personal preference. Cutting your own cabbage is so much fresher than the bagged slaw mix you buy in the bagged salad area of your supermarket. The Marzetti Original Slaw dressing is found in the "non-refrigerated" salad dressing aisle.


Easy Tri-Color Coleslaw
1 small head of green cabbage
1/2 small head of red cabbage
2 medium-large carrots, scraped and grated
1 jar Marzetti Original Slaw Dressing
Cut both the green and red cabbage into wedges and then, with a sharp knife, thinly slice the cabbage into shreds and place in a large bowl. Add the grated carrots and pour about 1/2 the jar of Marzetti Original Slaw dressing (or to taste) and mix thoroughly; chill in the refrigerator for several hours before serving (the cabbage will wilt as it chills).
*Note: Hand cutting/slicing your own cabbage will give it the consistency of a cross between slaw and salad. I prefer slaw that isn't too finely shredded because it tends to get soggy, but you can cut or shred your cabbage to your own personal preference. Cutting your own cabbage is so much fresher than the bagged slaw mix you buy in the bagged salad area of your supermarket. The Marzetti Original Slaw dressing is found in the "non-refrigerated" salad dressing aisle.
Tuesday, May 29, 2012
Red Potato Salad w/ Fresh Dill
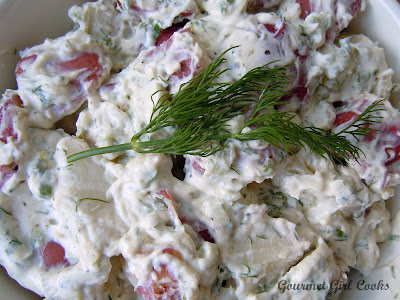
There is nothing I like better in the summer than having a bowl of cool, creamy and refreshing potato salad in the fridge to pull out as a quick side dish to accompany grilled meats or even sandwiches. It just screams summertime to me. I especially like using red potatoes for potato salad because it eliminates the part I hate most about handling potatoes....PEELING THEM! Red potato salad not only is easier to make because you don't peel the potatoes, but it is actually prettier because of the beautiful red color the skin adds to your potato salad. It also gives you a little extra fiber too.
The original recipe I used as a base called for dried dill weed which I have used numerous times over the years in various potato salad recipes. However, this time I decided to substitute fresh dill instead -- what a difference it made! It gave the potato salad so much more of a fresh flavor -- fresh dill has so much more of a "clean" flavor than its dried counterpart. It also called for onion powder, garlic powder and green onions. Instead, I substituted chopped fresh chives in place of all that which also added a really fresh, mild flavor that I feel really enhanced the flavor of this potato salad. It also called for hard boiled eggs which I do not care for in my potato salad, so I omitted them as well.
Below I've included the recipe for the Red Potato Salad w/ Fresh Dill that I made for our cookout on Memorial Day weekend. I found the basic recipe on Allrecipes and then made numerous modifications to suit my taste. It turned out delicious, cool and refreshing. I really love the "fresh" modifications. Below is a picture as well as the recipe that I re-made.
Red Potato Salad w/ Fresh Dill
3 pounds red potatoes, cut into chunks
1 cup low-fat sour cream (I used Breakstone's Reduced Fat)
1/2 cup light mayonnaise (I used Hellmann's Light Mayo)
2 teaspoons Dijon mustard (I used Grey Poupon)
1 teaspoon white vinegar
1 small dill pickle, chopped finely
1/2 celery stalk, finely chopped
1/3 cup chives, finely chopped/sliced
1 dash hot sauce
1/4 cup fresh dill, finely chopped (more to taste)
Salt and freshly ground black pepper, to taste
Place potatoes in a pot of water (enough water to cover). Bring to a boil and cook 10-12 minutes or until just done when pierced with a fork or knife (do not overcook or they will fall apart when you toss with the dressing). Drain and spread out in a single layer on a cookie sheet to cool. Mix remaining ingredients in a medium bowl until thoroughly combined. Taste dressing mixture to adjust seasoning. Place cooled potatoes in a large bowl and pour the dressing over the potatoes and toss gently to thoroughly coat. Chill at least 4 hours in the refrigerator before serving.
The original recipe I used as a base called for dried dill weed which I have used numerous times over the years in various potato salad recipes. However, this time I decided to substitute fresh dill instead -- what a difference it made! It gave the potato salad so much more of a fresh flavor -- fresh dill has so much more of a "clean" flavor than its dried counterpart. It also called for onion powder, garlic powder and green onions. Instead, I substituted chopped fresh chives in place of all that which also added a really fresh, mild flavor that I feel really enhanced the flavor of this potato salad. It also called for hard boiled eggs which I do not care for in my potato salad, so I omitted them as well.
Below I've included the recipe for the Red Potato Salad w/ Fresh Dill that I made for our cookout on Memorial Day weekend. I found the basic recipe on Allrecipes and then made numerous modifications to suit my taste. It turned out delicious, cool and refreshing. I really love the "fresh" modifications. Below is a picture as well as the recipe that I re-made.

Red Potato Salad w/ Fresh Dill
3 pounds red potatoes, cut into chunks
1 cup low-fat sour cream (I used Breakstone's Reduced Fat)
1/2 cup light mayonnaise (I used Hellmann's Light Mayo)
2 teaspoons Dijon mustard (I used Grey Poupon)
1 teaspoon white vinegar
1 small dill pickle, chopped finely
1/2 celery stalk, finely chopped
1/3 cup chives, finely chopped/sliced
1 dash hot sauce
1/4 cup fresh dill, finely chopped (more to taste)
Salt and freshly ground black pepper, to taste
Place potatoes in a pot of water (enough water to cover). Bring to a boil and cook 10-12 minutes or until just done when pierced with a fork or knife (do not overcook or they will fall apart when you toss with the dressing). Drain and spread out in a single layer on a cookie sheet to cool. Mix remaining ingredients in a medium bowl until thoroughly combined. Taste dressing mixture to adjust seasoning. Place cooled potatoes in a large bowl and pour the dressing over the potatoes and toss gently to thoroughly coat. Chill at least 4 hours in the refrigerator before serving.
Monday, May 28, 2012
"Make Your Own" Mini Hot Fudge Sundaes
One of our most favorite, fun and festive desserts for summer also happens to be the most simple. The dessert we had for our Memorial Day weekend cookout was "make your own" mini hot fudge sundaes. They are so easy to make and who doesn't like making their own sundae? I picked up some little waffle cone bowls made by Keebler and some Smucker's Hot Fudge Sundae Sauce as well as some Heath bits (crushed Heath bars), fresh red raspberries, vanilla ice cream and vanilla frozen yogurt. The waffle bowls probably comfortably hold one large scoop of ice cream and still give you room to add your own toppings and/or sauce. It's a way to get your ice cream "cone" in a bowl...the best of both worlds in my opinion. You get to eat an ice cream cone without fear of it dripping or running down your arm! Also, it is a perfect dessert for summertime because it doesn't heat up your kitchen.
I snapped a picture of the little sundae I made today...it's a scoop of Kemp's Vanilla Frozen Yogurt in a Keebler Waffle Bowl, drizzled with some Smucker's Hot Fudge Sundae Sauce and topped with a few beautiful fresh "sugar coated" red raspberries. It's not only delicious but it's also a fun way to eat your ice cream or frozen yogurt. Check out the pics below. Enjoy!

I snapped a picture of the little sundae I made today...it's a scoop of Kemp's Vanilla Frozen Yogurt in a Keebler Waffle Bowl, drizzled with some Smucker's Hot Fudge Sundae Sauce and topped with a few beautiful fresh "sugar coated" red raspberries. It's not only delicious but it's also a fun way to eat your ice cream or frozen yogurt. Check out the pics below. Enjoy!
 |
| Isn't it absolutely precious? |
 |
| BOOM! |
P.S. -- In case you wanted to find these cute little waffle cone bowls,
this is what the package looks like!

Memorial Day's Paninis
Happy Memorial Day! It's Monday and last night we had our cookout and my son and his girlfriend spent the night, which was great. We got to have breakfast with them this morning which is a rare treat. I fixed us scrambled eggs, turkey sausage, biscuits, etc. They left around noon and I got to send home lots of leftovers with them from last night's cookout.
This afternoon, I decided to give my new panini pan another workout. My first paninis last week turned out good but were a bit messy because I overstuffed them. Today's paninis turned out awesome. To start out with, I bought a loaf of "unsliced" Ciabatta bread so I could cut it to the thickness I wanted. I also was careful not to overstuff them. I snapped a picture of hubby's panini -- he had a corned beef and swiss panini with a smear of honey mustard. I served it with leftover tri-color coleslaw and red potato salad from last night's cookout. Check out the pic below!

This afternoon, I decided to give my new panini pan another workout. My first paninis last week turned out good but were a bit messy because I overstuffed them. Today's paninis turned out awesome. To start out with, I bought a loaf of "unsliced" Ciabatta bread so I could cut it to the thickness I wanted. I also was careful not to overstuff them. I snapped a picture of hubby's panini -- he had a corned beef and swiss panini with a smear of honey mustard. I served it with leftover tri-color coleslaw and red potato salad from last night's cookout. Check out the pic below!

Kick-off to Memorial Day Weekend Cookout
Sunday was a warm and sunny day here and 88 degrees. This morning, Monday, we woke to an overcast and cooler day and rain is predicted throughout most of the day. I'm glad we did our cookout yesterday! Both youngest son and oldest son and his girlfriend came for dinner -- daughter was on her way back from San Francisco so she couldn't be with us.
I decided to try a few new recipes that I will share over the next couple of days. This was our menu: Grilled Rosemary Ranch Chicken, Red Potato Salad w/ Fresh Dill, Fresh Corn on the Cob, Tri-color Coleslaw and Sliders (mini-burgers on mini buns). For dessert we had Dark Chocolate Espresso Cookies and "make your own Hot Fudge Sundaes". Below I've included the recipes for the marinade for the Grilled Rosemary Ranch Chicken (I found this on Allrecipes) as well as the recipe for the Sliders (courtesy of the Pioneer Woman). Both of these turned out really good.
I also have a few pics of our cookout fare below (I forgot to snap a picture of the grilled chicken after it was cooked in the marinade...but it was tasty). I'll post the recipe for the Red Potato Salad as well as the super easy Tri-Color Coleslaw some time this week.
Grilled Rosemary Ranch Chicken
6 boneless, skinless chicken breasts - pounded until thin and even thickness (I used Perdue)
1/2 cup olive oil
1/2 cup ranch dressing (I used Hidden Valley Ranch)
3 tablespoons Worcestershire sauce
1 tablespoon minced fresh rosemary
Salt, to taste (the recipe called for 2 teaspoons, but I did not add any)
1 teaspoon lemon juice
1 teaspoon white vinegar
1/4 teaspoon ground black pepper, or to taste
1 tablespoon sugar (optional)
In a medium bowl, stir all ingredients (except the chicken) together until well blended. Let stand about 5 minutes. Place chicken cutlets in the bowl (or place the chicken and marinade in a large Ziploc bag and squeeze out all the excess air. Refrigerate at least 30 minutes. (I marinated about 4 hours).
Preheat the grill to medium-high heat and add chicken to the lightly oiled grate. Cook about 4-5 minutes on each side until no longer pink and juices run clear.
Sliders
2 pounds ground beef (I used Laura's 92% Lean Ground Beef)
4 tablespoons heavy whipping cream
6 dashes Worcestershire sauce (or to taste)
1 teaspoon Kosher salt
Freshly ground black pepper
16 slider rolls or dinner rolls
Preheat the grill to medium heat. Mix the ground beef, heavy cream, Worcestershire and salt and pepper in a bowl. Use your hands to thoroughly mix the ingredients. Form 1/4 cup of the meat mixture into patties, making 16 patties total. Make an indentation with your thumb in the top center of the patties to keep them from plumping up too much when they cook. Grill the sliders until just cooked through, 2 to 3 minutes per side. Remove from the grill and pile on a platter. Toast the halved buns on the grill if desired. Serve immediately.
I decided to try a few new recipes that I will share over the next couple of days. This was our menu: Grilled Rosemary Ranch Chicken, Red Potato Salad w/ Fresh Dill, Fresh Corn on the Cob, Tri-color Coleslaw and Sliders (mini-burgers on mini buns). For dessert we had Dark Chocolate Espresso Cookies and "make your own Hot Fudge Sundaes". Below I've included the recipes for the marinade for the Grilled Rosemary Ranch Chicken (I found this on Allrecipes) as well as the recipe for the Sliders (courtesy of the Pioneer Woman). Both of these turned out really good.
I also have a few pics of our cookout fare below (I forgot to snap a picture of the grilled chicken after it was cooked in the marinade...but it was tasty). I'll post the recipe for the Red Potato Salad as well as the super easy Tri-Color Coleslaw some time this week.
 |
| Here are the sliders waiting to be grilled |
 |
| Tri-Color Coleslaw |
 |
| Red potato salad w/ fresh dill |
6 boneless, skinless chicken breasts - pounded until thin and even thickness (I used Perdue)
1/2 cup olive oil
1/2 cup ranch dressing (I used Hidden Valley Ranch)
3 tablespoons Worcestershire sauce
1 tablespoon minced fresh rosemary
Salt, to taste (the recipe called for 2 teaspoons, but I did not add any)
1 teaspoon lemon juice
1 teaspoon white vinegar
1/4 teaspoon ground black pepper, or to taste
1 tablespoon sugar (optional)
In a medium bowl, stir all ingredients (except the chicken) together until well blended. Let stand about 5 minutes. Place chicken cutlets in the bowl (or place the chicken and marinade in a large Ziploc bag and squeeze out all the excess air. Refrigerate at least 30 minutes. (I marinated about 4 hours).
Preheat the grill to medium-high heat and add chicken to the lightly oiled grate. Cook about 4-5 minutes on each side until no longer pink and juices run clear.
___________________________________________________________
Sliders
2 pounds ground beef (I used Laura's 92% Lean Ground Beef)
4 tablespoons heavy whipping cream
6 dashes Worcestershire sauce (or to taste)
1 teaspoon Kosher salt
Freshly ground black pepper
16 slider rolls or dinner rolls
Preheat the grill to medium heat. Mix the ground beef, heavy cream, Worcestershire and salt and pepper in a bowl. Use your hands to thoroughly mix the ingredients. Form 1/4 cup of the meat mixture into patties, making 16 patties total. Make an indentation with your thumb in the top center of the patties to keep them from plumping up too much when they cook. Grill the sliders until just cooked through, 2 to 3 minutes per side. Remove from the grill and pile on a platter. Toast the halved buns on the grill if desired. Serve immediately.
Sunday, May 27, 2012
Dark Chocolate Espresso Cookies
This weekend youngest son (who was born with a massive sweet tooth) came over so I decided to try a new recipe for Dark Chocolate Espresso Cookies that I found on the back of a box of Duncan Hines Dark Chocolate Brownie mix. The turned out really good. They are VERY deep, dark and chocolatey...so beware -- if you don't like chocolate, then I'd skip reading the rest of this post -- BUT, if on the other hand...you like rich, deep, dark, sinful chocolate...then READ ON! These cookies are soft and delicious and a cross between a brownie and a cookie in texture.
There are not too many ingredients in this recipe...but one of them is espresso powder that really helps intensify the depth of the chocolate flavor. I also used Ghiradelli 60% Cacao Bittersweet Chocolate Chips that gave these cookies an even more intense deep chocolate flavor. Of course, if you aren't a dark chocolate fan, you could substitute milk or semisweet chips instead. I like to use the bittersweet chips because they aren't as sweet and they have more antioxidants (hey, they almost qualify as health food then...right?). ;-) I've snapped a few pics and included the recipe below. Enjoy!
There are not too many ingredients in this recipe...but one of them is espresso powder that really helps intensify the depth of the chocolate flavor. I also used Ghiradelli 60% Cacao Bittersweet Chocolate Chips that gave these cookies an even more intense deep chocolate flavor. Of course, if you aren't a dark chocolate fan, you could substitute milk or semisweet chips instead. I like to use the bittersweet chips because they aren't as sweet and they have more antioxidants (hey, they almost qualify as health food then...right?). ;-) I've snapped a few pics and included the recipe below. Enjoy!
 |
| BOOM! |
Dark Chocolate Espresso Cookies
3 tablespoons water
2 tablespoons instant espresso coffee powder
1 Duncan Hines Dark Chocolate Brownie Mix
1 egg
3 tablespoons vegetable oil
1/4 teaspoon of cinnamon
1-1/2 cups dark chocolate chips (or semisweet, milk chocolate or white chocolate chips)
Preheat oven to 350 degrees. Lightly grease a cookie sheet (or line it with non-stick Reynolds foil). In a small bowl, combine the water and espresso powder. In a large mixing bowl, combine brownie mix, egg, oil, cinnamon and espresso. Beat by hand until combined, scraping sides of bowl (batter will be very thick). Stir in chocolate chips by hand using a spatula or wooden spoon. Drop batter by rounded teaspoons onto prepared cookie sheet. Bake about 6-8 minutes or just until edges are set (centers may still appear doughy). Do not overbake. Cool on cookie sheet for a few minutes and move to a cookie rack to complete cooling (cookies will be very soft).
(Note: The recipe on the box also suggests cooking on parchment paper as an option -- I don't recommend that as it was very difficult to remove the cookies from the parchment paper since they are extremely soft until they cool. I used Reynolds non-stick foil for my second batch and it worked perfectly. I actually baked my cookies about 8-9 minutes. I also allowed the cookies to cool for at least 5-10 minutes before moving them over to a rack so the chips would set a bit because they were so soft and melty. Once the cookies were cooled, they were a perfect consistency.)
Saturday, May 26, 2012
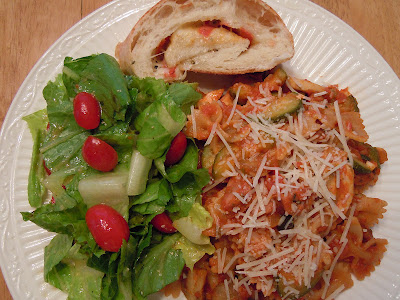
Fantastic Farfalle w/ Fireworks Sauce
It is Saturday and this evening, youngest son came for dinner. I made a pasta dish using DeLallo Organic Whole Wheat Farfalle (bowties), DelGrosso Fireworks Sauce, Aidells' Italian Smoked Chicken Sausage w/ Mozzarella, grilled Perdue boneless chicken breasts, sliced mushrooms and sliced zucchini -- whew, that's a mouthful! I also made Dark Chocolate Espresso Cookies for dessert. I'll post the recipe for those tomorrow!
I served our pasta with a tossed salad and my Easy Cheesy Bread which I make using Publix fresh pizza dough that I filled with mozzarella, provolone, cheddar, Boar's Head diced turkey pepperoni, red pepper flakes, cracked black pepper and some Italian Seasoning and then rolled tightly and baked for about 20 minutes. It really is some of the best bread I have ever had and it couldn't be easier to make! Here is the link if you want to see how it is made: http://gourmetgirlcooks.blogspot.com/search/label/Easy%20Cheesy%20Bread
Below are a couple pics of our dinner this evening. Enjoy!


 |
| BOOM! |
Super Saturday Odds n' Ends
Well it is Saturday and it is hot here today -- 91 degrees....yuck! This past week was such a busy week and I am so glad to have a long weekend ahead to recuperate. I received several items this week that I ordered and am excited to share. I finally bought a new set of pots and pans....I have hemmed and hawed for years and just couldn't justify paying a couple thousand dollars for the set I really wanted (All-Clad's Copper Core). But I did find another set that I really liked made by Calphalon. It is their tri-ply stainless steel line. I am looking forward to unpacking them and trying them out this weekend. Another item I bought was a Calphalon panini pan that you use on the stove (not the kind that is its own appliance). I tried my panini pan out Thursday night. I made hubby a reuben panini and myself a chicken-philly panini. Unfortunately I didn't take any pics...I wish I had. What I learned was that you shouldn't over stuff your sandwiches when you make paninis...because it sort of oozes and spills out when weighted with the heavy panini press. While my first paninis may not have won any beauty contests...they definitely would have won a taste contest! It made the most crisp sandwich crust ever and since they are lightly brushed with olive oil before cooking it and the bottom of the panini pan is ridged, it is not greasy like a grilled cheese sandwich can sometimes get. You could also use this pan as a grill pan too. I snapped a pic of my new panini pan below. I look forward to making simple sandwiches a bit fancier by converting them into paninis. You can check out my new Calphalon panini pan below. Even though you can't tell by looking at the picture, the panini press is heavy!!!
 |
| Calphalon Panini Pan |
 |
| Picked these up this morning -- hope they are good! |
 |
| Baby eggplants...can't wait to use these! |
 |
| New flavor of k-cups -- Macadamia Nut Cookie! |
 |
| Another new flavor of k-cups -- Donut Shop Coconut Mocha! |
Friday, May 25, 2012
Pepperoni Poblano Pepper Pizza
It has been a long week and I can't tell you how glad I am that it is Friday! Not just any Friday either...it is Friday on a 3-day weekend (actually 4 days for me)! This evening I made a quick and simple pizza using Publix fresh pizza dough. I had half of a Poblano pepper left in the fridge and some Boar's Head pepperoni...so that is what we had on our pizza...Pepperoni Poblano Pepper Pizza (that's a lot of "p" words isn't it)! It was delicious and so easy to make. I took a pic below for you to check out.
 |
| Pepperoni Poblano Pepper Pizza |
 |
| Hubby had a pretty bouquet of flowers for me to kick off our long weekend |
Tuesday, May 22, 2012
Tasty Tuesday Salad Bowl
Well, it is Tuesday and as I write this post, the sky has become black and there is thunder rolling in and the trees are blowing all over the place. Looks like we are going to get another big thunderstorm like we got yesterday.
Last night, we had a mini-monsoon full of pounding rain, hail, wind, thunder and lightning after I got home. Since I got home late from work yesterday and it had been a while since we had eggplant parmesan for dinner (and I just happened to have a tray of Michael Angelo's Eggplant Parmesan in the freezer), I decided to make that for our dinner last night. As I mentioned back in my February 1st post, it is truly "restaurant quality"...not your typical frozen dinner fare. There was enough left to have it for lunch today too which made it even better! In case you didn't see my February 1st post about this awesome eggplant parmesan....here is the link: http://gourmetgirlcooks.blogspot.com/2012/02/wet-wacky-wednesday-mealwow.html
This evening I was in the mood for a main dish salad for dinner. I made hubby and I huge salads filled with fresh romaine, carrots, cherry tomatoes, shredded parmesan cheese and chunks of breaded chicken tenders. I decided I wanted to whip together my own vinaigrette type dressing and just kind of made it up as I went. I whisked together extra virgin olive oil, red wine vinegar, dijon mustard, honey, grated parmesan and then spiced it up by adding some sea salt, cracked black pepper, cayenne pepper, seasoned salt, dried buttermilk dressing herbs, onion powder and garlic powder. I kept playing around and adjusting it until it tasted yummy. I must say...it was pretty darn tasty! I snapped a pic below to share. Enjoy!

Sunday, May 20, 2012
Fresh Fruit Mini-Tarts
I promised to post the recipe for the fresh fruit tartlets my daughter made for Mother's Day. The recipe is a Paula Deen recipe for a large fresh fruit tart that was modified to make bite-sized tartlets made with store bought shells (the filling ingredients are identical but 1.75" tartlet shells were substituted in place of the crust part of the recipe). These made "1-bite size" little tarts that are really cute. The tart shells are made by Clearbrook Farms and the also make a 3" size as well. To save time, you could also use a store bought ready made crust that is already baked or cooked since the tart does not get baked. You could substitute a graham cracker crust too or your favorite tart or pie crust recipe. The key thing is that your crust has to be cooked before adding your filling and fruit. To save time, you could also take a short-cut on the glaze by melting apple or apricot jelly and glazing the top by brushing that on with a pastry brush instead of making a glaze. There are numerous ways to easily modify or simplify this recipe, depending on your preference and time. Hope you enjoy!


Fresh Fruit Tart(s)
Crust:
·
1/2 cup confectioners' sugar
·
1 1/2 cups all-purpose flour
·
1 1/2 sticks unsalted butter,
softened and sliced
***Note: For our crust, we used
store bought ready-made “bite size” tartlet shells
Filling:
·
1 (8-ounce) package cream cheese,
softened
·
1/2 cup granulated sugar
·
1 teaspoon vanilla extract
Topping:
·
Fresh strawberries, kiwi slices,
blueberries, raspberries (or your favorite fresh fruit)
Glaze:
·
1 (6-ounce) can frozen limeade
concentrate, thawed
·
1 tablespoon cornstarch
·
1 tablespoon fresh lime juice
·
1/4 cup granulated sugar
*Note: You can substitute melted apricot
or apple jelly for the glaze and simply brush on
· Whipped cream, for garnish
(optional)
Directions
Preheat the oven to 350 degrees F.
For the crust: In a food processor, combine the confectioners' sugar,
flour, and butter, and process until the mixture forms a ball. With your
fingers, press the dough into a 12-inch tart pan with a removable bottom,
taking care to push the crust into the indentations in the sides. Pat until the
crust is even. Bake for 10 to 12 minutes, until very lightly browned. Set aside
to cool. ***Optional: You can substitute a ready made crust or tartlet
shells to save time
For the filling and topping: Beat the cream cheese, sugar, and vanilla together until
smooth. Spread over the cooled crust. Cut the strawberries into 1/4-inch slices
and arrange around the edge of the crust. For the next circle, use kiwi slices.
Add another circle of strawberries, filling in any spaces with blueberries.
Cluster the raspberries in the center of the tart. ***Optional:
If making tartlets instead of a larger fruit tart, dice the fruit into small
pieces to top the tartlets
For the glaze: Combine the limeade, cornstarch, lime juice, and sugar in
a small saucepan and cook over medium heat until clear and thick, about 2
minutes. Let cool. With a pastry brush, glaze the entire tart. You will not use
all the glaze. ***Optional: To
save time, you can substitute melted apricot or apple jelly to brush on as a
quick glaze
Keep the tart in the refrigerator.
Remove about 15 minutes before serving.
Saturday, May 19, 2012
Saturday's Pizza w/ Super Quick & Easy Herbed Pizza Dough
Today was an absolutely gorgeous "top 10" day here. It was in the 70s, breezy, sunny and the kind of weather I would love to have all year long! We ran our errands bright and early this morning with our Einstein's bagel stop for breakfast and then Costco and Publix. I was planning to make pizza for dinner tonight and was so disappointed when we found the Publix fresh pizza dough was FROZEN solid as a rock! So, I figured we'd have to switch gears and make something different. When we got home, I couldn't stop thinking about how I really needed to just make my own pizza dough. I know that it wouldn't be hard to do...but it does require a bit of planning ahead because most pizza dough needs time to rise, etc. and you need to either make it the day before or hours ahead of time. In other words, it isn't a spur of the moment kind of thing. After surfing around online for a while, I found what looked like an easy yeast based pizza dough recipe that didn't require much advanced preparation. So, I decided to go for it and give it a try...of course I modified it a bit "because I could". :-) . This recipe is so simple and quick to make that I might just have to say bye-bye to Publix fresh pizza dough! It literally only took about 5 minutes to put together. (During the 10 minutes the yeast activated in the water, I measured out the rest of my ingredients). You are supposed to be able to use this dough after it has sat for 5 minutes...but I let it double in size which only took about 30 minutes (and during that 30 minutes I cut up all my toppings...red peppers, onions and mushrooms for me and pepperoni, artichokes & Kalamata olives for him). I must say, the pizza crust was absolutely delicious! I may even try adding some Parmesan cheese to the dough next time. The addition of herbs, onion and garlic powder really kicked this dough up a notch. I found this dough very easy to work with too. If you keep your counter or work surface and rolling pin well floured, it is a breeze to roll out. It made a huge 16" pizza crust -- almost too big for my pizza stone. It would easily make 2 medium sized pizzas, depending on how thick you like your crust to be. I snapped a few pics below as well as the recipe for the pizza dough. Enjoy!
 |
| Before going into the oven -- almost too big for my pizza stone |
 |
| Fresh out of the oven...the fresh mozzarella looks delicious! |
 |
| BOOM! |
 |
| My hydrangeas have never been more beautiful |
Super Quick-n-Easy Herbed Pizza Dough
1 (.25 oz) pkg of active dry yeast
1 teaspoon sugar
1 cup warm water (110 degrees F)
2-1/2 cups bread flour
1 teaspoon salt
2 teaspoons Italian Seasoning
1/2 teaspoon onion powder
1/4 teaspoon garlic powder
2 tablespoons olive oil
1. Preheat oven to 425 degrees F. In a medium bowl, dissolve yeast and sugar in
warm water. Let stand until creamy looking, about 10 minutes.
2. Add and stir in flour, salt, Italian seasoning, onion powder,
garlic powder and olive oil to the yeast mixture. Mix well until smooth (form in a ball and cover
bowl with a towel or saran wrap). Let
rest for 5 to 30 minutes.
3. Turn dough out onto a lightly floured surface and pat or
roll into a round or the shape of your pan. Transfer crust to a lightly greased pizza pan or cornmeal
dusted pizza stone. Spread with sauce,
cheese and desired toppings and bake in preheated oven for about 20-25 minutes,
or until golden brown. Let baked pizza cool for 5-10 minutes before serving.
Thursday, May 17, 2012
Thankful Thursday's Dinner
I worked late this evening and didn't feel like doing a lot of cooking after a really long day...so when I got home, I put some frozen breaded chicken tenders in the oven and threw a couple of sweet potatoes in the microwave to bake and cooked a package of frozen green beans w/ almonds. I found a couple of frozen biscuits in the freezer that I tossed into the oven to heat up with the tenders. It was a quick dinner and one that I call "fast food made at home". Now I can relax with a cup of coffee after dinner. I am so glad that tomorrow is Friday. Check out a picture of our fast meal below. Enjoy!
 |
| Voila! |
Wednesday, May 16, 2012
Wacky Wednesday's Ravioli
This evening I got home late from work and decided to make something quick for dinner. I had a pack of Pasta Prima Grilled Chicken & Cheese Ravioli in the fridge and an open jar of DelGrosso's Vodka Sauce that I decided would go great together. Hubby picked up a few zucchinis on his way home that I diced, quickly sauteed and then simmered in the sauce while I made a salad to go with our meal. It turned out awesome...and you would never know it only took about 20 minutes to make. I carefully overlapped the huge triangular ravioli down the center of our plates and then poured the zucchini filled Vodka sauce over them and topped with shredded Parmesan cheese. The meal was delicious and easy to make...and the best part of all is that I got to eat in my nightgown after a really long day -- any meal I can eat dressed like that is MY KIND OF MEAL! ;-) I snapped a pic below for you to see (of the food, that is...not me in my nightgown...hahaha). Enjoy!


Tuesday, May 15, 2012
Deep Chocolate Dessert Bars

Deep Chocolate Dessert Bars
Chocolate Chip Cookie Dough Base Layer Ingredients
1 cup (2 sticks) butter, softened
1 cup granulated sugar
3/4 cup light brown sugar
2 large eggs
1 Tablespoon pure vanilla extract
2-1/2 cups all-purpose flour
1 teaspoon baking soda
1 teaspoon salt
2 cups (12 ounces) milk or semisweet chocolate chips (these used semisweet)
*Note: If you are in a hurry and don't want to make your chocolate chip cookie dough from scratch, you can easily substitute refrigerated chocolate chip cookie dough that is already made (like Pillsbury, etc.) and omit all the ingredients above and just begin following the directions below with the 2nd paragraph that reads: **"Spread the cookie dough in the bottom of a 9×13 baking dish that’s been lined with wax paper and sprayed with cooking spray."
Remaining ingredients
1 pkg Double Stuffed Oreos (or regular Oreos)
1 Family Size (9×13) Brownie mix (made according to box directions for "fudgy brownies)
1/4 cup hot fudge topping (optional)
Reeses Peanut butter cups, cut in half (optional)
Directions
Preheat oven to 350 degrees F. Cream the butter and both sugars in a large bowl with an electric mixer on medium speed for 3-5 minutes. Add the eggs and vanilla and mix well to thoroughly combine. In a separate bowl, whisk together the flour, baking soda and salt, then slowly incorporate into the mixer until the flour is just combined. Stir in chocolate chips.
**Spread the cookie dough in the bottom of a 9×13 baking dish that’s been lined with wax paper and sprayed with cooking spray.
Top with a layer of Oreos. Mix together brownie mix according to directions for fudgy brownies (these were made with Ghiradelli Dark Chocolate brownie mix), adding the "optional" 1/4 cup of hot fudge topping to the mix. Pour the brownie batter over the cookie dough and Oreos. Cover with foil and bake at 350 degrees for 30 minutes. Remove foil and lightly press Reeses peanut butter cups into the brownie dough top and continue baking uncovered for an additional 15-25 minutes (until done). Let cool completely before cutting -- brownies may still be gooey in the middle when still warm, but will set up perfectly once cooled. Enjoy!!
Monday, May 14, 2012
Monday's "Hearty" Pasta
This evening I put together a quick, beautiful and tasty pasta dinner in under 30 minutes. A couple of months ago I picked up a bag of gourmet multi-colored heart shaped imported Italian pasta at Fresh Market in Atlanta. I've been wanting to try it, but didn't want to make a sauce that the little hearts would get lost in. So...I diced a boneless Perdue chicken breast and sauteed it in a little olive oil, then poured about 1/2 of a jar of DelGrosso Vodka sauce over the chicken and let it simmer about 20 minutes while the pasta cooked and I made a salad. I made a chopped side salad and heated up some leftover Easy Cheesy Bread from Saturday night's dinner. I was careful not to overcook the pasta so the cute little hearts wouldn't break. I mean seriously...nobody wants to HAVE a broken heart, much less eat one! ;-) I served the meal on rectangular plates that really accentuated the different shapes and colors...it was a simple and delicious meal. Check out the pic below. Enjoy!
 |
| BOOM! |
Sunday, May 13, 2012
Mother's Day Desserts
Well, I'm waiting for my boys to show up so we can go out to dinner for Mother's Day...but my daughter arrived a little while ago with dessert(s). She made Mini Fresh Fruit Tarts and Deep Chocolate Dessert Bars that are like a cookie-candy-brownie all in one. I've taken a few pics to share below. Recipes will following later this week! I already know they are going to be good...see what you think! Aren't they gorgeous? Yes...Gourmet Girl Cooks' daughter cooks too! :-)


 |
| BOOM! |


 |
| BOOM! |
My oldest son and his girlfriend brought me some beautiful bright yellow flowers...they are absolutely gorgeous! Check them out below!

 |
| BOOM! |
Happy Mother's Day!
HAPPY MOTHER'S DAY!
First I must say...Happy Mother's Day to my Mom...you are the best! Next I want to wish all the other Mommy's of the world a very Happy Mother's Day too. Later today, my kids are coming over to take me to dinner and my daughter is making a "surprise dessert". It's a rainy day here and I got to sleep in late this morning (which is awesome). I just finished my quick brunch omelet that I quickly whipped up for myself as well as an awesome cup of Rainforest Espresso with Cinnabon creamer. The coffee wasn't just fantastic...it wasn't just fabulous...it was FANTABULOUS! I snapped a few photos below. Enjoy and Happy Mother's Day!
 |
| Red bell peppers, Vidalia onions & Cherubs tomatoes as well as a little cheese |
 |
| Voila...and BOOM! |
 |
| Ahhh...this cup of coffee is awesome! |
 |
| Adding this to my morning espresso made me feel like I was drinking a creamy cinnamon roll! |
Saturday, May 12, 2012
Saturday's Super Salads & Easy Cheesy Bread
It's Saturday and hubby and I ran our usual errands and stops today...Einsteins for power bagels & coffee and our weekly Costco stop. Since we had pizza for dinner last night and our leftover pizza for lunch this afternoon, I decided we'd have big main dish salads tonight filled with romaine, Cherubs tomatoes, carrots and sliced chicken tenders along with my Easy Cheesy Bread. I just sort of stumbled on the cheesy bread by accident recently by trying to figure out a way to use a leftover ball of Publix fresh pizza dough that needed to be used. So I thought I would try making a cheesy bread roll that would help use up all the partially used bags of different shredded cheeses in my cheese drawer. I had some mozzarella, sharp cheddar, parmesan, and monterey jack. I figured if it turned out awful, then I'd just throw it out...but the amazing thing was it turned out absolutely wonderful!!! Below is the simple recipe to make my Easy Cheesy Bread as well as a few photos.
Easy Cheesy Bread
1 ball of fresh pizza dough, set out at room temp for about 1 hour
1-1/2 cups shredded cheese (any kind you like or have available)
Italian Seasoning, to taste
Red pepper flakes, to taste
Line a cookie sheet with foil and lightly spray it with Pam cooking spray or brush lightly with olive oil. Place ball of dough in the middle of your prepared cookie sheet and begin pressing it out with your fingers (or you can roll with a floured rolling pin if you prefer) until it is an oblong oval shape approximately 12-14 inches long and about 8-10 inches wide (this is not an exact measurement). After your dough is in an oblong/oval shape, spread your shredded cheese on top covering the entire surface; sprinkle with Italian seasoning (to taste) and red pepper flakes (to taste). Take the longer edge of your cheese covered dough and begin rolling it over (so it will be long when rolled up similar to the shape of a baguette/French bread). Press the edge/seam tightly so it won't come open when baked. Gently curve your bread roll (or you can leave it straight) and make sure it is seam side down on your cookie sheet. Lightly cut several slashes crosswise (3 or 4) on top of the loaf so steam can escape and a little cheese can gently ooze out. Place in a 400 degree oven for approximately 25 minutes until lightly golden brown and bread feels done. Let the bread sit for about 5-10 minutes before cutting. Slice and enjoy!
 |
| Ready to be rolled up |
 |
| Rolled, slashed and curved...ready to be baked |
 |
| Fresh out of the oven...oozing with cheese and herbs |
 |
| Sliced and ready to eat |
 |
| This is our dinner salad...fresh and yummy! |
 |
| BOOM! |
 |
| BOOM! BOOM! |
Subscribe to:
Posts (Atom)