Tuesday, December 31, 2013

Beef Fajitas w/ Chipotle Lime Marinade - Happy New Year!


Happy New Year! This evening I made Beef Fajitas w/ Chipotle Lime Marinade and used the "Beef Loin Flap Meat Steak" I picked up at Costco this weekend. This is the first I had ever seen or heard of it. I decided to marinate it for fajitas based on the responses I received from others about how best to use it. I marinated it for 7 to 8 hours and it turned out absolutely delicious! It was tender, but with some chew to it (the good kind of chew). In the past I have used sirloin steak or skirt steak for my fajitas...but I have to say, this meat was very flavorful and I would definitely buy and use it again. Hubby grilled it until it had nice grill marks on the outside but was still slightly pink on the inside (medium). We covered it and let it sit for about 20 minutes and then thinly sliced it on the diagonal against the grain. I cooked green and red pepper strips and onions to have with our fajitas. We filled grain free tortillas with the beef, veggies, cheese and sour cream. These were some of the best we've had. I snapped a few quick photos below. The recipe is linked above in the first sentence. I went back through my blog to see what we had for New Year's Eve last year and realized that I made beef fajitas last year, too...how funny is that? I wish all of you the Happiest & Healthiest New Year and may 2014 bring you love, joy and good health...and lots of good food (wheat and grain free, of course)! Enjoy!  :-)


Sunday, December 29, 2013

Random Sunday Musings...

It was a chilly damp day here today. The rain finally stopped this morning and the sun peeked out on and off...mostly off. It almost felt like snow and was pretty dismal overall. This afternoon we ran our errands. We made our usual Costco run, our local grocery store visit and also stopped at Whole Foods. Since we shopped at Whole Foods we went to a different Costco that was closer to it. Every time I go to a different Costco, even though they are all in the Atlanta area...I notice they carry some different items and cater more to those that shop there -- this one carried more international foods than the one we usually go to. I noticed they also carried some different cuts of meat, too. I found a cut of beef there that I have never seen before, "Beef Loin Flap Meat Steak". It was cut in long strips and looked similar to their boneless short ribs but not exactly. Anyway...I decided to pick up a package to experiment with. I'm not sure what I will make with it yet..but I'm thinking about marinating them and making Carne Asada with soft tacos or tortillas...or I may use them in a stir-fry or even the crock pot, depending on how my mood strikes when I decide to use it. Has anyone else ever heard of this cut of beef before, and if so, how did you use it? We shopped all afternoon long since we went all over the place...and I started getting a little hungry since I had only had yogurt for breakfast this morning...so when we were in Whole Foods I decided to pick up something I could use for a little snack as we traveled to the next place. I know this is going to sound like a really odd kind of snack...but I really liked it and it didn't take very much to satisfy my hunger. I picked up a small container of Valrhona 70% dark Guanaja chocolate feves (bittersweet oval discs) and then went to the section where you could grind your own nut butters. I ground up a small container of fresh cashew butter (it is unsalted and is warm when it comes out of the grinder). As soon as we got in the car, I proceeded to eat my "chip and dip" or "hummus for chocoholics"...LOL. I dipped 4 or 5 of the little dark chocolate discs into the warm fresh cashew butter...and it was so good. It immediately squelched any hunger I was feeling! Could I have just bought some nuts and eaten them...yes, but I wanted something more creative...LOL. Since we skipped lunch, when we got home from shopping we just reheated pizza left from last night's dinner. I had 2 pieces for dinner last night and the last 2 pieces tonight. I like to reheat my pizza on the stove in a non-stick skillet, covered, and turned on low-medium and use it like a little stove top oven. It re-crisps the crust and doesn't get soggy like it does if you reheat it in the microwave. You also don't have to heat the entire oven up for a couple little pieces of pizza. I snapped a few random pictures to share below. Enjoy!

It almost looks like hummus, doesn't it? It's bittersweet chocolate discs dipped into cashew butter...instead of Reese's Peanut Butter Cups...it's Valrhona's Cashew Butter Discs
Beef Loin Flap Meat Steak...is anyone familiar with this cut of beef and what did you make with it?
Picked this up at Whole Foods...it's sweetened with stevia and erythritol
I've ground my own before to use as a thickener...but found this at my grocery store!
This is how I like to reheat my pizza slices

Heating it this way keeps the crust crisp so you can still pick it up and eat it...no forks required!

Saturday, December 28, 2013

White Pizza -- Topped w/ Oven Dried Tomatoes & Pepperoni


This evening I made grain free White Pizza for dinner and topped it with organic oven dried tomatoes (packed in oil), diced pepperoni and drizzled it with spicy olive oil that is infused with red pepper and garlic. It turned out absolutely delicious. I pre-baked the crust and then topped it with sliced provolone cheese, scattered a thin layer of shredded mozzarella cheese and then spooned dollops of ricotta on top (slightly heaped teaspoonfuls). I topped it with organic oven dried tomatoes packed in oil (a new item that I found at Costco recently), diced pepperoni, drizzled it with some spicy red pepper and garlic infused oil, topped it with a bit of shredded Parmigiano Reggiano and then baked it for 8 to 10 minutes until hot and bubbly. I decided to try this "white cheese" combination so I could use up some of the leftover ricotta cheese I had from making lasagna a few days ago. This is now one of my favorite pizza toppings and combinations! I've made white pizza before without ricotta, and have seen it added to pizza before -- I don't know why I waited so long to try it. It was a nice contrast of flavors...the saltiness of the provolone and Parmigiano Reggiano, the spiciness of the pepperoni and spice infused oil along with the deep roasted flavor of the oven dried tomatoes and the creamy sweetness of the whole milk ricotta. I will definitely be making this combination again. I snapped a couple photos below as well as the recipe for my favorite grain free pizza crust here: -----> Best Grain-free Pizza Crust. Enjoy!


Friday, December 27, 2013

Spicy Beef & Cabbage Soup -- Slow Cooker

It was a bright and sunny, but somewhat chilly day here today. Today was kind of a lazy day for us. When I got up this morning, I put a batch of my Spicy Beef & Cabbage Soup in the crock pot to cook all day long. We had originally intended to get some shopping and errands done today and I thought it would be nice to come home to dinner already made. Instead, we ended up taking the day off from running errands but it was still nice not to have to make dinner this evening. This soup is so simple to make and its perfect for a cold winter day. It doesn't have a lot of ingredients and it reheats nicely. I actually froze the leftovers after dinner tonight so we can have it to pull out on a day when I don't have anything handy or already made. I am planning to try and freeze more leftovers to use as "convenience food" for the days I might not feel like cooking. I'm going to freeze the rest of the lasagna leftover from Christmas, too. I snapped a couple photos of tonight's soup below. The link to the recipe is here ------> Spicy Beef & Cabbage Soup (Slow Cooker). Enjoy!


Thursday, December 26, 2013

Herb Crusted Boneless Rib Eye Roast

This evening I made an Herb Crusted Boneless Rib Eye Roast for dinner. I served it with sauteed mushroom slices cooked in butter, steamed fresh broccolini (a milder tasting kind of broccoli) and super simple "hash brown cauliflower" which is essentially coarsely chopped fresh cauliflower steamed in a few tablespoons of water in a covered glass casserole in the microwave for about 4 to 5 minutes just until tender but not mushy or falling apart. I melted a couple tablespoons of butter in a large non-stick skillet over medium-high heat and then placed the well drained steamed cauliflower in the skillet in a single layer and let it brown in the butter until golden brown (you can add some finely diced onion if you like) and then used a spatula to flip it over in sections the same way you would do when making hash brown potatoes and brown the other side. I season it liberally on both sides with sea salt and fresh ground black pepper as it cooks. It turned out absolutely delicious and it was so simple to make.

I bought a small boneless rib eye roast -- it was 3 pounds which makes 4 to 5 nice servings. I picked up a fresh herb packet that came with rosemary, thyme and sage (I didn't use the sage for the rub) and made a very simple herb, salt and pepper mixture to rub on the outside of the roast before cooking it. I prefer my meat medium-well...I do not like any red on my plate when the red comes from meat...LOL. On the other hand, hubby likes his medium-rare. That works out pretty well -- I simply choose the end cut and he prefers the less cooked center cut. It turned out absolutely delicious and tasted like a "fine restaurant meal". I picked the roast up at Costco (it was $8.99/lb) and not a bad deal considering the roast served 4 or 5 and cost only a little more than what 1 person's meal would be if we had eaten this meal out. I snapped a couple photos below as well as the recipe for the roast. Enjoy!


Herb Crusted Boneless Rib Eye Roast

Ingredients:

1 boneless rib eye roast (about 3 pounds)
2 tablespoons olive oil
2 tablespoons chopped fresh rosemary
2 teaspoons chopped fresh thyme
2 large cloves of garlic, finely minced
1 teaspoon freshly ground black pepper
1 to 1-1/2 tablespoons coarse Kosher salt, or to taste

Directions:

Preheat oven to 450 degrees F. In a small bowl, add rosemary, thyme, garlic, pepper and salt; combine until evenly mixed. Place roast on a rack in a shallow roasting pan. Using your hands, rub roast all over with olive oil. Sprinkle herb mixture evenly over the roast, rubbing it around until evenly coated on top and sides.

Place roast uncovered in a 450 degree F oven and cook for 15 minutes. Reduce heat to 325 degrees and roast an additional 15 to 20 minutes per pound, or until desired doneness (use a meat thermometer inserted into the center of the thickest part of meat to determine doneness).

Beef is rare at 125-130 degrees F; medium rare at 135-140 degrees F; medium at 145-150 degrees F; medium well at 155-160 degrees F and well done beyond that. For this type of roast, any temperature above medium (145-150) is probably overcooked. When roast is almost at the desired temperature, remove from oven and cover loosely with foil and let stand for about 15 minutes to complete cooking (temperature rises about 5 to 10 degrees while standing and should be factored into the cooking time). Standing allows juices to set so they don't run out while slicing. Slice and serve.

*Note: If browning the roast before cooking is desired, prior to coating with herb mixture, roast can be browned in oil in a medium hot pan.


Wednesday, December 25, 2013

Christmas Dinner...The "New Normal"


I hope everyone had a beautiful Christmas. I took a quick snapshot of my Christmas dinner. Prior to going wheat free, I could never have imagined being able to eat so well after eliminating wheat and grains from my life. I certainly could not have imagined losing weight this way. I served this beautiful lasagna to my unsuspecting wheat eating family members last night...and nobody knew anything was different until half way through our meal when I told them that I had made the "noodles" (last year I made regular lasagna for them and a smaller wheat free version for me). It was priceless...and not because I tricked them, but because they literally could not tell the difference. It just reaffirms to me that eating this way can be and is delicious for everyone -- not just those of us that have chosen not to consume wheat and grains. It was a pretty typical holiday prep day yesterday...I baked cranberry lemon coconut muffins, chocolate chip cookies, pecan parmesan crackers, and cheddar black pepper biscuits. I made lasagna for dinner. For breakfast this morning we had scrambled eggs with cheese, sausage, muffins and biscuits. The menu really wasn't much different than our typical Christmas menus...the only difference was in some of the ingredients used to make these items. Life without wheat isn't just good...it's great! Welcome to the "new normal". Enjoy!


Merry Christmas!

From my home to yours...

Wishing all of you a very Merry Christmas!


Sunday, December 22, 2013

No-Bake Cheesecake w/ Pecan-Cinnamon Crust & Cranberry-Coconut-Pecan Topping

This evening I'm posting the cheesecake recipe that I made for dessert last Christmas but never posted since I was so sick with the flu last year (so far, so good this year). I made a hazelnut-pecan crust for it last year, but this year I used pecan meal to make a pecan-cinnamon crust. I topped it with my Cranberry-Orange-Coconut Sauce that I added chopped pecans to. It turned out unbelievably good. I actually made the cheesecake last night in my mini springform pans (by Analon) -- they come in a set of four. I made a fresh batch of cranberry-orange-coconut-pecan sauce this evening to top them with and added chopped pecans. I had half of one for dessert this evening (I needed to make sure they were good enough for Christmas eve)...LOL. The recipe makes 4 generous servings or 8 nice servings. I love the fact that these are no-bake cheesecakes. The only thing that gets cooked is the crust (for 10 minutes) just long enough to toast a bit and to set. The pecan meal makes a crust similar in texture to graham cracker crust and it is consists of ground pecans, sweetener (I used Swerve), cinnamon and butter mixed together and pressed into the bottom of the pan(s). The cranberries are not only festive but tasted excellent as a topping -- I actually prefer it to the traditional strawberry or blueberry topping typical on most cheesecake. If you don't have the special pans, you can easily use a regular pie dish or springform pan and just make a larger cheesecake. You could also skip the crust and use a piping bag with a large star tip and pipe the chilled mixture into fancy little dessert glasses or dishes and top with the cranberry sauce. I snapped a few pictures below as well as the recipe. Enjoy!


No-Bake Cheesecake w/ Pecan-Cinnamon Crust
(Topped w/ Cranberry-Orange-Coconut-Pecan Sauce)

Ingredients:


For the Pecan-Cinnamon Crust

1 cup ground pecans (or hazelnuts)
2 tablespoons butter, melted
1/4 cup Swerve Sweetener (or erythritol or preferred granular sweetener)
1/4 teaspoon cinnamon

For the Cheesecake Filling
16 ounces brick-style cream cheese (2 bricks), slightly softened
3/4 cup heavy cream
2 teaspoons vanilla extract
1/2 to 3/4 cup powdered Swerve Sweetener (or other preferred sweetener)

Optional Topping  
Fresh berries, sweetened to taste or Cranberry Sauce

Directions:


Add crust ingredients to a medium bowl.  Combine mixture until crumbly.  Divide between 4 mini springform pans or springform tart pans and press crust mixture firmly into the bottom of each pan.  Bake at 350 degrees F for about 10 minutes.  Cool completely.


In a mixing bowl, using a hand mixer, beat cream cheese, until creamy and smooth; stir in cream,vanilla and sweetener.  Beat with hand mixer for about 3 to 4 minutes or until smooth, light and fluffy.  Divide filling between 4 pans and spread until smooth.  When ready to serve, remove from spring-form pans or spring-form tart pans and place on a small dessert plate and top with sweetened berries or spread with cranberry sauce, if desired.  Serves 4 to 8.


*Note: I used 1/2 cup plus 2 tablespoons Swerve to sweeten my cheesecake filling


Friday, December 20, 2013

Quick Sausage & Sprouts Stir-fry -- Low Carb & Wheat Free

Wow...long time no see, right? It has been a few days since I last posted anything. I have gone Christmas shopping after work every single night this past week and not gotten home before 10:00 p.m. totally exhausted. My menu for the past few days has consisted of leftover pizza one evening, turkey and cheese roll-ups another evening and scrambled eggs with cheese & bacon bits last night. Basically enough to sustain...but certainly not very enjoyable after being on the go for a total of 16+ hours for 4 nights in a row!!! So, while I do plan to do some shopping this evening, too...I decided that I could not go another night without a REAL meal. I wanted vegetables...I wanted something on a plate that I ate with a fork...that tasted good and had COLOR (festive color at that)!  LOL Since I got home about 30 minutes before hubby this evening...I decided to  make a quick dinner that would be ready when he walked in the door and we would eat, walk the dog and then continue our holiday shopping. I am doing a quick post of our dinner this evening while hubby walks the dog. It was so good to have a sit down meal...I can not even tell you. It was also nice to eat before getting worn out rather than after. I had a bag of fresh brussels sprouts in the fridge and a package of Aidell's smoked chicken sausage links with habanero and pepper-jack cheese. I had part of a red bell pepper and a wedge of onion in the fridge...so I sliced 4 sausage links, thinly sliced about 1/2 cup of onion, thinly sliced about 1/4 of a large red bell pepper and sauteed the pepper and onion in a bit of olive oil until translucent and the onion began to caramelize and brown. While that cooked, I trimmed and quartered about 1 pound of brussels sprouts (I quartered them because they were larger than I usually buy). I put them in a covered glass casserole dish with a couple tablespoons of water and steamed them in the microwave on high for about 4 minutes until bright green and "crisp-tender". I added the sliced sausage to my cooked onions and peppers and browned it together a bit (the sausage is fully cooked) and then added the sprouts and stir-fried everything together until the sprouts cooked a few more minutes and were cooked but still had some bite. I seasoned it with salt and pepper and added a few pats of butter and tossed it around...it was delicious...it was dinner...it was colorful...and I realized how much I missed having a real DINNER! It took me less than 30 minutes. Tomorrow I am planning to make cheesecake...I made it last Christmas and never posted it -- it is still in draft and I don't have any pictures since I was so sick with the flu last year. I am making it again and tweaking it a bit this year...I can't wait! So...be on the lookout for my cheesecake post this weekend. Check out the pictures of my dinner below (and my office pizza lunch). Now...I'm off to shop until I drop.  Enjoy!


P.S. -- I mentioned earlier in the week that we had an office pizza lunch -- and I told you that I made my own little wheat/grain free pizza to enjoy along with the group -- check out my pizza among the two 28-inch and 20-inch pizzas. Can you guess which one was mine? The pretty one, of course!   ;-)


Monday, December 16, 2013

Pizza Crust -- Wheat-free & Low Carb...& Delicious!

This evening I decided to make pizza for dinner...why on a Monday night you ask (since Friday's are my favorite pizza night)? This week we are having a "Holiday Pizza Party" at work for lunch. I am the one responsible for ordering the pizza for the gathering so I wanted to make a grain-free pizza crust for myself so I could join in and participate, too. So this evening I went ahead and made a double batch of pizza crust dough -- one for tonight's dinner (and a couple of lunches this week) and another one to enjoy with my coworkers at our Wednesday get together. I pre-baked the crust so all I need to do right before the rest of the pizza arrives is top it and pop it in the oven to heat for about 10-15 minutes. I will have a piping hot fresh pizza -- probably hotter than the ones we are ordering for everyone else! I didn't do anything fancy for tonight's pizza. I had ground sirloin in the fridge that needed to be cooked so I browned it along with diced onion and seasoned it generously with sea salt and black pepper and then added about 8 ounces of fresh baby spinach to the meat and onion mixture and cooked it until everything was done. I topped tonight's pizza with sauce, my beef/onion/spinach mixture and then topped it with fresh mozzarella cheese and Parmigiana Reggiano and red pepper flakes. It turned out good and was so filling I only ate one piece (1/4 of the pizza). If you haven't tried my pizza crust yet, it is one worth trying (and not just because it's mine) -- you can pick it up like a "regular pizza"...it tastes great and you won't miss eating regular pizza any more! It's quick and easy to mix together and the crust can be made and baked in advance, then wrapped and used fresh within a few days or frozen and used later. I snapped a quick photo below. Here is the link to the recipe and the step-by-step photos -------> Pizza Crust. Enjoy!

BOOM!

Sunday, December 15, 2013

White Chicken Enchilada Casserole -- Low Carb & Wheat Free

Today we were busy all day long decorating the house and Christmas shopping. We still have a bit of decorating to finish up and I still have more shopping left to do...but we at least put a dent in both. All 3 of the kids came for dinner this evening. I made my White Chicken Enchilada Casserole for dinner since none of them were here to share it with us last weekend. I served it with steamed fresh broccoli florets. To keep with the Christmas theme of the day, I added some sauteed diced red bell pepper and Poblano peppers to the top before baking it to add a little splash of red and green. I also added some pepper-jack cheese to the casserole to give it a tiny bit of zip. It turned out delicious. I actually made 12 enchiladas and cooked them in a larger casserole dish. I increased the chicken to 4 cups and the cheese to 3 cups but kept the same amount of sauce. It turned out really good and the red and green peppers not only added some seasonal color, but flavor as well. I snapped a quick photo for you to see below. The recipe is here ------>  White Chicken Enchilada Casserole  Enjoy!


Saturday, December 14, 2013

Salted Cranberry Chocolate Chip Cookies

Check out the cookies I made this past weekend using the Cranberry Orange Coconut Sauce I made -- I did so much cooking last weekend I didn't have a chance to post it all. If you like the combination of sweet and salty, try doing what I did...sprinkle the tops with a bit if Pink Himalayan salt before baking...I really liked the sweet/tart/slightly salty combination!  If you aren't sure if you like the sweet and salty combination...just bake one cookie with the salt as a "test". If sweet and salty just isn't your thing...just omit the salt on top. Below are a few photos as well as the recipe. Enjoy! :-)


Salted Cranberry Chocolate Chip Cookies

Ingredients:


2 cups blanched almond flour
1 teaspoon baking powder (aluminum free)
1/4 teaspoon Celtic sea salt
1/2 to 3/4 cup Swerve sweetener, or to desired sweetness (I used 3/4 cup in mine)
1/4 cup butter, softened (1/2 stick)
4 ounces (brick style) cream cheese, softened
1 large egg
1 teaspoon vanilla extract
1/2 cup Cranberry Orange Coconut Sauce (or your favorite sugar free cranberry sauce)
1/2 cup walnuts, coarsely chopped
3/4 cup 70% or 85% cacao chocolate bar (3.5 ounces), chopped or 70% chocolate chips
Pink Himalayan sea salt, optional

Directions:

Preheat oven to 350 degrees F.  In a medium mixing bowl, mix together flour, baking powder, salt and Swerve sweetener (or other granular sweetener).  Make a well in the center of the bowl and add softened butter, cream cheese, egg and vanilla extract. Using a wooden spoon, cream and mix dry and wet ingredients together until the dough is mixed and blended well.  


Fold in cranberry sauce, walnuts and chocolate chips/chunks with a rubber spatula; mix just until blended.  Drop by rounded tablespoonfuls (or chill and lightly roll into balls for neater cookies) onto a parchment paper lined cookie sheet. Very lightly tamp down (do not flatten) -- the cookies do not spread much while they bake.  Sprinkle lightly with pink Himalayan sea salt, if desired. Bake at 350 degrees F for 15-18 minutes or until lightly browned. Cookies are very soft when hot and will firm up as they cool.  Let sit 10-15 minutes; transfer to a rack using a spatula to cool completely. Makes about 2 dozen cookies.


       Find 100's of FREE eBooks here:  FREE Grain-Free eBooks

Saturday Breakfast - Fried Eggs w/ Brussels Bacon Hash & Easy Cheddar Black Pepper Biscuits

This morning we slept in and awoke to a very dark, rainy cold morning here. We have lots to do this weekend with decorating and Christmas shopping. I am a bit behind schedule this year -- I'm usually better organized. We did our Costco run last night after work so we just had "sandwiches" for dinner last night. I used one of my grain free tortillas and layered it with Boar's Head Cracked Black Pepper Turkey and their sliced muenster cheese and just rolled it up. When I woke up this morning I was in the mood for a good breakfast, so I sliced up a little over a pound of brussels sprouts into 1/4" slices and steamed them for about 4-5 minutes in a couple tablespoons of water covered in the microwave just to soften and wilt them a bit, but not cook them. I diced some applewood smoked bacon into large dice and cooked the diced bacon in a non-stick skillet on the stove, removing the rendered fat as it cooked out so it would become nice and crisp (I just tilted the pan and spooned it off into a bowl). In another skillet I sauteed a diced small onion n a bit of oil until translucent. I transferred my crisp bacon bits over to a paper towel lined plate to drain and left a tablespoon or 2 of the drippings in my skillet and added the sprouts and cooked them on medium-high heat, turning them frequently until browned and caramelized. I added my crispy bacon and onions to the sprouts, seasoned with sea salt and black pepper and tossed them around and set aside. I fried an egg in the empty skillet my onions cooked in and then arranged my Brussels Bacon Hash in a "wreath-like" pattern around the edge of my plate, leaving a spot in the middle to place my fried egg. I served it with an Easy Cheddar Black Pepper Biscuit that I pulled out of the freezer and then lightly toasted. It was a delicious pre-holiday breakfast with the slightly sweet flavor of the caramelized sprouts and onions combined with the salty crispness of the bacon, and of course a rich cheddary biscuit. I snapped a quick photo below and the recipe for the biscuits. Enjoy!


Thursday, December 12, 2013

Parmesan Pecan Crackers -- Low Carb & Wheat/Grain-Free

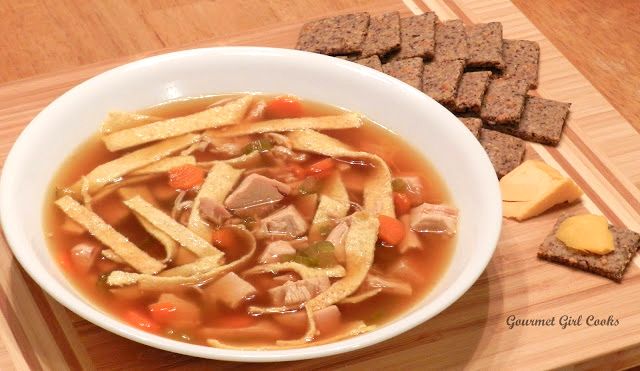
We had another cold day here today -- it was only 28 degrees this morning and only made it up into the 40s. I had a really busy day today and didn't want to make anything complicated for dinner...but wanted something "comforting" to eat. I had leftover cooked chicken breast in the fridge, so I decided to make a quick 
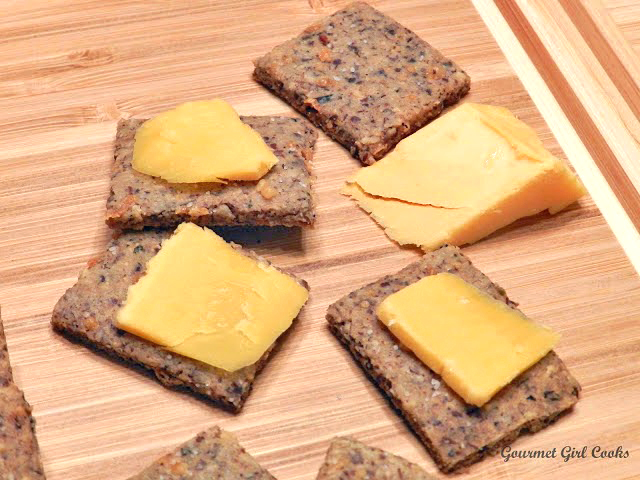
Chicken Noodle Soup with it. I made a half batch of tortillas to use as noodles for my soup and just used a carton of chicken stock since I didn't have any homemade stock available. I thinly sliced a carrot and stalk of celery and simmered it in the stock along with the chicken. I stirred my "noodles" into the soup before serving. But...what is soup without crackers? Well, it's soup...and tonight I wanted soup AND crackers, so I made a quick and oh-so-simple batch of Parmesan Pecan Crackers using a mixture of almond flour, pecan meal and Parmesan cheese along with some herbs and spices. The crackers turned out great! We enjoyed them with some cheese along with our soup. I snapped a couple photos below as well as the easy cracker recipe. It only takes about 5 to 10 minutes to make the crackers and roll them out and then about 15-20 minutes to bake them...and they are really good. With the upcoming holidays they would be great with cheese or dipped in hummus or topped with a variety of different spreads. They are actually good all by themselves. Enjoy!


Parmesan Pecan Crackers
Makes approximately 4 dozen crackers

Ingredients:

·        1/4 cup finely grated Parmesan cheese
·        3/4 cup almond flour
·        3/4 cup pecan meal
·        2 tablespoons shredded Parmesan cheese
·        1/2 teaspoon Italian seasoning
·        1/4 teaspoon onion powder
·        1/8 teaspoon garlic powder
·        1/8 teaspoon cayenne pepper, to taste
·        1/4 teaspoon sea salt
·        1 large egg
·        1-1/2 tablespoons olive oil

Directions:

Preheat oven to 325 degrees F. Place first 9 ingredients (all the dry ingredients) in a medium bowl.

In a separate small bowl, whisk egg and olive oil until combined; pour into dry mixture. Combine mixture using a rubber spatula into stiff dense dough; knead a couple times in the bowl with the heel of your hand to thoroughly combine and moisten ingredients; shape into a ball.

Cut a piece of parchment paper to fit the size of your baking pan; place parchment on counter or workspace. Place dough in center and press down evenly with your hands to about 1-inch thick. Place another sheet of parchment on top of dough. Roll dough out between parchment paper until about 1/8-inch thick. Remove top sheet of parchment; transfer bottom parchment to baking pan. If desired, lightly sprinkle additional sea salt on top of dough. Using a sharp knife or pizza cutting wheel, cut into 1-inch squares, or desired size.

Bake for 15-20 minutes until light golden brown, checking frequently. If crackers on outer edge begin browning more quickly, carefully remove those and transfer to a plate or rack. When crackers are done, remove from oven and leave on parchment paper until cool. Separate crackers and enjoy. Store cooled crackers in an air tight container.

*Note – If crispier crackers are desired, after separating baked crackers, return to a 300 degree oven for about 5 to 7 minutes until crisp. 

Wednesday, December 11, 2013

Chicken & Broccoli Stir-Fry -- Low Carb

It was a chilly morning here -- 28 degrees when I woke up! For dinner, I made a super quick chicken-broccoli stir-fry and tweaked one of my old recipes for marinating the chicken before stir-frying (with some modifications, of course). My old recipe used cornstarch as part of the mixture to marinate the chicken -- it helped the chicken retain its juices when stir-frying so it stayed nice and juicy...and then later, when you added the broth to make the sauce, it helped thicken the broth. Instead of using cornstarch, I substituted the same amount of peanut flour which is super fine in texture -- as fine as cornstarch. It turned out great and kept the chicken super moist the same way the cornstarch would when I used it. To add a little additional thickness to my sauce, I stirred in some peanut butter until I achieved the consistency I wanted. The peanut flour helps keep the chicken from releasing its juices when cooking and it doesn't end up "boiling in its own juice". If you do much stir-frying at all, you know what I mean -- sometimes the juices cook out of the chicken and then it literally begins to boil in its own juices, which is not ideal when you are stir-frying. You can use peanut butter stirred into the broth mixture to thicken your sauce -- it works great as a thickening agent for stir-fries. I snapped a couple photos below. Enjoy!


Monday, December 9, 2013

White Chicken Enchilada Casserole -- Low Carb & Wheat Free

This evening I made White Chicken Enchilada Casserole. This was a recipe that I had originally enjoyed eating before I went wheat free. I later converted it to a grain-free version after eliminating wheat from my diet last July. My original grain-free version of this casserole used coconut flour based tortillas from another blogger's site, and while it turned out good, I found the coconut flour based tortillas a bit more tricky to make and didn't particularly care for the subtle coconut flavor it gave to this dish (I find coconut to be a bit distracting in a Mexican style dish). So, this evening, I used my own version of grain-free tortillas that are more neutral in taste. They are made with a combination of blanched almond flour, ground golden flax and a bit of grated Parmesan and seasoned with a bit of chipotle chile powder. The dish turned out even better than I had hoped. I added a few tablespoons of water to my basic tortilla recipe to produce a slightly thinner tortilla and they worked perfectly in this casserole. It turned out great and I have enough leftovers to enjoy again tomorrow evening, which is always a good thing! I snapped a few photos below as well as the recipe. Enjoy!


Sunday, December 8, 2013

Sunday Breakfast -- Who said cranberry sauce isn't for breakfast?

This morning we slept in a bit and awoke to another dark, rainy and dismal day. Our high for today is only supposed to be around 45, which feels colder when it is rainy and damp outside. This morning I made a big Sunday breakfast. The only thing I had to make totally from scratch (other than my fried egg which doesn't count) was my Cranberry-Lemon Macaroon Mini-Muffins since everything else was "pre-made". I had a batch of my Easy Cheddar Black Pepper Biscuits frozen in a Ziploc bag in the freezer that I just pulled out and lightly toasted to reheat and some leftover cooked bacon in the fridge from last night (made to garnish my Golden Cream of Faux-tato Soup with). As I reached for the cream to put in my coffee, I caught a glimpse of the bowl of my Cranberry Orange Coconut Sauce I made yesterday and thought about adding a dollop of that to my plate...but then thought...nah, that isn't for breakfast...and then after a brief pause of righteousness, my thoughts switched to...WHO said cranberry sauce isn't for breakfast??? Certainly it wasn't ME that said that...so I proceeded to add a dollop to my breakfast plate this morning...and you know what??? I will be doing that from now on any time there is cranberry sauce "in the house". It was nice having a little bite of sweet-tart fruitiness along with the salty bacon, biscuits and eggs this morning...and lets not forget those 2 cute little muffins on my plate either! I actually think I enjoyed the little blast of fresh cranberry sauce better at breakfast time than I ever did at dinner time! Go ahead...break the rules...don't always stay in between the lines...enjoy your little dollop of defiance this morning...I did!  ;-)


Golden Cream of Faux-tato Soup -- Low Carb & Wheat/Grain-Free (GGC Style)

With the sudden drastic drop in temperature this weekend and the dark, rainy, gloomy weather as well...I found myself thinking about one of my longtime (decades) favorite "comfort soups" that I always enjoyed making this time of year. The only problem is that it is full of carbs since it's a super cheesy creamed potato soup, and full of other unhealthy things as well, like processed cheese (Velveeta) and regular wheat flour that is used to thicken it. It is called "Golden Cream of Potato Soup." I found the recipe many years ago in one of my old Southern Living Annual Cookbooks. It quickly became a regular staple in our house when my kids were growing up and I continued making it and surprising them with it even after they grew up -- you know, one of those "my Mommy loves me meals". We really love(d) that soup! Since I no longer eat wheat and like to eat low carb as well, I have been contemplating "de-carb-onating" it for a while...and finally decided to bite the bullet and give it a try this weekend with the cold ugly weather we are experiencing. It turned out AWESOME, and better than I expected...so much so, that hubby actually thought that there were potatoes in it!!! Now how is that for successful?

My secret ingredient was the good old "faux-tato"...called cauliflower! I actually picked up a 2-pound bag of raw cauliflower florets this weekend at Costco which yielded about 3 cups of pureed cauliflower after it was cooked. It worked superbly as a replacement for the potatoes and I used cream cheese in place of the flour to help thicken it...and cream in place of the skim milk...REAL cheddar cheese (instead of Velveeta) that I freshly grated so it wouldn't have any starches on it (like pre-shredded cheese has) to hinder it from melting smoothly into my soup...and I used chicken stock instead of bouillon cubes called for in the original recipe. Otherwise, it was essentially the same as the original version...just better! When I cook my cauliflower, I prepare it the same way I do when I make my cauliflower mash -- I cook all the liquid out of it until the pan is essentially dry on the bottom -- not scorched at all, but just until there is no wetness left on the bottom of the pan. Getting all the moisture out of the cauliflower is the key to making it "potato-like" in texture since cooked potatoes tend to be a bit drier inside because of the starch and since potatoes are what we are trying to substitute...it helps if the cauliflower is not waterlogged after cooking it. I garnished our soup the same way I used to garnish the original version...with extra shredded cheddar cheese and crumbled bacon. While my soup was cooking, I oven roasted some Maverick Ranch Applewood Smoked Bacon and crumbled it on top of the soup when I served it. This soup is rich, creamy, cheesy and decadent...just like the original version. If I hadn't made the soup with my own two hands...I could have easily tricked myself! LOL Below are a few photos as well as the recipe. If you are curious in seeing the original version of this soup...here is the post, recipe and photos when I made it almost 2 years ago, before I went wheat/grain free and low carb...so you can compare the 2 versions for yourself. ---> "Golden Cream of Potato Soup". Enjoy!


How about those "faux-tatoes" -- I'll never tell!  


Golden Cream of Faux-tato Soup
Makes 6 to 8 servings

Ingredients:

1 cup water
2 pounds raw cauliflower florets
1/2 cup thinly sliced celery
1/2 cup thinly sliced carrots
1/2 cup onion, finely chopped
1 teaspoon dried parsley flakes
4 cups chicken stock
1/2 teaspoon sea salt, or to taste
1/4 teaspoon black pepper
3 to 4 ounces brick style cream cheese, diced and softened (I used 3 ounces)
1 cup heavy cream
8 ounces shredded sharp cheddar cheese
Extra shredded cheddar cheese or crumbled bacon, optional (for garnishing)

Directions:

Place cauliflower and 1 cup of water in a large pot or Dutch oven; cover and bring to a boil and cook about 10-15 minutes or until tender. Remove lid and continue cooking until no water remains in bottom of pot (watching closely and careful not to burn or scorch) and cauliflower is not waterlogged. Puree cauliflower with an immersion blender or regular blender until smooth (yields approximately 3 cups of pureed cauliflower); transfer puree to a bowl and set aside

In same pot, add celery, carrots, onion, parsley, chicken stock, salt and pepper; bring to a boil over medium-high heat; cover and reduce heat to low and simmer until vegetables are tender, approximately 10 to 15 minutes. Return and add pureed cauliflower back to pot and stir into soup mixture; heat thoroughly until hot; add cream cheese and stir until melted throughout. Stir in cream and heat over medium heat; careful not to boil. Stir in the shredded cheddar cheese, half at a time, stirring frequently until melted and well blended. Taste for seasoning and adjust salt and pepper, as necessary. Do not boil soup; heat just until it begins to simmer (stirring constantly to keep from burning or sticking to bottom of pan).  Remove from heat. Ladle into bowls and garnish with shredded cheese and crumbled bacon, if desired. 

Saturday, December 7, 2013

Cranberry Orange Coconut Sauce

Today it's a cold and overcast day here and it looks and feels like winter again at 48 degrees (compared to the mid-70s of the last couple of days). We did our Costco run this morning and ran a few other errands. I've been cooking and baking this afternoon (imagine that) and wanted to use the large bag of cranberries I had in the fridge...so I baked some more cranberry muffins and made another batch of cranberry sauce and changed it up a bit. I made Cranberry Orange Coconut Sauce and it turned out awesome! Rather than use orange juice, I just used water as my liquid and orange zest for the orange flavor (you could also use a little orange extract instead of the zest if you wanted to). I decided to add unsweetened shredded coconut for a bit of crunch and added texture instead of the walnuts this time. Since the unsweetened coconut is dry and a bit absorbent, I increased my water to 1/2 cup for 2 cups of fresh cranberries. I like to make sure all my cranberries have burst so I don't get any "sour squirt surprises" in my mouth by biting on a still intact cranberry (ewww)...so near the end of simmering my cranberry sauce, I use my handheld potato masher to gently press all the berries while they are still cooking to make sure they have all ruptured. I snapped a few photos below as well as the easy peasy recipe. Enjoy!