Showing posts with label Italian Recipes. Show all posts

Wednesday, June 20, 2018

Grilled Summer Veggie Lasagna - Easy Low Carb

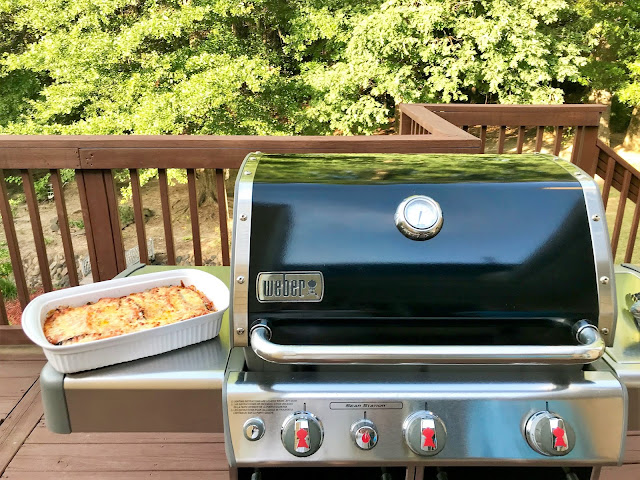
This evening I made a delicious grilled summer vegetable lasagna using the bounty of fresh zucchini, yellow summer squash and eggplant that I had on hand. I had 2 medium eggplant, about 2-1/2 pounds of a mixture of yellow squash and zucchini. The only other ingredients I used were a jar of Rao's Arrabbiata Sauce, 2 cups of shredded mozzarella cheese, 1/4 cup shredded Parmigiana Reggiano cheese, olive oil and salt (to brush on the sliced veggies before grilling). I will post the actual easy recipe later this evening but wanted to get the photos up. It turned out AMAZING! I picked up the 2 eggplants at Sprouts Farmers Market a few days ago and they were only $1.00 each. I picked up a mixed bag of organic zucchini and yellow summer squash at Costco over the weekend. I always keep jars of sauce in my pantry along with olive oil and I always have shredded cheeses available in the fridge. As soon as I got home from work, I fired up our grill, washed and sliced the veggies, brushed with oil and sprinkled with salt. I grilled the veggies in 2 stages; first the eggplant and then the squash and zucchini. They only took about 7 to 8 minutes to grill until tender but not too soft they would fall apart when taking off the grill or layering. It took about 5 minutes to assemble the casserole and less than 30 minutes to bake. I let it sit for about 10-15 minutes so the cheeses would set up before cutting it. It cut into beautiful pieces. Hubby and I enjoyed it and it was the perfect meal to enjoy on the night before the official start of Summer tomorrow. Of course, we have lots leftover for us both to enjoy for several more dinners. It would make an awesome side dish to grilled marinated chicken or other meat as well. Check out the photos of the easy steps below. I'll be back later to add the actual written recipe. Enjoy!


Using your grill is a great way to help you make lasagna in the summertime


Grilled Summer Vegetable Lasagna

Ingredients:

2 medium eggplant, sliced approximately 1/2" thick (eggplant can be peeled if desired)
2-1/2 pounds zucchini and yellow summer squash, sliced lengthwise approximately 1/4" thick
1/4 - 1/3 cup olive oil (to brush eggplant and squash with)
Sea salt, to taste
1 24-ounce jar of your favorite pasta sauce (I used Rao's Homemade Arrabbiata)
2 cups shredded mozzarella cheese
1/3 cup shredded Parmigiana Reggiano (or Parmesan cheese)

Directions:

Brush both sides of eggplant, zucchini, and yellow squash with olive oil and sprinkle with salt, if desired. Grill on a 400-450 degree F grill for approximately 3 minutes per side, or just until tender (be careful not to overcook and make mushy so vegetables don't fall apart). Remove from grill to a platter.

Preheat oven to 400 degrees F. Lightly oil a 9" x 13" casserole dish and spread about 1/2 cup of the pasta sauce, just enough to coat bottom of dish. Layer eggplant slices on bottom, overlapping slightly. Spoon 1/2 of the remaining sauce over top of the eggplant; then scatter 1 cup of mozzarella on top. Layer zucchini and yellow squash next, overlapping slightly. Spread remaining sauce over top; scatter remaining 1 cup mozzarella on top; then scatter Parmesan cheese last. Bake uncovered at 400 degrees for 20 to 25 minutes or until hot and bubbly. If desired, run under broiler for a few minutes to brown top layer of cheese. Allow lasagna to sit about 10 minutes so cheese sets up and can be cut into neat squares.

*Note: If desired, you can increase amount of cheese. Sauce should be used sparingly to keep from adding too much liquid to the casserole since the vegetables don't absorb liquid the way regular pasta noodles do. I prefer to partially skin my eggplant by using a vegetable peeler lengthwise, removing 1 swipe every other row (it looks striped when done). I like to slice the eggplant into rounds but you can slice it lengthwise if preferred. The vegetables can also be roasted in the oven until tender, however grilling them helps dry the excess juices up making your lasagna non-watery. If preferred this can be made using all eggplant, or all zucchini or squash. You can also add a layer of cooked ground beef, if desired.


Sunday, May 20, 2018

White Pizza Topped w/ Spicy Chicken, Spinach, Roasted Tomatoes & Crispy Vidalia Onion Rings

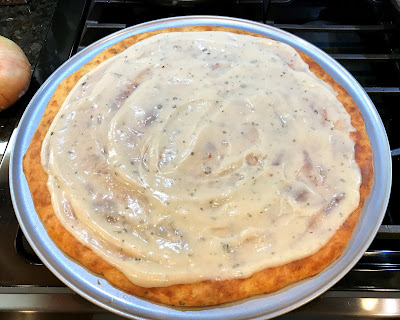
This evening I made the best pizza ever using my Cheese Head Pizza Crust. After baking the crust, I topped it with Paesana's White NY Style Pizza Sauce, sautéed diced boneless chicken breast (seasoned with salt, black pepper and a bit of cayenne), wilted baby spinach, roasted halved grape tomatoes and thinly sliced Vidalia onion tossed in olive oil, spread out on a baking sheet and roasted until caramelized and crispy. The combination was amazing. Even hubby said he thought it was the best pizza he ever ate in his life. The combination of flavors was delicious. Roasting the tomatoes intensified their flavor, roasting the Vidalia onions intensified their sweetness and the spiced chicken breast and spinach along with the white cheese sauce gave it a chicken alfredo like flavor. I snapped a number of photos and included the recipe for the crust below. I roasted the tomatoes and the onions at 400-425 degrees after tossing them with olive oil and cooking them (stirring a couple times) until they were the consistency I wanted. I used my large USA Pizza Pan for tonight's pizza, but a large sheet pan lined with parchment paper works fine as well. Enjoy!


CHEESE HEAD PIZZA 

INGREDIENTS:

8 ounces (2 cups) shredded mozzarella (whole milk or part skim)
3 ounces brick style cream cheese
1/4 cup finely grated Parmesan (powdery style)
1/8 teaspoon salt, optional
Dash garlic powder
1/2 teaspoon dried Italian seasoning
1 large egg
1 tablespoon olive oil (to press out dough with hands or rubber spatula)
Desired toppings (pizza sauce, pepperoni, cooked peppers, onions, mushrooms, additional cheese, etc.)

DIRECTIONS:

Preheat oven to 425 degrees F. Line a large baking sheet or pizza pan with parchment paper.

Place mozzarella and cream cheese in a medium bowl. Heat cheese in microwave on high for 45 seconds; stir and heat an additional 30 to 45 seconds or until a hot melty mass of cheese is formed.

While cheese is melting in microwave, stir almond flour, Parmesan, salt, garlic powder and Italian seasoning together in a small bowl. Add flour mixture and egg to bowl of hot melted cheese. Working quickly, fold and stir mixture together with a rubber spatula until a ball of dough is formed (make sure cheese mixture is hot before adding flour and egg).   

Place ball of dough in center of parchment lined baking sheet. Press dough out with oiled hands or pour the 1 tablespoon of olive oil on top of dough to help press and smooth dough out using the rubber spatula into the desired shape (round, oval or rectangular) until about ¼-inch thick. Prick holes all over crust surface with a fork to prevent crust from bubbling up. Bake for 10 to 12 minutes or until lightly golden (be careful not to overbake so it doesn't burn when returning to oven to bake with toppings). Remove crust and top with pizza sauce, additional cheese, and any desired toppings. Reduce oven temp to 400 degrees F and bake an additional 5 to 7 minutes or until cheese is melted and heated through. 


Wednesday, May 2, 2018

Burger Parmigiana over Non-Watery Zoodles

This evening I didn't have any meat thawed for dinner so I grabbed a bag of burgers that I had made several months ago, double wrapped and froze (raw). I added them to a skillet with some olive oil, covered the pan and cooked over medium heat until they thawed and cooked (it took about 15-20 minutes). I flipped them a couple times. I moved the burgers aside to a plate and added 1/2 of a diced Vidalia onion to the pan and cooked for about 5 to 7 minutes until translucent and caramelized. I returned the 3 burgers to the pan with the onions and poured a jar of Classico's Riserva Arrabbiata sauce over top of the burgers. I wanted a spicy sauce to contrast the sweetness from the Vidalia onions. I covered the pan and simmered the burgers on low for about 20 minutes. While I was cooking the burgers, I pulled out my Paderno Spiralizer and quickly made a huge pile of zoodles using 5 medium-large zucchinis. It took about 3 to 4 minutes. They are so much fresher than those you purchase pre-spiralized in the store and when you realize how quickly you can make a bunch at a fraction of the cost, it will easily justify purchasing this spiralizer. Plus, I think there is something fun about using it. It cleans up so easily by simply rinsing with water and lightly wiping with a paper towel with a drop of dish soap. Just shake it off and place on the counter or in a dish rack and allow it to dry naturally overnight. One of the things many don't like about using zoodles is they can be so watery. I found a way to take care of that by layering the raw zoodles between paper towels (lightly salting to help draw out excess liquid), rolling them up and allowing to wick out the excess liquid. I actually dedicated an entire blog post on "How to Make Non-Watery Zoodles" that you can find by clicking the bolded blog title with that name on the line above.

After the burgers simmered in the sauce, I removed the pot from the heat and topped each with a slice of Bel Gioioso fresh mozzarella cheese and topped with a pinch of dried basil and gave the cheese a few minutes to melt. After my zoodles had sat for a while (at least 30 minutes, but the longer the better...you can make them the night before, roll-up and place in the fridge overnight), I did a quick saute in a bit of olive oil in a nonstick pan (just a couple of minutes on medium high while tossing frequently). I cooked half of the zoodles I made and did it in 2 separate batches. I rolled up the other half of uncooked zoodles and placed on a plate in the fridge to use in the next day or two. I transferred the cooked zoodles to a mesh strainer over a bowl to allow any juices from cooking to drain off. To store leftover cooked zoodles, I line a bowl with a white paper towel and place the zoodles on that and cover the bowl with plastic wrap. I served the Burger Parmigiana over zoodles and we added finely grated Parmesan cheese to our burgers at the table before eating. I snapped a few photos below. Enjoy!


Tuesday, October 10, 2017

Turkey Burger Parmesan & Roasted Sun Dried Tomato Brussels Sprouts

This evening I didn't have anything thawed to make for dinner. After a quick scan of my fridge and freezer, I came across a package of frozen Kirkland's Signature Turkey Burgers (from Costco). They come with 12 burgers (1/3 pound each) to a package, separated by wax paper. Each burger contains 35 grams of protein (they're made with turkey breast). You cook them while frozen and they take about 8 minutes per side to grill. I brushed them with a bit of olive oil mixed with some Mezzetta Basil Pesto while grilling them. I decided to make a quick and easy "Turkey Burger Parmesan" with the turkey burgers by roasting some multi-colored grape and cherry tomatoes (by Mucci Farms that I also find at Costco). After halving the tomatoes, I tossed them in a mixture of olive oil whisked with a couple tablespoons of Mezzetta's Basil Pesto and spread them out on a parchment lined baking sheet to roast for about 20 minutes, then sprinkled with shredded Parmigiano Reggiano and roasted an additional 5 minutes. I topped each grilled turkey burger with a slice of fresh mozzarella cheese right before pulling off the grill so it could soften and begin to melt and get gooey. I topped each burger with roasted tomatoes right before serving. You could substitute using chicken or beef burgers instead, if preferred.

To go with our Turkey Burger Parmesan, I decided to Italianize fresh brussels sprouts by halving them and tossing them with a mixture of olive oil and Mezzetta Sun Dried Tomato Pesto. I roasted them for about 20 minutes and then topped them with shredded Parmigiana Reggiano and popped them back in the oven for another 5 minutes or so. They turned out AMAZING and were the perfect accompaniment to the Turkey Burger Parmesan. I snapped a few photos below and included the easy peasy recipe for my Turkey Burger Parmesan. Enjoy!


I roasted the tomatoes tossed with basil pesto alongside the brussels sprouts tossed with sun dried tomato pesto (both were topped with shredded Parmesan near the end of cooking).


The melting mozzarella cheese has completely engulfed the turkey burger

Grilled Turkey Burger Parmesan

Ingredients:

4 frozen turkey burgers (or use fresh and adjust cooking time)
8 ounce ball of fresh mozzarella, cut into 4 thick slices about 2-ounces each
Olive oil spray to spray burgers
2 cups halved assorted grape and cherry tomatoes
2 tablespoons olive oil
2 rounded tablespoons basil pesto (fresh or jarred)
Salt and pepper, to taste
1/4 cup shredded parmesan cheese

Directions:

Preheat grill. Spray both sides of turkey burgers with olive oil and grill for 8 minutes per side. While burgers are grilling, preheat oven to 425 degrees F. Combine tomatoes, 2 tablespoons olive oil and basil pesto in a bowl; season with salt and pepper. Spread in a single layer on a parchment lined baking sheet and roast for 20 minutes. Remove from oven and sprinkle with parmesan cheese; return to oven and bake an additional 5 to 10 minutes. Top each burger with a slice of mozzarella cheese and spoon roasted tomatoes over top.

*Note: If desired, baste turkey burgers with any remaining olive oil and basil pesto mixture while cooking


Sunday, October 8, 2017

Italian Style Herbed Beef & Zucchini Meatballs

This weekend we stayed busy running errands and I did a lot of cooking to get a head start on the week since another tropical storm is dumping rain on us for the next few days. I made a big pot of chili in my Instant Pot and will post the recipe for it tomorrow. I made enough for us to enjoy for a couple of meals now and plenty of extra left to freeze and pull out for a quick meal some evening that I don't have time to cook, or just don't feel like cooking. For our dinner this evening, I oven roasted a bunch of Italian Style Meatballs filled with herbs, mozzarella, parmesan, and shredded zucchini to keep moist. They turned out awesome! I made 26 golf ball sized meatballs so we'd have plenty of extra leftover to freeze in a Ziploc freezer bag to pull out and pop into sauce and simmer for quick spaghetti (zoodles) and meatballs any time. I snapped a few photos of tonight's delicious meatballs as well as a pic of the yummy oven roasted butternut squash and miniature patty pan and zucchini squash I roasted to go alongside our meatballs. I heated up some marinara to use as a dipping sauce for our meatballs, but both hubby and I enjoyed eating them "as is" without any sauce since they were so flavorful. We enjoyed the roasted squash medley alongside our roasted meatballs. The recipe for the meatballs is below. Enjoy!


I roasted these for about 30 minutes at 425 degrees (tossed w/ olive oil, salt and pepper)

A new case for my phone...a beautiful gift from my youngest son!

Italian Style Herbed Beef & Zucchini Meatballs

Ingredients:

3 pounds ground beef (I used Costco's 88% lean ground beef)
1 medium zucchini, grated (press excess juices out between paper towels)
1 large egg
1 cup shredded mozzarella cheese
1/4 cup finely grated parmesan cheese
1 teaspoon salt
1 teaspoon freshly ground black pepper
1 teaspoon red pepper flakes, optional
1/4 teaspoon garlic powder
1/2 teaspoon onion powder
1 teaspoon dried basil
1 teaspoon dried oregano
1 tablespoon fresh thyme (or 1 teaspoon dried)
3 tablespoons chopped fresh Italian flat leaf parsley

Directions:

Preheat oven to 400 degrees F. Combine all ingredients in a large bowl. Using a 3-tablespoon retractable scoop, divide meat and roll, using your hands, into approximately 24 to 30 golf-ball sized meatballs. Place in a large roasting pan, spaced about 1/2-inch apart. Roast for 30 to 35 minutes or until done. 


Saturday, September 2, 2017

Best Ever Eggplant Parmesan - Easy Low Carb

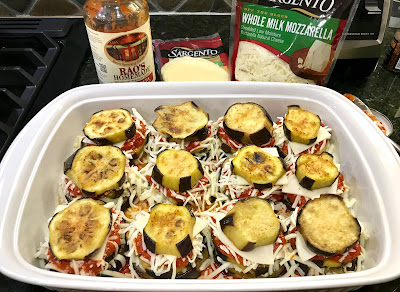
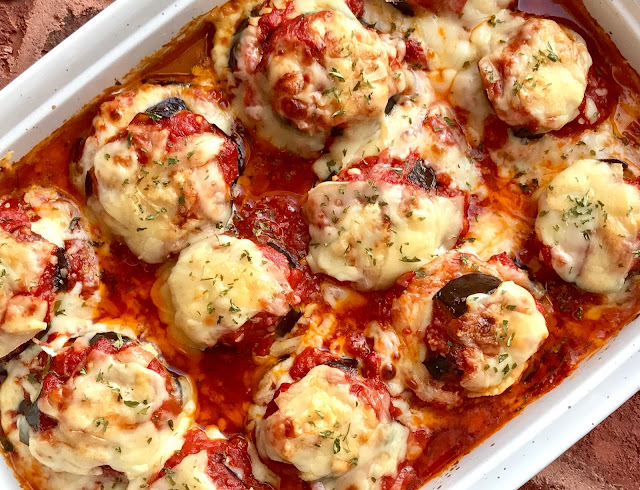
This evening I made my Eggplant Parmesan. I absolutely love eggplant. Rather than the traditional way of breading and frying the eggplant before assembling the casserole, I brush the slices of eggplant with olive oil, season with salt and then bake for 25 to 30 minutes until tender. There are very few ingredients in this dish, so using the best ingredients makes a big difference. I found beautiful fresh eggplants at Sprouts Farmers Market. I like to use Costco's organic extra virgin olive oil, Sargento's traditional cut mozzarella cheese as well as their sliced Provolone. Since I like my Eggplant Parmesan to have a little kick, I use Rao's Arrabbiata Sauce for a bit of heat. I found some beautiful shaved Parmesan cheese at Sprouts that was shaved in nice big thick flakes, and I used that to top the dish with. I wanted to make sure you could really taste the Parmesan. Use your own favorite jarred or homemade sauce and your favorite cheeses. As I was layering my eggplant, it was obvious after the first layer that I had enough to make 3 layers of eggplant instead of two, so I just divided my sauce out accordingly to make sure I had enough sauce for the 3rd row. It worked out perfectly. This Eggplant Parmesan is honestly some of the best I've ever had. The eggplant literally melts in your mouth. The eggplants I used were fresh and had very little seeds, which are the best to use. Larger, older eggplant can be filled with too many seeds which can sometimes be a little bitter. These were perfect. I snapped some photos below of the different steps as well as included the recipe below. Enjoy!


Eggplant Parmesan - Low Carb

Ingredients:

4 medium eggplants, cut into 1/2-inch thick round slices
1/3 cup olive oil (more, if needed)
Sea salt, to taste
1 24-ounce jar pasta sauce (I used Rao's Arrabbiata Sauce)
12-ounces (about 3 cups) shredded mozzarella cheese (more, if desired)
5 to 6 slices provolone cheese, cut into fourths
1/2 cup shredded or shaved Parmesan cheese

Directions:

Preheat oven to 425 degrees F. Brush both sides of eggplant slices with olive oil and place on a parchment lined baking sheet or in a single layer in a nonstick roasting pan. Season with salt, to taste. Bake for 15 minutes; turn slices over, brush with additional olive oil, and bake for an additional 10 minutes, or until tender when pierced with a fork. Set cooked eggplant aside.

Reduce oven to 400 degrees F. Spread about 1/2 cup of pasta sauce in the bottom of a 2 to 3 quart casserole dish. Place half of the eggplant slices on top of sauce (see note below). Top and spread each slice with a spoonful (about 1 tablespoon) of sauce. Top with half of the mozzarella cheese. Cut slices of provolone cheese in half, then half again to cut into fourths. Place 1/4 slice of provolone on top of each eggplant/mozzarella mound. Top with remaining half of eggplant slices. Spoon remaining pasta sauce on top of each eggplant stack. Top with remaining half of mozzarella cheese, then with final layer of Parmesan cheese. Bake for 20 to 30 minutes or until hot and bubbly. If desired, run under the broiler for a few minutes to brown cheese. Allow to sit for about 10 to 15 minutes before serving so cheese can set up.

*Note: If you have extra slices of cooked eggplant left, you can add an additional layer of eggplant and top with sauce, then end with Parmesan. 


Wednesday, August 30, 2017

Cheesy Italian Breadsticks - Low Carb Bread

Today I'm re-sharing my recipe for Cheesy Italian Breadsticks.These breadsticks are amazing and really delicious dipped in pizza sauce. We absolutely love them! If you miss serving bread along with your meals, these breadsticks are the perfect answer and they are easy to make. The leftover breadsticks go beautifully alongside your scrambled eggs and omelets for breakfast, too. Check out the step by step photos and the recipe below. Enjoy!


Cheesy Italian Breadsticks

Ingredients:

2 tablespoons coconut flour, sifted
3/4 cup blanched almond flour
3/4 cup ground golden flaxseed
2 teaspoons baking powder
1/2 teaspoon baking soda
1/2 teaspoon sea salt
1 teaspoon Italian seasoning
1/4 teaspoon onion powder
1/8 teaspoon garlic powder
1/2 cup finely grated Parmesan cheese
1 cup shredded mozzarella cheese
3 large eggs
1/4 cup buttermilk
3 tablespoons olive oil

For the topping:
2 tablespoons melted butter
2 tablespoons finely grated Parmesan cheese
1 tablespoon finely chopped fresh parsley, optional

Directions:

Preheat oven to 375 degrees F.  Line a baking sheet with parchment paper (or lightly grease a nonstick baking sheet).

In a mixing bowl, mix first 10 ingredients together with a whisk to help break up any lumps; stir in shredded mozzarella.

In a small bowl, lightly beat eggs, buttermilk and olive oil together. Add wet mixture to dry ingredients, mixing just until combined and dough pulls together; lightly shape into a ball.  Allow dough to sit for about 5 minutes; dough thickens as it sits.

Place ball of dough in the center of a sheet of parchment paper on counter or work surface. Cover dough with an additional sheet of parchment paper and roll dough out between parchment, using a rolling pin, into a rectangular or oblong shape, about 9” x 12” (½-inch thick). Lightly grease a pizza wheel or sharp knife and cut into approximate 1-inch wide strips. Carefully transfer strips of dough to prepared baking sheet and space about 1-1/2 inches apart. Bake for approximately 15 to 18 minutes, or until golden brown. Makes approximately 1 dozen breadsticks, or if desired, cut strips of dough in half lengthwise to make 2 dozen 4-inch sticks.

Remove breadsticks from oven and brush with melted butter and sprinkle with Parmesan and parsley before serving. If desired, serve with your favorite marinara or pizza sauce for dipping.

*Note: If breadstick dough breaks while transferring to baking sheet, simply press dough lightly back together.