Monday, June 30, 2014

Slow Roasted Beef Back Ribs w/ Sweet & Spicy Chipotle Barbecue Sauce

I was home today trying to get my kitchen back in order. I don't want to just schlep it back together -- I want to reorganize it and de-clutter it as I go. I also want to take advantage of having everything already out of the cabinets to thoroughly clean everything out. My new appliances should be here any day now so I am trying to get everything in order before they arrive. I also need to make a final decision on my backsplash tile. I've found something I really like in NY...but would prefer to find something local, if possible...so the search continues. Since I was at home working around the house today, I decided to prepare Slow Roasted Beef Back Ribs for dinner. I picked up a package of beef back ribs that looked good at the store yesterday. 

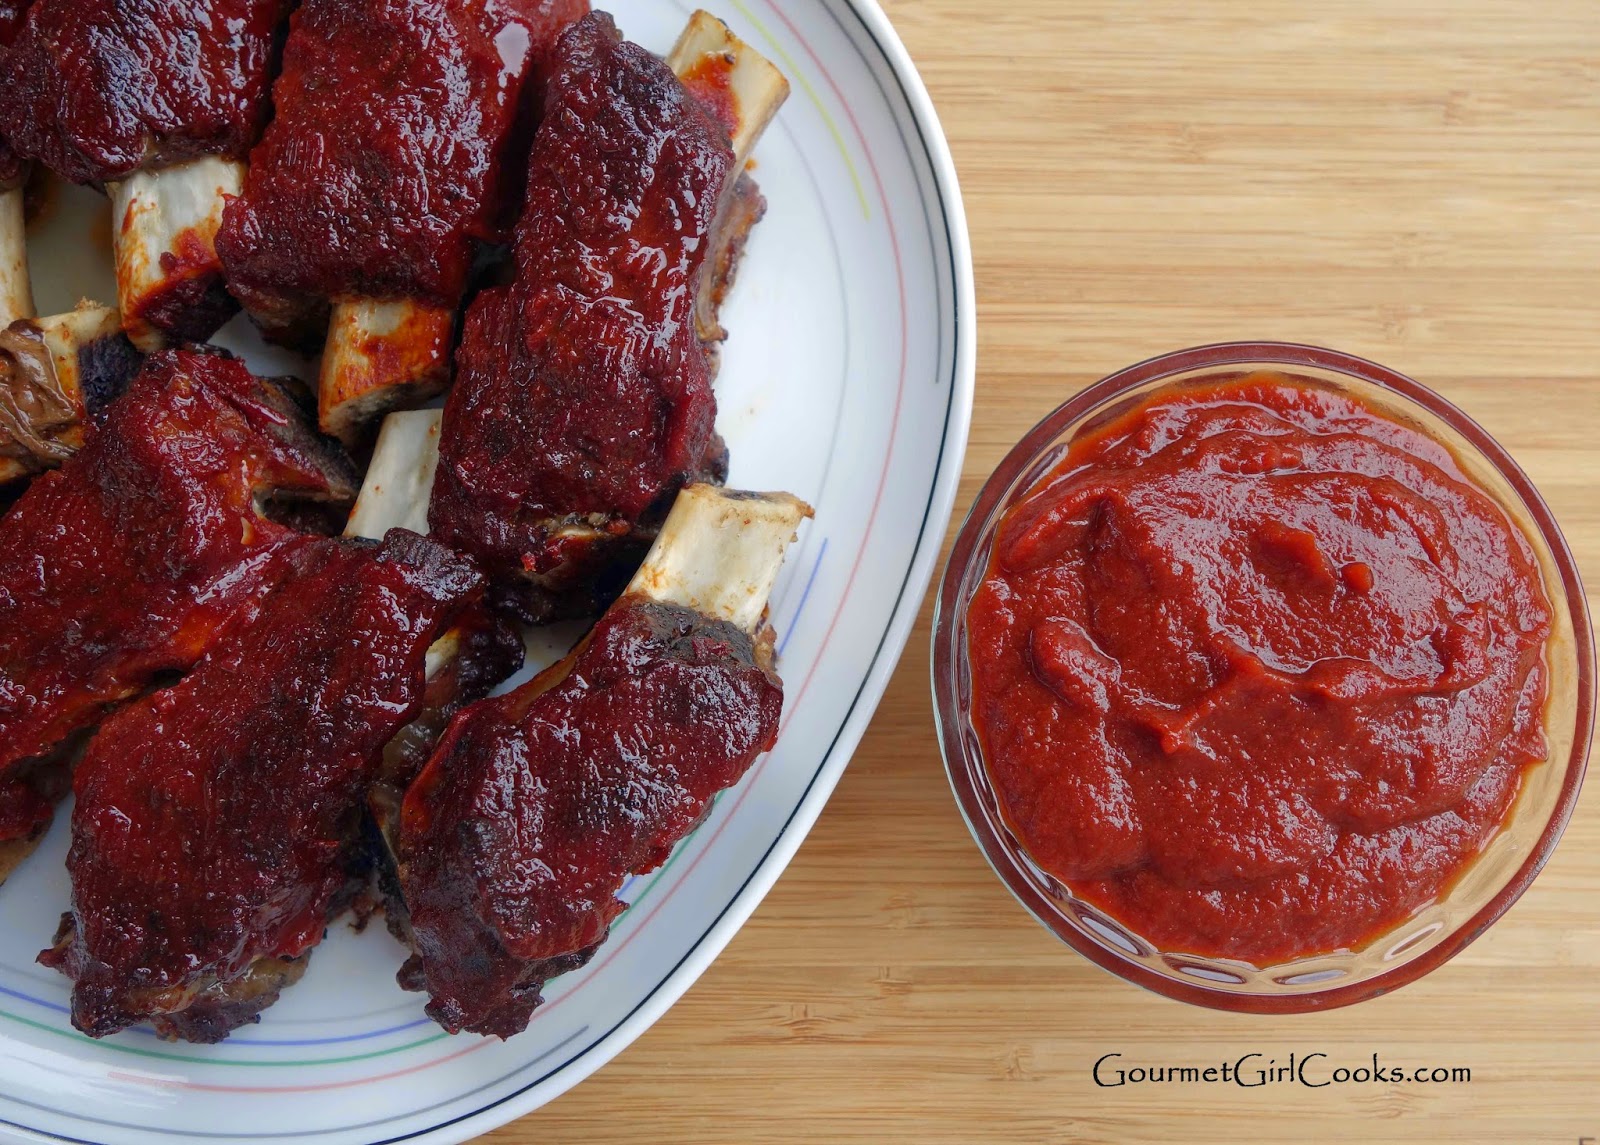
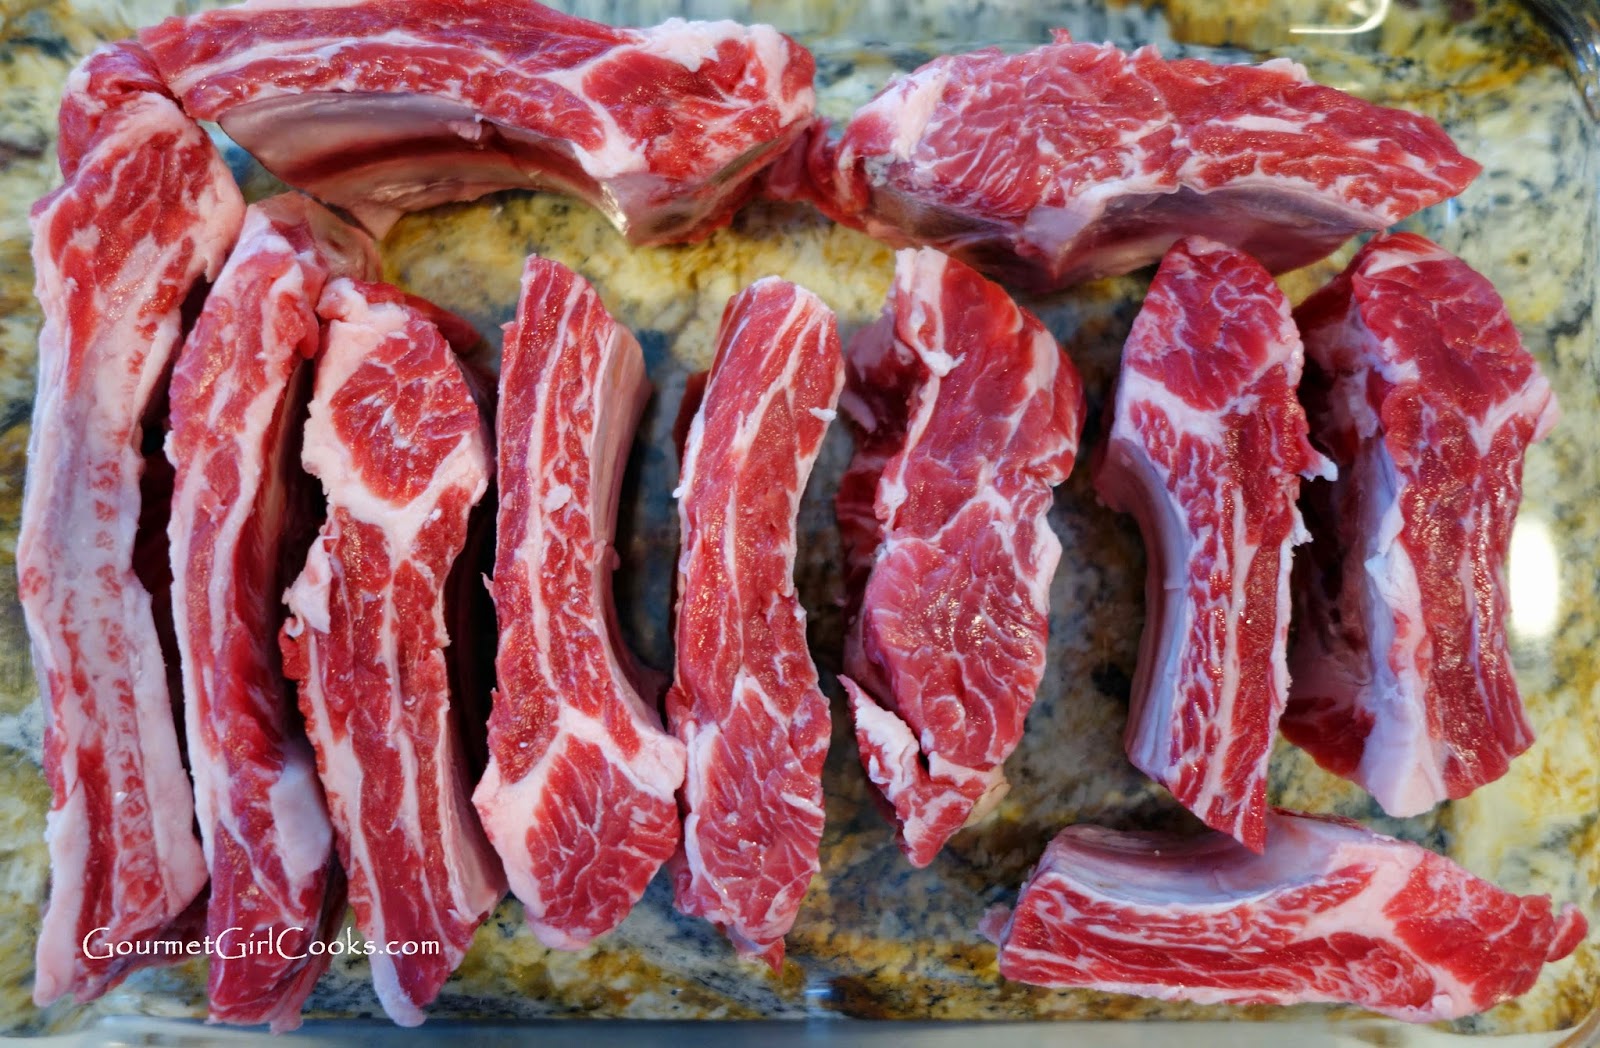
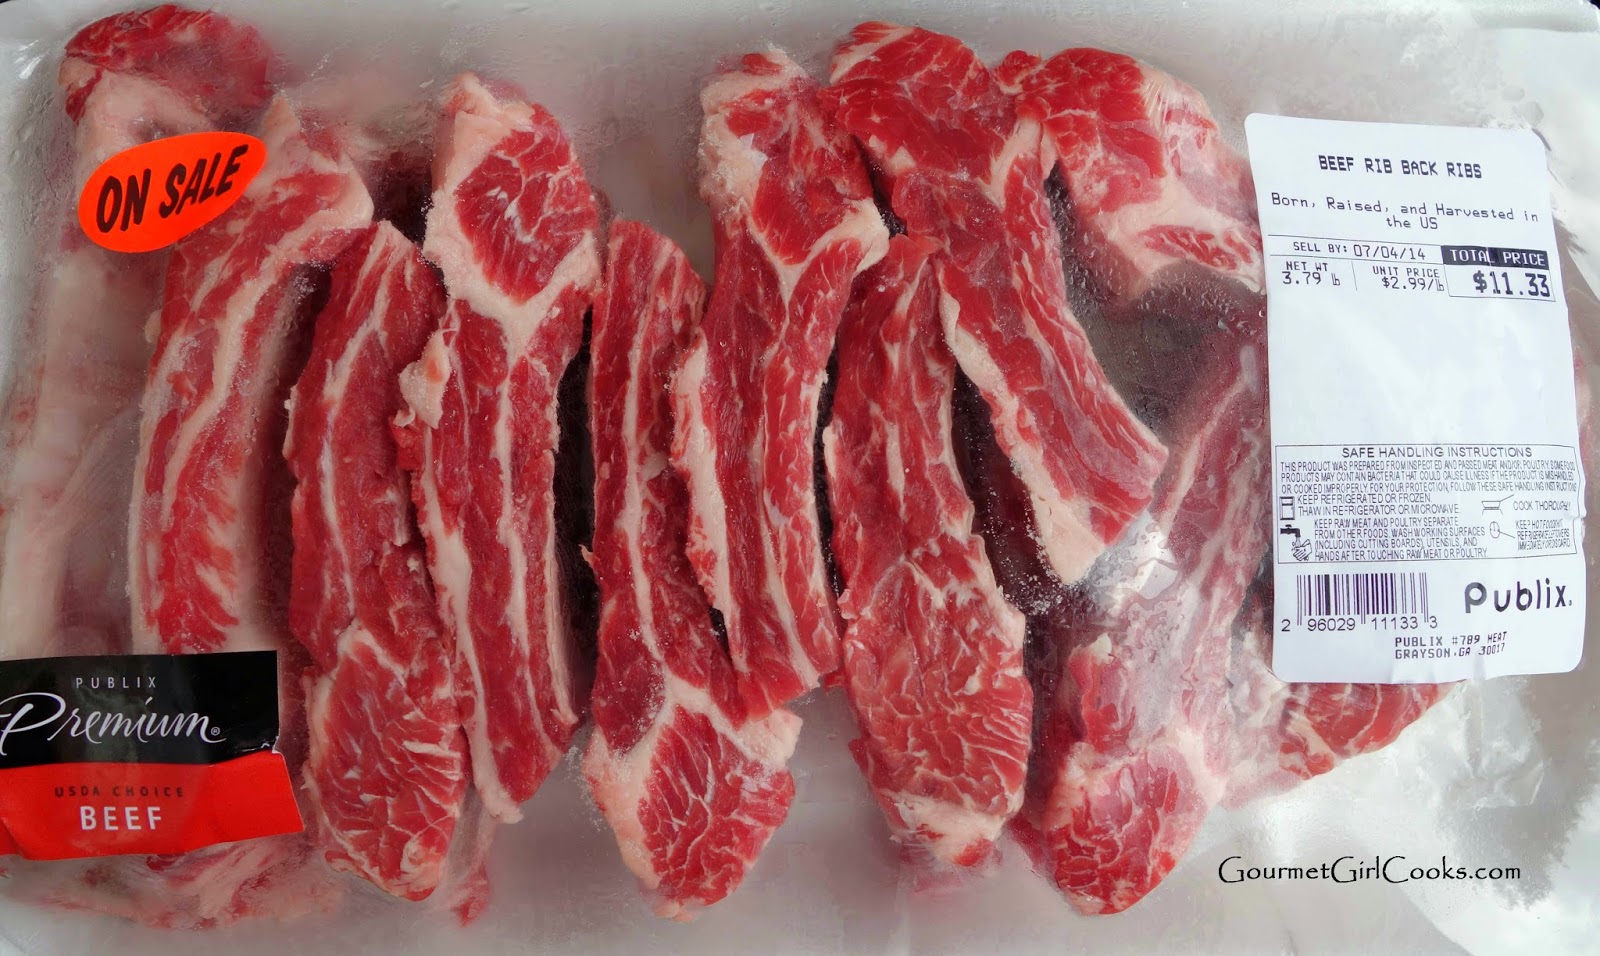
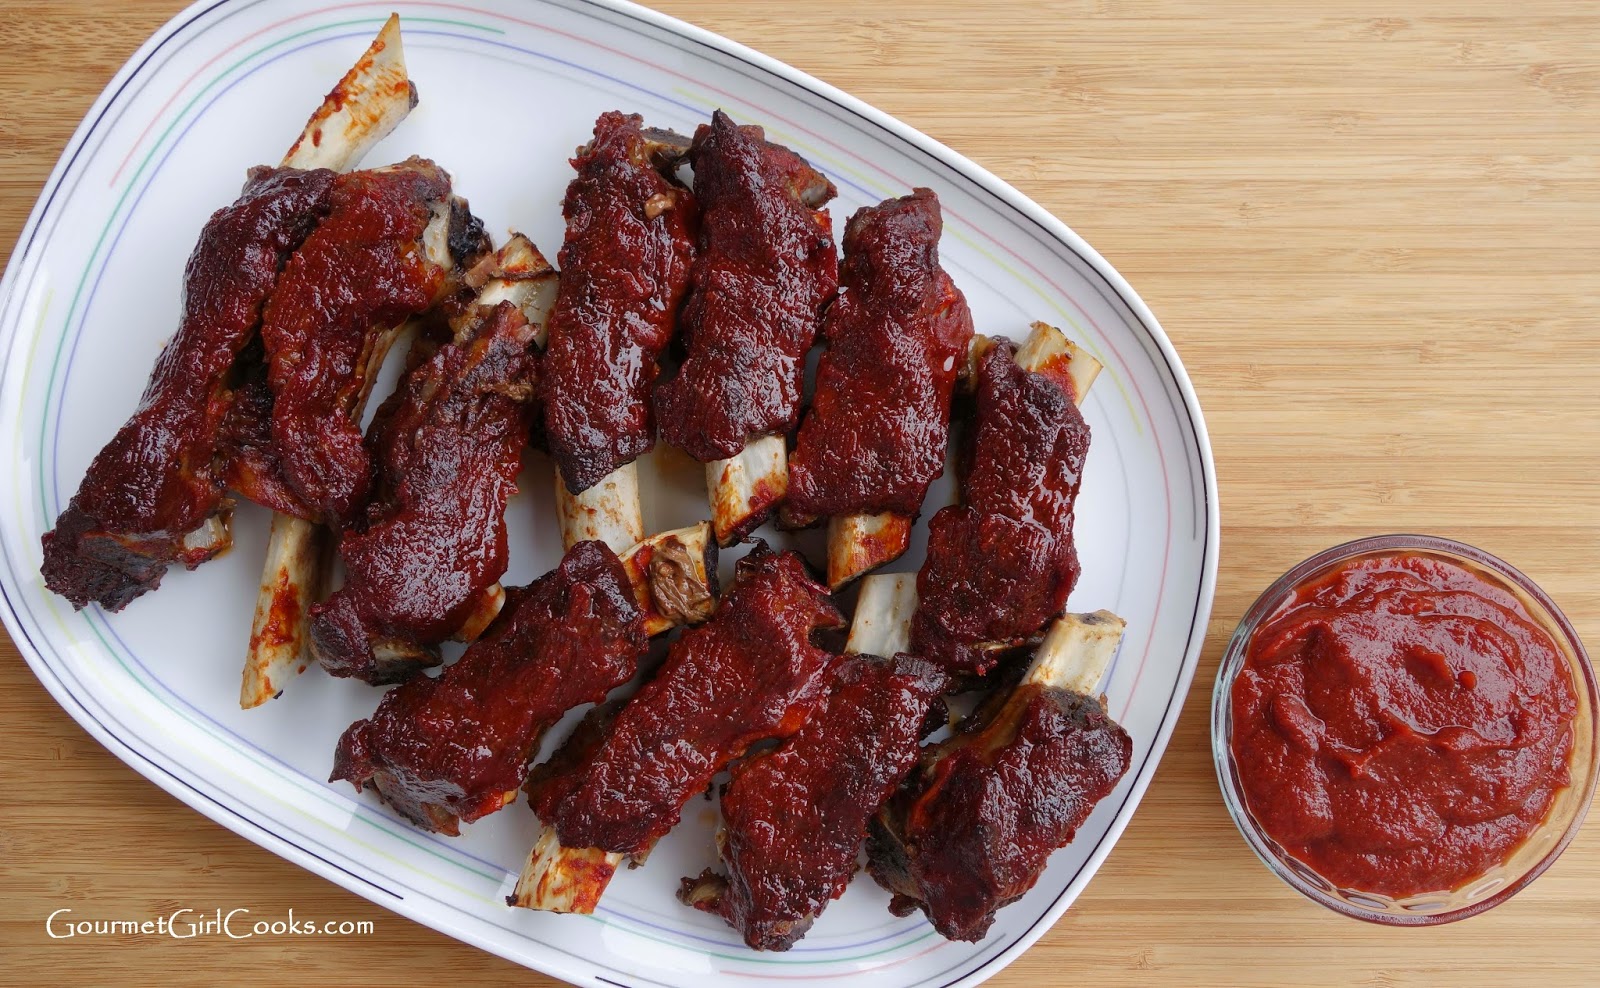
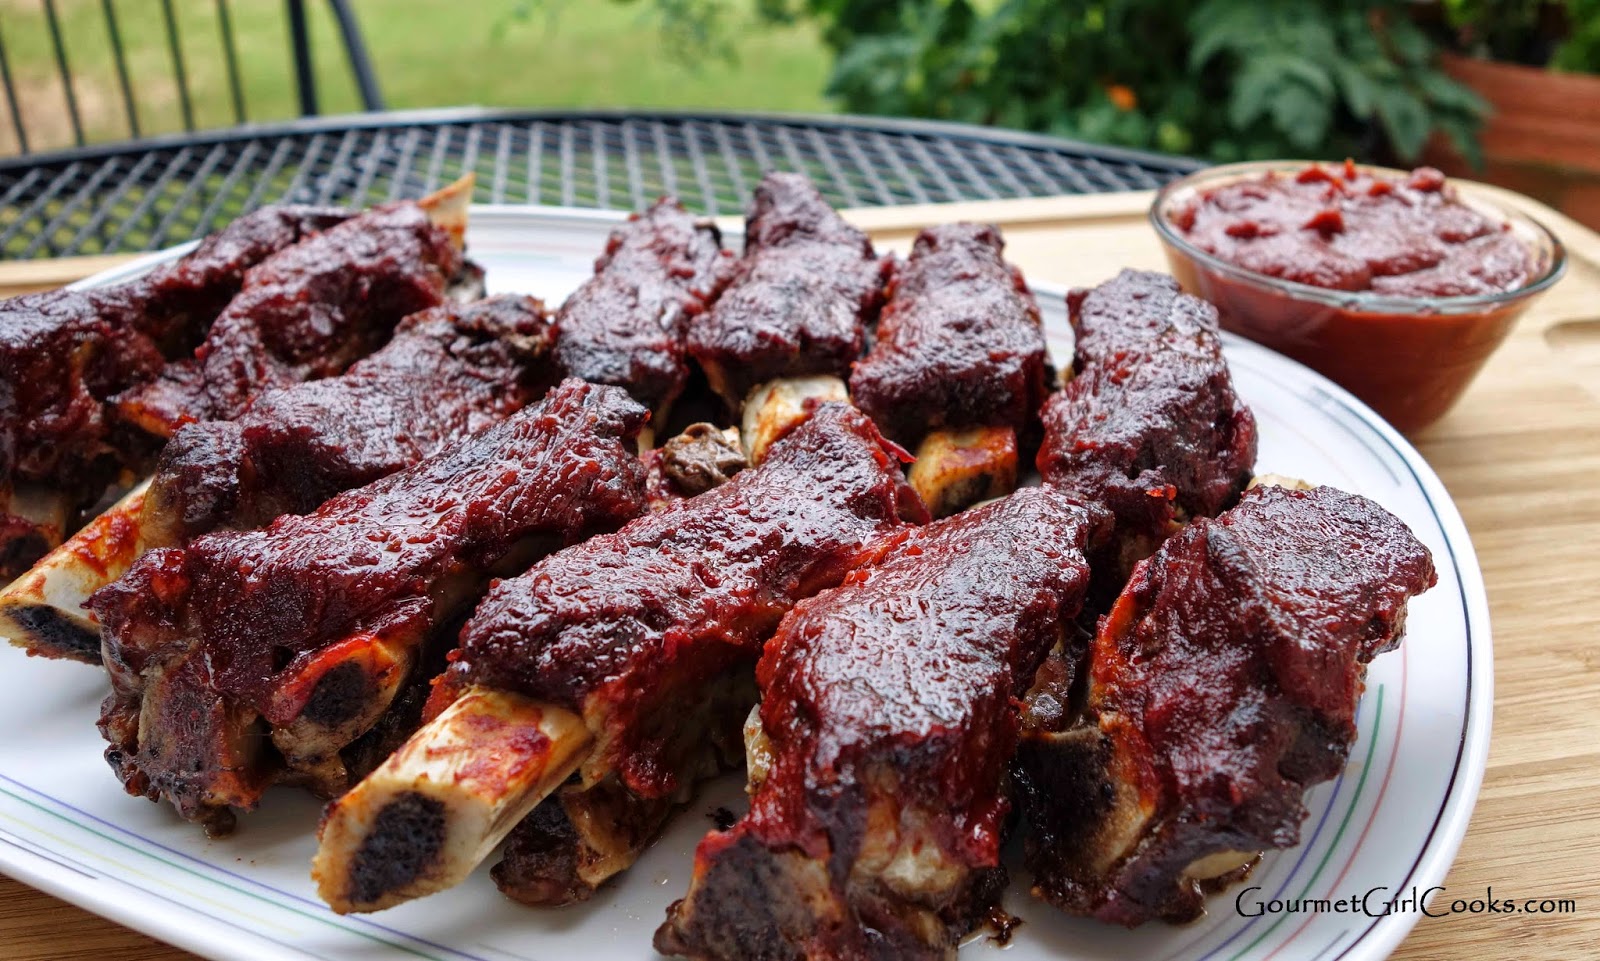
While I've made boneless beef ribs in the crock pot several times before...I've never actually oven roasted or grilled bone-in beef ribs. I wanted to coat them with a dry rub while they roasted and then brush them with barbecue sauce near the end. The problem with commercial barbecue sauces is that they are almost always full of high fructose corn syrup which I avoid at all costs. I've seen the simple paleo version of tomato paste and balsamic vinegar barbecue sauce floating around on the web...but I've tried it and well...it just doesn't float my boat if you know what I mean! So, I embellished the patootie out of my little can of tomato paste which started as the base of my sauce. I have to tell you...I wasn't sure what to expect with my maiden voyage cooking bone-in ribs, much less a decent barbecue sauce to baste them with...but I have to tell you...they were out of this world! They were fall off the bone tender and the combination of the spice rub and the sauce together was outstanding. 

My personal preference for barbecue sauce has always been a sweeter type sauce...usually sweet and spicy. One of my old favorite flavors of barbecue sauce was Sweet Baby Ray's Sweet & Spicy sauce. I actually have a bottle of it in my fridge that my sons use occasionally to dunk their chicken in. One of the ingredients in that sauce is pineapple juice concentrate. So...I decided to play around and use that flavor in my sauce as well. I made my own "sugar free pineapple juice concentrate" using my OliveNation Pure Pineapple Extract (there's another decent extract made by Bakto but you have to buy it in a set along with other flavors). Pineapple is one of those fruits that is very high in sugar which means that pineapple juice concentrate would be sky high in sugar. So, I decided to make my own sugar free pineapple juice concentrate by using water, pineapple extract and Swerve to sweeten it with. It was so good and so "pineappley"...LOL. For those of you that don't like your sauce as sweet, you can reduce the sweetener a bit...but by the time I blended all my seasonings, spices and flavors together...it was perfect for me. These ribs slow roasted for several hours, so obviously they are not your typical weeknight meal...but when you have time, they are definitely worth the time to make. I posted several photos below as well as the recipe for the ribs and the barbecue sauce. Enjoy!


Slow Roasted Beef Back Ribs w/ Sweet & Spicy Chipotle Barbecue Sauce

Ingredients:

4 pounds beef back ribs (cut into individual ribs)
Chipotle Rib Rub, or preferred dry rub
1/4 cup Sweet & Spicy Chipotle Barbecue Sauce
1 cup of water

For the Chipotle Rib Rub:
1 heaping tablespoon Swerve sweetener (or preferred granular sweetener)
1 teaspoon sea salt
Freshly ground black pepper, to taste
1/2 teaspoon smoked paprika
1/2 teaspoon ground chipotle pepper, or to taste
1/2 teaspoon onion powder
1/4 teaspoon garlic powder

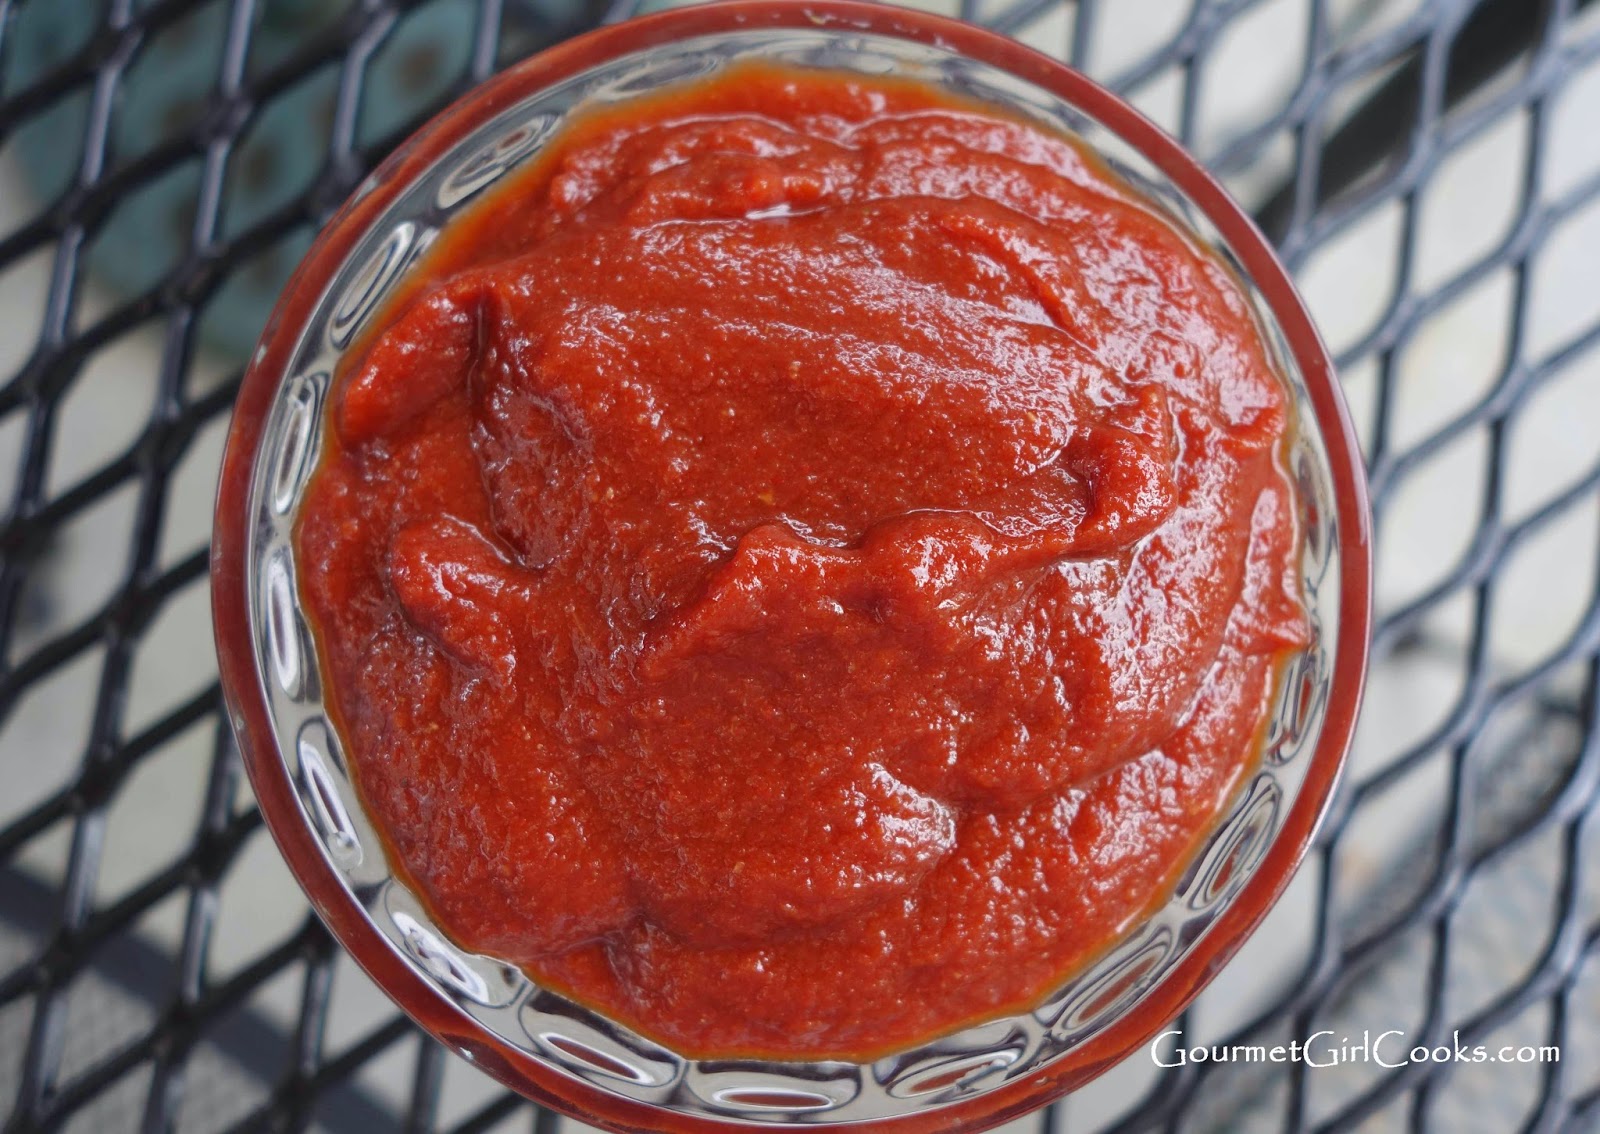
For the Sweet & Spicy Chipotle Barbecue Sauce:
1 6-ounce can tomato paste
1/4 cup water
3 tablespoons Swerve sweetener
1 teaspoon pure pineapple extract
2 dashes ground cinnamon
1 pinch ground cloves
1/4 cup apple cider vinegar
2 tablespoons balsamic vinegar
1 tablespoon white vinegar
1 tablespoon Worcestershire sauce (I used Lea & Perrins original)
1 teaspoon Tamari sauce (I used San-J organic gluten free)
1-1/2 teaspoons ground mustard
1 teaspoon sea salt, or to taste
1/2 teaspoon smoked paprika
1/4 - 1/2 teaspoon ground chipotle powder, to taste (I used 1/2 teaspoon to make it spicy)
1/2 teaspoon onion powder
1/8 teaspoon garlic powder
1 tablespoon olive oil

Directions:

Preheat oven to 325 degrees F. In a large casserole dish or shallow baking pan, arrange ribs in a single layer. 

Mix dry rub ingredients together in a small bowl. Season both sides of ribs and gently rub in.

Pour 1 cup of water, up to about 1/4-inch deep around ribs. Cover tightly with aluminum foil and place in oven. Roast covered for 3 hours, until tender. 

While ribs are roasting, combine barbecue sauce ingredients in a saucepan over medium heat. Simmer for 5 minutes, stirring frequently. Set aside.

Uncover ribs after roasting for 3 hours. Brush with thin layer of barbecue sauce. Reduce heat to 300 degrees. Place ribs uncovered in oven and roast for an additional 30 minutes. Brush with additional sauce, if desired. Refrigerate remaining unused barbecue sauce up to 2 weeks.

*Note: Do not dip brush directly in pan of barbecue sauce. To avoid cross contamination of sauce, remove a portion of sauce to a separate small bowl. Store remaining sauce in refrigerator up to 2 weeks.


Sunday, June 29, 2014

Grilled Chipotle Chicken & Andouille Ratatouille Bake

This afternoon we went to the Fox Theatre in Atlanta to see Wizard of Oz on the big screen. It was one of hubby's father's day gifts. The Wizard of Oz is one of his favorite old movies and neither of us had ever seen it on a big screen before. It was actually great seeing it on a large movie screen since both of us had only ever seen it on television. It was 4:30 when we got out of the movie so we headed home since both boys were coming for dinner tonight. The sky opened up on our way home and poured down rain most of the way home. Fortunately it cleared up because I wanted to grill chicken for dinner since it's quick and I didn't have a lot of time. I made a quick and simple meal. I pounded boneless chicken breasts between plastic wrap until even in thickness, about 1/2-inch thick. I sprayed them with a little olive oil and seasoned them with ground chipotle pepper and sea salt on both sides. Hubby grilled them for about 6 or 7 minutes per side. While he was cooking the chicken I reheated the leftover Andouille Ratatouille Bake to serve as a side dish with our chicken. I knew the boys would like it. To serve the grilled chipotle chicken, I added sliced pickled jalapeno slices to the top and then topped it with a slice of jalapeno pepper cheese and popped it in the oven to heat just until the cheese melted. It actually went great with the Andouille Ratatouille Bake from last night. I snapped a few quick pics for you to see below. Eating low carb and wheat free really does give you lots of variety and options if you choose to. Enjoy!


Saturday, June 28, 2014

Andouille Ratatouille Bake -- Low Carb & Garden Fresh

Today I was busy working on cleaning up the kitchen and starting the process of putting stuff back in our empty kitchen cabinets and trying to organize it better after getting our new counters installed. Hubby was gone all day to a meeting out of town and didn't get home until 7:30. I wanted to make something for dinner that used all of the garden fresh produce we had...I still had a huge bowl of assorted tomatoes he brought home from work the other day as well as additional tomatoes I picked from our own plants. I picked our first 2 ichiban eggplants (long thin eggplant similar in size and shape to a zucchini). Tonight's meal was one of those meals I just put together as I went. I didn't have a recipe or a plan. Our meal evolved into Andouille Ratatouille Bake. You know...where cajun meets Italian. LOL 

I sauteed half of a diced medium onion in a bit of olive oil until it began softening. Then, I tossed in a couple of minced cloves of garlic and the 2 ichiban eggplant that I halved and sliced. I salted it, and covered to saute until the eggplant began softening (I had to add a bit more olive oil since eggplant soaks it up like a sponge). To add some additional liquid to the eggplant, garlic and onion mixture, I diced a couple medium tomatoes and added them to the pan, covered and cooked until almost tender. While they were cooking, I sliced 2 medium zucchini and 4 small yellow summer squash and added them to the pot to cook until almost tender. I added thinly sliced chicken andouille sausages (by Amylu) to the veggie mixture. 

While the rest of the veggies were cooking, I quartered and cut up a big bowl of red, yellow, orange and purple tomatoes. When the eggplant, zucchini and squash mixture was tender, I added the cut up fresh ripe tomatoes (about 5 cups). I just heated them until hot and then turned off the heat. I stirred in 1/2 cup of finely grated Parmesan cheese (the powdery style) to help thicken up the juices a bit. I layered half of the ratatouille in the bottom of a baking dish; topped with about 1/4 cup shredded Parmigiano Reggiano, 1 cup shredded mozzarella, a 15-ounce container of whole milk ricotta cheese and then topped with 4 large torn leaves of fresh basil. I layered on the remaining half of the ratatouille and then topped with 1 more cup of shredded mozzarella cheese and about 1/3 cup of finely grated Parmesan. I popped it into a 350 degree F oven for 30 minutes and then ran it under the broiler for about 3 to 4 minutes until browned and bubbly. I topped it with freshly chopped Italian parsley when it came out of the oven. It was unbelievably good and one of those dishes that just sort of evolved as I went along...my favorite kind! It was a cross between ratatouille with a cajun twist, but layered with cheeses much like lasagna. We really enjoyed it and have plenty of leftovers. It used up most of our bounty of fresh tomatoes, my first 2 eggplants, as well as fresh basil and parsley from my little garden. I snapped a few photos for you to see below. Enjoy!


Friday, June 27, 2014

Farm Fresh Tomato Frittata w/ Cheddar Biscuits - Low Carb Breakfast for Dinner

I am so glad it's finally Friday. It's been a particularly hot and humid week here. This evening I am on my own for dinner. Hubby is out of town this evening and all day tomorrow attending a meeting. I'm on my own until later tomorrow night. Yesterday, he brought home a big bag of assorted fresh tomatoes and cucumbers that someone at his work so generously shared with him. They also brought him 1 dozen large farm fresh eggs as well! The tomatoes were so beautiful. As I placed them into a colander to rinse off, it looked like a rainbow with all of the colors. I immediately knew exactly what I was going to make first with them. I planned to make a frittata loaded with fresh tomatoes, onions and mushrooms...something that I knew hubby would not be interested in because of the onions and mushrooms (he thinks he's allergic to them which I translate into he thinks they are yucky). I figured that would be the perfect dish to make just for ME while he wasn't home . 

I started working on my dinner as soon as I got home. I began by making a batch (actually a half batch) of my Black Pepper Cheddar Biscuits which are one of my favorites. I swapped out the cream for buttermilk in tonight's biscuits since I had some that needed to be used. While the biscuits baked, I sliced fresh mushrooms and onions and cut up an assortment of the fresh tomatoes. I sauteed the onions in a bit of olive oil, tossed in the mushrooms and cooked until the onions were softened and the liquid had evaporated from the mushrooms. I tossed a mound of fresh tomatoes into the skillet and sauteed very lightly, then tossed in a bit of diced pepperoni for added flavor. I beat 4 of the large farm fresh eggs together with a splash of cream, pinch of salt and pepper. I sprinkled a few tablespoons of finely grated Parmesan on top of the sauteed veggies in the skillet and topped with a bit of shredded cheddar cheese and then poured the beaten eggs on top just until the veggies were covered. I cooked it on the stove top for a few minutes to cook a bit and then popped the ovenproof skillet into the oven and baked it at 350 degrees until puffed up and golden brown (about 15 minutes). I ran it under the broiler for a few minutes to get nice and bubbly before removing from the oven. I served myself a nice large wedge of my tomato frittata along with warm cheddar biscuits. 

It was unbelievably good and the sweetness of the fresh ripe tomatoes was outstanding. The best part about having this for dinner tonight is that I get to enjoy the frittata and biscuits again for breakfast tomorrow morning! I snapped a few photos of my gorgeous summer fresh tomato frittata below. Enjoy!


Thursday, June 26, 2014

Fresh Berry Tart w/ Butter Pecan Cookie Crust

Happy Thursday! Our kitchen renovation project is progressing along nicely. The mess and disorganization of my main hub...my kitchen...is a little unsettling, but I know when it's all over with it will be well worth it. 

Today, I'm doing another guest post on Honeyville's blog -- it is one of my new dessert recipes that I created with the upcoming Fourth of July celebrations in mind. I have to tell you...it is one of my favorite dessert recipes that I've created so far. There are a couple of others that rank up there close...but this one is REALLY...REALLY good! I've been enjoying this one for several days now and should have it finished up in time to make another one for July 4th -- not that I'm counting down the days or anything. I got this one made before losing the water in my kitchen. It's decorated in festive red, white and blue, but you can design yours however you'd like and use whatever fruits that are your favorite. I used sliced strawberries and fresh blueberries on mine. It is AMAZING...and I think you are going to love this recipe. It is simple to make. The only baking involved is the 20 to 22 minutes it takes to bake the "butter pecan cookie crust." Trust me, it's worth turning on the oven in July for this one! It has an unbelievable no-bake cheesecake topping and then it's topped with fresh sliced strawberries, fresh blueberries and whipped cream. I sweetened the cookie crust base and the cheesecake topping with Swerve (my favorite non-sugar sweetener). I swear that you would never ever EVER know that this dessert has no added sugar. Trust me...you could fool all the skeptics with this one! This recipe contains two of my favorite products...Honeyville's Blanched Almond Flour as well as Swerve sweetener. Check out the photos and recipe below. Enjoy!


Behind the Scenes...

Crust before baking
Crust after baking
Cheesecake topping has been spread on the cooled cookie crust


This is the pan I used...how appropriate that it's a "USA Pan" to make a Fourth of July dessert!  If you haven't tried these baking pans before...you will love them. I've been using their loaf pan for a while now and picked this jelly roll pan up and absolutely love it.  I liked it so much I went back and bought a 5-piece set, too. They sell these on Amazon (below)...but if you have a Bed Bath & Beyond nearby, you can get them at a great price and even better if you use their 20% coupon that comes out all the time!

Fresh Berry Tart w/ Butter Pecan Cookie Crust 

Ingredients:

For the Cookie Crust:
1/4 teaspoon salt
1/2 teaspoon baking powder (preferably aluminum free)
1/2 to 3/4 cup Swerve Sweetener, or preferred granular sweetener
1/4 cup butter, softened (1/2 stick)
3 ounces (brick style) cream cheese, softened
1 large egg
1 teaspoon vanilla extract
1 cup pecan meal

For the Cheesecake Topping:

16 ounces brick-style cream cheese (2 8-ounce bricks), slightly softened
3/4 cup heavy cream
2 teaspoons vanilla extract
1/2 to 3/4 cup powdered Swerve Confectioners Style Sweetener (or preferred confectioners style sweetener

Fruit Topping:

Fresh berries (strawberries, blueberries, raspberries, etc.)
Whipped cream for serving, optional

Directions:

Preheat oven to 350 degrees F.  Lightly grease a 10"x15"x1" jelly roll pan.

In a mixing bowl, combine flour, salt, baking powder, and sweetener. Make a well in the center of the bowl and add softened butter, cream cheese, egg and vanilla. Using a wooden spoon or rubber spatula, mix dry and wet ingredients together until blended. Stir in pecan meal.

Using a rubber spatula spread and press dough evenly in pan. Bake for 20-22 minutes or until lightly browned. Cool completely.

In a mixing bowl, using a hand mixer, beat cream cheese, until creamy and smooth; stir in cream, vanilla and sweetener.  Beat with hand mixer for about 3 to 4 minutes or until smooth, light and fluffy. Spread topping over top of crust until smooth. Refrigerate for several hours until chilled. Arrange berries on top. Serve with whipped cream, if desired.

Note: If you are unable to find pecan meal locally, it can be ordered online or you can easily make your own by using the pulse setting of your food processor outfitted with a steel blade. Nut meal is more coarsely textured than flour and should resemble the consistency of cornmeal. The pecan meal provides more texture to the cookie crust.


Wednesday, June 25, 2014

Kitchen Renovation Update...

Just a quick update on the kitchen renovation project. Our granite is in and it looks great. We were lucky that they were able to cut my island in one solid piece...so I don't have any seams to worry about in any of my countertops. Luckily, my huge sink fit into my sink cabinet. It was touch and go as to whether it actually would. We were down to about 1/8" would make it or break it...and since my granite was cut to fit that sink...well, it would not have been pretty if the sink didn't work needless to say. It left very little room for my faucet. 

My new faucet and disposal were installed this evening and water has been restored to my kitchen...very big YAY! You don't realize just how inconvenient it is not having water in the kitchen...until you don't! My kitchen cabinets are empty, the drawers are removed...and it looks like a bomb went off in my house...we can't find ANYTHING...but I have water in the kitchen this evening...so life is good. 

The granite was sealed yesterday so we haven't put anything on top of the granite yet...we could have started this evening but we are just too tired. We survived the fumes from the glue and adhesives used to attach the undermount sink and granite. It took our poor plumber several hours to connect my difficult (but beautiful) faucet this evening and do all the necessary work to make the new sink function -- the ginormous sink left him almost no room to work in the sink cabinet and attach the faucet. I just hope he is able to walk tomorrow! Just so you know, he's my hero! I really wanted THAT faucet...I was told by the granite installers that our plumber will hate us (for the lack of space he had to work with and the difficulty of installing this particular faucet). So far the granite installation has gone well...the plumbing has gone well. We still have backsplash to choose and install (I'm working on that)...and the appliances are on order. Other than cabinet hardware to change and painting to do...it's beginning to come together. I snapped a few photos so you can take a peek at our progress....please ignore the clutter. Everything is EVERYWHERE! Enjoy!


The sink and faucet are my favorite part!  :-)

Saturday, June 21, 2014

Grain-Free Sandwich Nirvana on my Awesome Grain-Free Bread

This morning we got up early to get started on our errands. We headed back home early in the afternoon to refrigerate some of our purchases as well as take a lunch break. We stopped on the way home and picked up some Boars Head deli (no junk, nitrites or additives). I picked up some of their cracked pepper turkey breast and muenster cheese. I was so excited to come home and make myself a quick sandwich on my Awesome Grain-Free Bread and top it with my beautiful home grown sliced tomatoes. It is so hot here today and I can't tell you how nice and convenient it was having that loaf of bread sitting on my counter when we got home. I snapped a few photos to show you that YES...it is possible to enjoy a sandwich on bread when you are wheat and grain free...you just need to have the "right kind of bread." I love, love, love this bread. Honestly...it really should be called "Wonder Bread"...except someone has already used that name to identify the white junky bread with polka dots on the wrapper!  ;-) So...while it may not be "Wonder Bread"....it is most definitely "Wonderful Bread". 

If the fear of never eating another real sandwich is holding you back from flipping the no-grain switch...have no fear...REAL BREAD is here! LOL Just so you know, this morning I lightly toasted a couple of thin slices of this delicious bread and spread them with cream cheese and enjoyed that with a cup of coffee for breakfast -- much like the old days when it was a wheat riddled bagel instead. Then, for lunch I enjoyed a sandwich...not a pretend naked or lettuce wrapped sandwich substitution (which I'm not knocking because I actually like those)...but a REAL SANDWICH just like every other wheat eating person eats...just minus the wheat. Try this bread...you WILL like it!  It will make you want to smack your mama -- but don't do that, because that wouldn't be nice!  :-)  Enjoy!

This is complete sandwich nirvana...
Looking down on it...there's no way to know...
...the unbelievable sandwich that lies beneath!
An amazing sandwich on amazing bread...


Thursday, June 19, 2014

Oven Roasted Copper River Wild Salmon & Oven Roasted Asparagus

This evening has been a busy one. As many of you know, we are in the process of a kitchen renovation project. We were on schedule for our granite installation, new sink and faucet to be installed at the end of next week. I was surprised (blindsided) this morning when our granite installer sent me an email and said they had to come do the template TODAY! So, I scrambled home at lunch time to get started clearing out my kitchen and then left a little early this afternoon to get home and finish removing EVERYTHING from my kitchen counters. Wow...you don't know how much is on your kitchen counters until you go to remove it try to find a spot to quickly offload it. 

It took them a couple of hours to do the template and it almost came to a halt when it looked like the sink I purchased was not going to work in my sink cabinet. They are going to do some modifications to make it work...I just hope it will leave our plumber enough room to install our faucet. Instead of next Friday...my counters are now rescheduled to be installed Monday. This means my kitchen will go down for a couple of days before we get our water, sink and dishwasher connected. Guess I'll be busy this weekend making sandwich buns, bread, etc. so we can make quick meals for a couple of days. Don't want to dirty up too many dishes if we don't have a sink or dishwasher to wash them. Since I got so engrossed in "Sprouts" last night...I posted my new bread recipe late last night...and didn't get to post last night's meal. Since our granite man didn't leave until after 8:00 this evening, I just made some quick scrambled eggs, toast and fresh strawberries for dinner. The eggs were unusually special because I got to enjoy them with TOAST! I lightly toasted some of my grain-free bread and spread Kerrygold on to melt in. It was so good. I snapped a few photos of last night's salmon and asparagus that I didn't have time to post along with a quick photo of tonight's quickie dinner. Enjoy!


Oven roasted wild salmon...roasted with sliced lemons, butter, sea salt and pepper (salmon and lemons, courtesy of Costco)
Fresh roasted asparagus (courtesy of Sprouts)...tossed with macadamia nut oil, sea salt and pepper
Tomatoes...courtesy of my patio garden
REAL Bread...try it; you'll like it!