

These are the ramblings of a self-described wheat, grain and gluten-free “gourmet girl” that loves to cook and eat good food. I love creating and sharing recipes and photographing “beautiful food”. In July 2012, I eliminated wheat, grains and added sugar from my diet and rediscovered real, whole fresh foods again and effortlessly lost 65+ pounds. Join me in my wheat, grain and gluten-free journey. See how easy it is to enjoy grain free gourmet, one meal at a time! Welcome to my blog. Enjoy!
Wednesday, October 16, 2013
Slow Cooked Tri-Tip Roast w/ Rich and Thick Parmesan Cauliflower Mash
This evening we had slow cooked tri-tip roast for dinner that was super simple to make. Last night I placed a 2-1/2 pound tri-tip roast in my crock-pot and cooked it overnight . Before hopping in the shower this morning, I took the roast out of the crock-pot and placed it on a platter to cool and then sliced it up and refrigerated it before leaving for work. It cooked for about 8 hours overnight. I can't say enough about how much I really like this cut of roast -- it's the second one I've made and it cooks up tender and juicy but stays together in nice neat slices when you cut it (instead of shredding like some roasts tend to do). It is fork tender and doesn't require a knife to cut the slices when you eat it. When I prepared it last night, I made a mirepoix to cook the roast on top of. A mirepoix is simply chopped carrot, celery and onion that is used in cooking as an "aromatic". It adds flavor and aroma to soups, stews, stocks and sauces. I diced 2 carrots, 2 stalks of celery and 1 small onion and added in 2 minced cloves of garlic and about 1/4 cup of chopped fresh flat-leaf parsley. I placed the mirepoix in the bottom of my crock-pot as a base to cook the roast on. I seasoned the tri-tip roast liberally with sea salt and cracked black pepper and rubbed it all over and then placed it on top of the bed of veggies. I then sprinkled a pinch of dried thyme on top and added a splash (2 to 3 tablespoons) of red wine (merlot) on top and then covered it and cooked it on high for the first 2 hours, then turned it down to low to cook for the last 6 hours. I sliced only half of the roast this morning for our dinner this evening and left the remaining half intact to use to make something else later this week. When I got home this evening, I strained the juices from the veggie mixture and discarded the cooked mirepoix and heated the juices (slightly more than 1 cup) until boiling and reduced it by almost half and then whisked in a couple tablespoons of butter, a couple tablespoons of heavy cream, pinch of thyme small splash of red wine (about 1 tablespoon) and then whisked in a tiny pinch of xanthum gum . I seasoned it with salt and pepper to taste. I wanted to make a concentrated demi-glace sauce (glaze-type) since I am not a big fan of gravy. A demi-glace is super concentrated and flavorful, so you don't need your food to swim in gravy for moistness and flavor. This roast is tender on its own and the demi-glace sauce simply adds a burst of concentrated flavor and richness. I served the roast with fresh yellow summer squash lightly sauteed in butter and my Rich and Thick Parmesan Cauliflower Mash along with a leftover Easy Cheddar Black Pepper Biscuit. It was a delicious "comfort food" style meal perfect for "hump-day" (Wednesday). I snapped a few photos below as well as the recipe for my cauliflower mash. Enjoy!


Tuesday, October 15, 2013
This & That Tuesday
Tonight's post is a random one. I thought I'd post a few random things that I've picked up in the last week or so to use in the kitchen. I ordered 3 of them from Amazon and the others I picked up at Bed Bath & Beyond. I have also recently been asked to post some of my "finds and deals" that I pick up at Costco regularly since I shop there almost every single week. I have a mental inventory of their regular stock since I go so frequently...LOL...and my eyes always zoom in on the "new stuff" they carry from week to week. This evening, I am going to cook another tri-tip roast in my crock pot overnight for tomorrow's dinner. One of my followers recently told me that she looked for and found a tri-tip at her local grocery store and that it was pricey at $9.99/lb. I couldn't remember what I had paid for mine at Costco, but didn't recall it being that pricey, so when I went back there this weekend, I looked to see how much they were. They were $5.99/lb there -- quite a big difference in price! Of course, I ended up picking up another one since it was such a good deal and because it was a such a delicious roast when I made it a couple of weeks ago. So, while tonight's post really has nothing to do with Costco, I thought I'd share a few of my recent random kitchen finds for you to see below. Enjoy!
 |
| This is the donut pan I bought and used to make Cinnamon Maple Donuts this weekend! |
 |
| I picked up this muffin top pan to make something fabulous...I just haven't figured out what yet! |
 |
| I have had many people tell me they love this Paderno slicer gadget...and I found it on an Amazon special for $21 recently (regularly about $30) so I picked one up to try for myself -- I will let you know what I think about it as soon as I try mine out! |
 |
| I found these recently at Bed Bath & Beyond -- they are only about 5 inches long -- I got them because they were cute (and useful)...and only about $2.00+ each |
Monday, October 14, 2013
Chicken Pot Pie w/ Cheddar Herb Crust
Yesterday, both of my sons came over and had dinner with us. I know they don't cook for themselves during the week so I always try and make a "homestyle/comfort food meal" when they come. I decided to make my Chicken Pot Pie w/ Cheddar Herb Crust. It literally "screams" comfort food. First of all, I need to go ahead and apologize to all the grandmothers of the world...because "this isn't your Grandma's chicken pot pie"...it's BETTER! Honestly, when I eat this meal, I forget all about being wheat free -- I truly do. It's just plain good, regardless of what you do or do not eat! It's also a great way to use up leftover cooked chicken, or even better, leftover Thanksgiving turkey (which is not that far away)! Last night I didn't have any leftover chicken to use, so I just started from scratch and cooked some boneless chicken breasts that I diced and quickly sauteed beforehand.
When I've made this pot pie in the past, it was always a bit of a challenge to transfer the rolled-out crust onto the top of my casserole dish without breaking it (and I know others experienced that, too). This time I rolled out my crust between 2 pieces of parchment paper to the shape of my casserole dish and then placed it on a cookie sheet and popped it into the freezer to chill for about 20 minutes (until firm but not frozen). Wow...I can't tell you HOW much better that worked in transferring the crust to the top of the casserole! As many of you know, I tend to be somewhat of a perfectionist (I'm working on that)...and I have to tell you, I was so tempted to make my crust look perfect...but I stopped myself. I decided that if the edges weren't perfect that it was okay; and that there was a word for that...it's called "rustic". So, I allowed my pot pie to have a rustic somewhat raggedy edged crust...and you know what??? It still looked beautiful and tasted just as good (and I only cringed a couple of times). LOL. Even more importantly, my boys didn't even notice! We enjoyed the pot pie last night, and there was enough left to have for dinner again this evening, too. It tasted just as good reheated! I snapped a few photos as well as the recipe below. Enjoy!
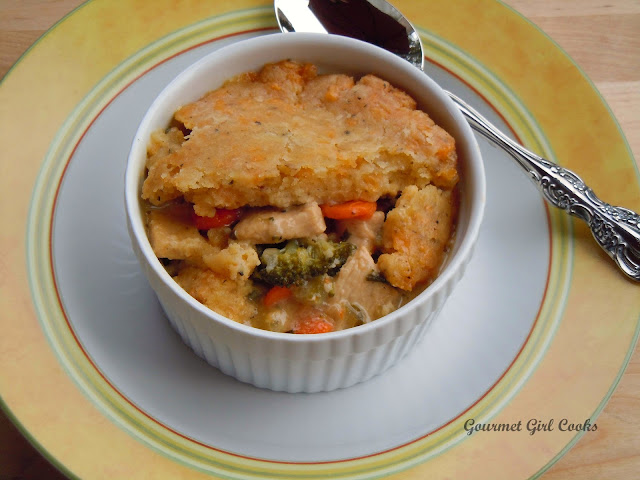
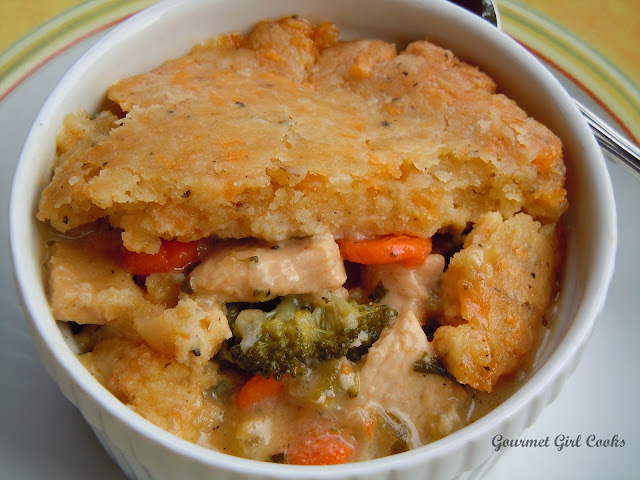
When I've made this pot pie in the past, it was always a bit of a challenge to transfer the rolled-out crust onto the top of my casserole dish without breaking it (and I know others experienced that, too). This time I rolled out my crust between 2 pieces of parchment paper to the shape of my casserole dish and then placed it on a cookie sheet and popped it into the freezer to chill for about 20 minutes (until firm but not frozen). Wow...I can't tell you HOW much better that worked in transferring the crust to the top of the casserole! As many of you know, I tend to be somewhat of a perfectionist (I'm working on that)...and I have to tell you, I was so tempted to make my crust look perfect...but I stopped myself. I decided that if the edges weren't perfect that it was okay; and that there was a word for that...it's called "rustic". So, I allowed my pot pie to have a rustic somewhat raggedy edged crust...and you know what??? It still looked beautiful and tasted just as good (and I only cringed a couple of times). LOL. Even more importantly, my boys didn't even notice! We enjoyed the pot pie last night, and there was enough left to have for dinner again this evening, too. It tasted just as good reheated! I snapped a few photos as well as the recipe below. Enjoy!


Sunday, October 13, 2013
Cinnamon Maple Donuts w/ Butter Pecan Frosting
Happy Sunday! This morning I decided to make donuts for the first time. I recently purchased a donut pan and wanted to give it a try. These are wheat-free, grain-free, and have no sugar added. I made Cinnamon Maple Donuts w/ Butter Pecan Frosting. I used Swerve confectioners style sweetener to make the donuts and frosting with. I also added a few drops of stevia to my frosting at the end to get just the right amount of sweetness without changing the light and fluffy texture (which might have occurred had I added more dry sweetener). It was a perfect consistency. Note that I added some vanilla whey protein powder to the donuts to help boost the protein a bit (and improve texture) since I was making these to eat as my breakfast, not just as a treat. Between the eggs, almond flour and whey protein powder, these were light, yet substantial donuts and the most amazing part is that no sugar or wheat was necessary to make these delicious cake style donuts. As I have mentioned before, I have been using Swerve for a year or more now and it is one of my favorite sweeteners to bake with because I enjoy both its taste and convenience of measuring cup for cup like sugar.I snapped a few photos for you to see below as well as the recipe. Enjoy!


Cinnamon Maple Donuts w/ Butter Pecan Frosting
Ingredients:
For the Donuts:
1-1/2 cups blanched almond flour
3/4 cup plus 2 tablespoons Swerve Confectioners Sweetener (or powdered erythritol)
1/4 cup vanilla whey protein powder (or use unflavored powder and add 1 teaspoon vanilla)
2 teaspoons baking powder
1/4 teaspoon sea salt
1 teaspoon ground cinnamon
3 large eggs
1/2 cup sour cream
1/4 cup plus 2 tablespoons "extra light" olive oil (not extra virgin olive oil)
2 teaspoons pure maple extract
1-1/2 teaspoons apple cider vinegar
For the Butter Pecan Frosting:
1/4 cup butter (4 tablespoons), softened
1/4 cup Swerve Confectioners Sweetener (or powdered erythritol)
1/4 cup heavy cream
1/2 teaspoon pure maple extract
1/8 teaspoon cinnamon
1/8 teaspoon sea salt
14 drops stevia extract
1/2 cup chopped pecans
Directions:
For the donuts, preheat oven to 350 degrees F. Lightly spray a 6-cavity donut mold pan with olive oil spray or coconut oil spray; set aside. In a large bowl, sift or whisk almond flour, Swerve Sweetener, protein powder, baking powder, salt and cinnamon (removing any lumps). In a separate bowl, whisk eggs and sour cream until smooth; add oil, maple extract and apple cider vinegar and whisk until smooth. Pour wet mixture into dry ingredients and mix well until smooth. Using a 1/4 cup measuring cup, scoop batter into well greased donut pan, filling almost to the top. Bake for approximately 12 minutes or until toothpick inserted in the center comes out clean. Let cool in pan for about 5 minutes; flip onto wire rack to cool completely. Makes approximately 15 donuts. Frost or glaze as desired.
For the frosting, in a medium bowl, cream softened butter and Swerve Sweetener until light and fluffy; beat in cream, maple extract, cinnamon, salt and stevia drops until well blended, light and fluffy. Lightly frost donuts and top with chopped pecans.
*Its best to frost donuts as they are used. Store any remaining frosting in the refrigerator.


Cinnamon Maple Donuts w/ Butter Pecan Frosting
Ingredients:
For the Donuts:
1-1/2 cups blanched almond flour
3/4 cup plus 2 tablespoons Swerve Confectioners Sweetener (or powdered erythritol)
1/4 cup vanilla whey protein powder (or use unflavored powder and add 1 teaspoon vanilla)
2 teaspoons baking powder
1/4 teaspoon sea salt
1 teaspoon ground cinnamon
3 large eggs
1/2 cup sour cream
1/4 cup plus 2 tablespoons "extra light" olive oil (not extra virgin olive oil)
2 teaspoons pure maple extract
1-1/2 teaspoons apple cider vinegar
For the Butter Pecan Frosting:
1/4 cup butter (4 tablespoons), softened
1/4 cup Swerve Confectioners Sweetener (or powdered erythritol)
1/4 cup heavy cream
1/2 teaspoon pure maple extract
1/8 teaspoon cinnamon
1/8 teaspoon sea salt
14 drops stevia extract
1/2 cup chopped pecans
Directions:
For the donuts, preheat oven to 350 degrees F. Lightly spray a 6-cavity donut mold pan with olive oil spray or coconut oil spray; set aside. In a large bowl, sift or whisk almond flour, Swerve Sweetener, protein powder, baking powder, salt and cinnamon (removing any lumps). In a separate bowl, whisk eggs and sour cream until smooth; add oil, maple extract and apple cider vinegar and whisk until smooth. Pour wet mixture into dry ingredients and mix well until smooth. Using a 1/4 cup measuring cup, scoop batter into well greased donut pan, filling almost to the top. Bake for approximately 12 minutes or until toothpick inserted in the center comes out clean. Let cool in pan for about 5 minutes; flip onto wire rack to cool completely. Makes approximately 15 donuts. Frost or glaze as desired.
For the frosting, in a medium bowl, cream softened butter and Swerve Sweetener until light and fluffy; beat in cream, maple extract, cinnamon, salt and stevia drops until well blended, light and fluffy. Lightly frost donuts and top with chopped pecans.
*Its best to frost donuts as they are used. Store any remaining frosting in the refrigerator.
Saturday, October 12, 2013
Stuffed Babybel Burgers
Today was a beautiful day here -- bright sunny and warm. We were busy all day long today and didn't get to our Costco run until late this afternoon. While browsing around Costco to check for anything new...I was browsing along their "wall of cheese", but didn't see anything that struck me...until my eye caught the little red mesh net bag of mini Babybel cheese wheels (a semi-soft French version of Dutch Edam cheese, each encased in a red wax coating). While they've always carried them, for some reason they caught my attention today. When I looked at the bag of them, I instantly envisioned them stuffed into burgers and grilled so they would get melty and soft when cut into. That little vision made me go ahead and grab a bag of them. Sometimes that is how a thought or idea comes to me -- I look at one thing and see something else! LOL Our dinner was so simple, and so delicious. I didn't want the burgers encasing those little Babybel cheese wheels to be plain, I wanted them to be tasty flavorful burgers. So, we stopped quickly at the grocery store on our way home and I ran in and picked up a few items and then got to work on my burgers as soon as we got home. I got ground sirloin to make them because I like its flavor for making burgers with. I picked up a 6-ounce bag of fresh baby spinach and quickly wilted half of it along with a sliced green onion and mixed it with the ground beef and added some seasonings and then shaped my burgers around the individual mini Babybel cheese wheels, sealing the meat carefully around the cheese so it wouldn't melt or ooze out as it cooked. They turned out so delicious and while I have put cheese inside burgers before, I had never used Babybel cheese, and found out that it doesn't liquify like other cheeses often do -- it got melty and soft but stayed thick and intact -- it was a perfect cheese to encase inside a burger. I sliced another little wheel of cheese in half and placed it on top of the burgers when I served them so it would soften and add a bit more cheese to the burgers, then topped them with diced mini San Marzano tomatoes. We had fresh roasted asparagus with our burgers -- it was a simple and delicious meal. I can't wait to make these burgers again! I snapped a few photos below as well as the simple recipe for the Stuffed Babybel Burgers. Enjoy!


Friday, October 11, 2013
Friday Night Pizza
This evening I was in the mood for pizza...Friday is always a good night for pizza to me! The only thing that I knew I wanted to put on top of it was the habanero smoked chicken sausages (by Aidells) that I used last night to make my "Pigs-in-Biscuit Blankies" with. I sliced them up and browned them and then tossed in some sliced orange bell pepper and then a little thinly sliced onion near the end. I made my favorite pizza crust (my Almond-Flax-Parmesan-Herb Crust) and then topped it with pizza sauce (by DelGrosso), freshly shredded mozzarella and then my sauteed sausage, peppers and onions and a bit of shredded Parmigiano Reggiano. When it came out of the oven, I topped it with freshly chopped Italian parsley and a few sliced cherry tomatoes -- I always like to add a few fresh uncooked herbs or ingredients after cooking to add that last blast of fresh flavor. I snapped a few photos for you to see below as well as the recipe for my favorite pizza crust. Enjoy!


Thursday, October 10, 2013
Total "In-Sausage-Sanity" -- We're Having Pigs-in-Biscuit Blankies
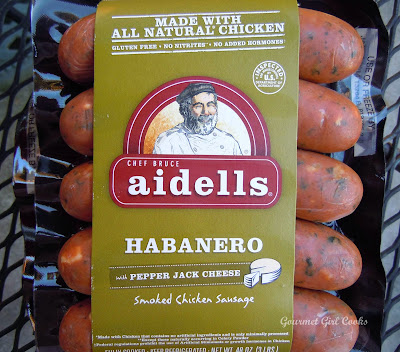
This evening I wanted to try the new sausages I picked up at Costco this past weekend..."Habanero w/ Pepper Jack Cheese Smoked Chicken Sausages" by Aidells. They are gluten-free, no MSG, no nitrites, and have no added hormones. I would never have purchased a sausage with habanero peppers in it because it is such a spicy variety of pepper (they happen to be my brother's favorite pepper...he eats them dried and flaked on EVERYTHING). When we were at Costco Sunday, they just happened to have the Aidells team there letting you try their different varieties...and I cautiously tasted this one fully expecting to regret it. Instead, I loved it. It wasn't crazy spicy at all and they had a wonderful flavor. So, I went ahead and picked up a package. I planned to wait until this weekend to use them at breakfast time...but decided to "start the weekend early" by making them for dinner tonight. You are never...EVER going to guess what silliness I embarked on tonight when putting dinner together. I had planned to either grill or saute the sausages and roast some brussels sprouts and maybe make some biscuits to go with them...and then, that crazy little light bulb went off in my head yet AGAIN! I prepped my sprouts and began sauteing the sausages in a skillet with a tiny splash of olive oil. Then, as I mixed my Easy Black Pepper Cheddar Biscuit dough together...I started wondering if I could somehow use my biscuits as a "wrap of sorts"...and then it hit me like a ton of...pigs-in-blankets! What the heck...why not make wheat and grain-free Pigs-in-Biscuit Blankies!!! LOL So, I did an experiment using only "my" sausage link. Just in case it turned out awful, I didn't want to waste an entire batch of biscuit dough...not with the weekend only days away and 2 nice weekend breakfasts to look forward to!
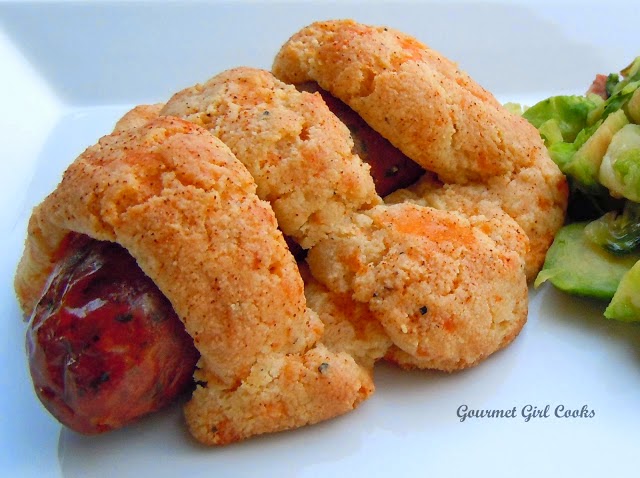
So, I found myself just standing there in my kitchen...staring at my sausage link, wondering how in the heck I was going to wrap that biscuit dough around that dog and bake it without making a complete and utter mess. I knew that, ideally, I should be chilling my biscuit dough first, but I didn't feel like waiting around for that...I wanted a Pig-in-Biscuit Blankie NOW! So, I grabbed 3 small balls of soft dough and rolled each one between the palms of my hands, making "biscuit rope". I just wrapped 3 ropes around my sausage link (kind of like a barber pole) and put it on a cookie sheet lined with parchment paper and baked it at 350 degrees F for about 13 minutes, removed it and brushed it with some melted butter spiked with a dash of ground chipotle powder and popped it back in the oven for another 3 or 4 minutes until golden brown. My biscuit ropes swelled and puffed up as they baked around the sausage...but looked gorgeous to me (in a "not the most attractive sort of way"). I will admit...I was standing there by myself in the kitchen, smiling at my Pig-in-Biscuit Blankie, much the way a proud Mommy smiles at her precious baby...LOL.
When hubby called to see if I wanted him to pick up anything at the store on his way home...I blurted into the phone..."You are NEVER going to believe this...it's complete "In-Sausage-Sanity" -- I made Pigs-in-Biscuit Blankies!" I don't know why or where that word came from -- but it's what came out of my mouth at that moment. Alright, enough chatter - I decided to make my brussels sprouts on the stove instead of the oven since it was tied up (I made a more attractive one for hubby after he got home because I chilled the dough before making his and made the biscuit ropes thinner and prettier since I had all that experience under my belt from making 1 of them already! ;-) I didn't take a picture of his -- just mine before I ate it -- I couldn't wait for his to finish cooking; the suspense was getting to me! The sprouts turned out delicious, too. I sliced my sprouts about 1/4" thick and put them in a glass covered casserole with 1 tablespoon of water and microwaved for 5 minutes to steam them and soften a bit. I then moved them to a skillet with some olive oil and sauteed for about 5 minutes and then added some butter and diced sauteed sausage. We had Pigs-in-Biscuit Blankies with Brussels Sprouts & Sausage for dinner -- I believe that qualifies as total "In-Sausage-Sanity"! I snapped a few photos of my silly dinner below as well as my biscuit recipe in case you'd like to experience "In-Sausage-Sanity" for yourself -- oh, and make it easier on yourself and chill the dough a bit first -- it makes for better "biscuit ropes" to wrap around your sausages or dogs. These would be great wrapped around a nice Applegate Grass-fed Beef Hot Dog, too! Enjoy!


Easy Cheddar Black Pepper Biscuits
Ingredients:
2 cups blanched almond flour
3 tablespoons "cold" butter, diced
1 egg (or 1/4 cup Egg Beaters)
1 cup sharp shredded cheddar cheese, divided
1/4 to 1/2 teaspoon salt, or to taste
1/2 - 1 teaspoon freshly ground black pepper, or to taste
2 teaspoons baking powder (aluminum free)
1/2 cup heavy cream
Directions:
Preheat oven to 350 degrees F. Lightly grease a baking pan or line with non-stick foil or parchment paper.
In a medium bowl, add almond flour, butter, egg, 1/2 cup of cheddar cheese, salt, black pepper, baking powder; cut in with a pastry cutter/dough blender until crumbly and all flour is slightly moistened and cheese is pulverized into the mixture. Stir in cream and remaining 1/2 cup of shredded cheddar cheese; mix in lightly. Divide and roll dough into 10 to 12 balls (I make 10) and place on a lined cookie sheet; do not flatten dough balls (this will result in a thicker biscuit). Bake at 350 degrees F for approximately 18-20 minutes or until light golden brown; be careful not to overcook. Remove from oven; brush tops with melted butter, if desired.
So, I found myself just standing there in my kitchen...staring at my sausage link, wondering how in the heck I was going to wrap that biscuit dough around that dog and bake it without making a complete and utter mess. I knew that, ideally, I should be chilling my biscuit dough first, but I didn't feel like waiting around for that...I wanted a Pig-in-Biscuit Blankie NOW! So, I grabbed 3 small balls of soft dough and rolled each one between the palms of my hands, making "biscuit rope". I just wrapped 3 ropes around my sausage link (kind of like a barber pole) and put it on a cookie sheet lined with parchment paper and baked it at 350 degrees F for about 13 minutes, removed it and brushed it with some melted butter spiked with a dash of ground chipotle powder and popped it back in the oven for another 3 or 4 minutes until golden brown. My biscuit ropes swelled and puffed up as they baked around the sausage...but looked gorgeous to me (in a "not the most attractive sort of way"). I will admit...I was standing there by myself in the kitchen, smiling at my Pig-in-Biscuit Blankie, much the way a proud Mommy smiles at her precious baby...LOL.
When hubby called to see if I wanted him to pick up anything at the store on his way home...I blurted into the phone..."You are NEVER going to believe this...it's complete "In-Sausage-Sanity" -- I made Pigs-in-Biscuit Blankies!" I don't know why or where that word came from -- but it's what came out of my mouth at that moment. Alright, enough chatter - I decided to make my brussels sprouts on the stove instead of the oven since it was tied up (I made a more attractive one for hubby after he got home because I chilled the dough before making his and made the biscuit ropes thinner and prettier since I had all that experience under my belt from making 1 of them already! ;-) I didn't take a picture of his -- just mine before I ate it -- I couldn't wait for his to finish cooking; the suspense was getting to me! The sprouts turned out delicious, too. I sliced my sprouts about 1/4" thick and put them in a glass covered casserole with 1 tablespoon of water and microwaved for 5 minutes to steam them and soften a bit. I then moved them to a skillet with some olive oil and sauteed for about 5 minutes and then added some butter and diced sauteed sausage. We had Pigs-in-Biscuit Blankies with Brussels Sprouts & Sausage for dinner -- I believe that qualifies as total "In-Sausage-Sanity"! I snapped a few photos of my silly dinner below as well as my biscuit recipe in case you'd like to experience "In-Sausage-Sanity" for yourself -- oh, and make it easier on yourself and chill the dough a bit first -- it makes for better "biscuit ropes" to wrap around your sausages or dogs. These would be great wrapped around a nice Applegate Grass-fed Beef Hot Dog, too! Enjoy!

Easy Cheddar Black Pepper Biscuits
Ingredients:
2 cups blanched almond flour
3 tablespoons "cold" butter, diced
1 egg (or 1/4 cup Egg Beaters)
1 cup sharp shredded cheddar cheese, divided
1/4 to 1/2 teaspoon salt, or to taste
1/2 - 1 teaspoon freshly ground black pepper, or to taste
2 teaspoons baking powder (aluminum free)
1/2 cup heavy cream
Directions:
Preheat oven to 350 degrees F. Lightly grease a baking pan or line with non-stick foil or parchment paper.
In a medium bowl, add almond flour, butter, egg, 1/2 cup of cheddar cheese, salt, black pepper, baking powder; cut in with a pastry cutter/dough blender until crumbly and all flour is slightly moistened and cheese is pulverized into the mixture. Stir in cream and remaining 1/2 cup of shredded cheddar cheese; mix in lightly. Divide and roll dough into 10 to 12 balls (I make 10) and place on a lined cookie sheet; do not flatten dough balls (this will result in a thicker biscuit). Bake at 350 degrees F for approximately 18-20 minutes or until light golden brown; be careful not to overcook. Remove from oven; brush tops with melted butter, if desired.
Wednesday, October 9, 2013
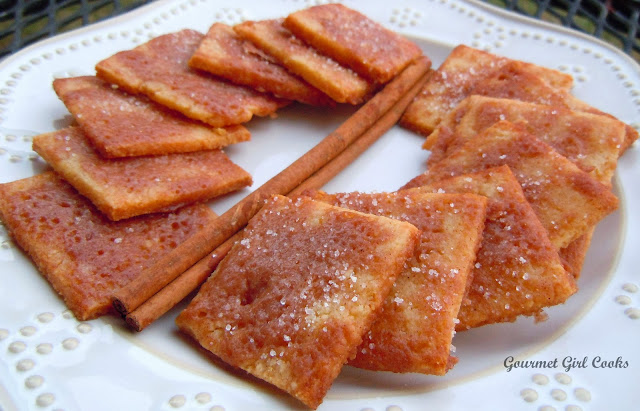
Cinnamony Pie Crust Squares
Since I had plenty of "Stuffed Eggplant Florentine" left from last night, I didn't need to cook dinner this evening. Instead, I tried to help recreate an old memory for one of my special followers, Elizabeth (a true WB cheerleader). When I recently posted one of my test creations of "Churro Chips" (still under construction)...she mentioned that when she saw the picture of them, they reminded her of the delicious leftover pie scraps her mother would roll in cinnamon and sugar and bake into delicious treats. Until she reminded me of those, I had forgotten all about those not-too-sweet little goodies made with leftover pie dough. While the "chip" recipe I'm working on has the same flavors...it doesn't have the texture of pie crust...so there was only one way, as I saw it, to make something close...and that was to start by making PIE CRUST! So, this evening, Cinnamony Pie Crust Squares were born! They don't have many ingredients and they don't take long to make...as a matter of fact, you could make the dough ahead of time or days beforehand and refrigerate it and then simply take it out of the fridge and roll it out and make them quickly if you wanted. The full recipe makes about 4 dozen little 1-1/2" squares. If you want to make a half-batch first to see if you like them, all the ingredients can be halved easily, except for the egg...in which case you can just use 1/8 cup of egg substitute (like Egg Beaters) to equal 1/2 of an egg. Since these cookies are made with pie crust, they need to be rolled out between sheets of parchment paper...and while you could cut them into cute little shapes with cookie cutters if you wanted to, I tried to keep these more rustic and reminiscent of a simple cookie made with "scraps" so I just used my pizza wheel cutter to cut them into little squares. I rolled the dough to about 1/4-inch thick so they would be "crust-like" as they baked. If you want them more dense and less crisp, just roll them a bit thicker -- if you want them more crisp, bake them a bit longer. I hope you enjoy these simple little not too sweet "cinnamon-sugar" treats. These are for you, Elizabeth -- "almost as good as Mom's"...but I'm not fooling myself, because I know nothing is ever quite as good as when "Mom makes it." Enjoy! :-)

Tuesday, October 8, 2013
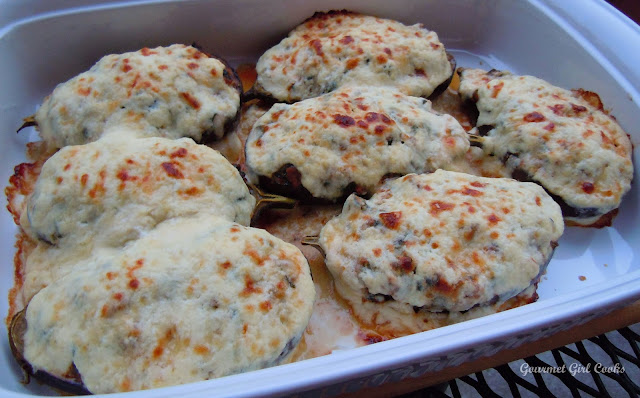
Stuffed Eggplant Florentine
This evening I decided to cook the small eggplants and fresh spinach that I picked up at Costco this weekend. I cut them in half lengthwise and roasted them and scooped out the flesh. I prepared a beef, spinach, cheese, onion and garlic filling to stuff them with and then made a ricotta topping to spread on top before baking. They turned out really good. I used 4 small eggplants...and if you are wondering why, if I cut 4 of them in half, there are only 7 "boats in the pictures"? Well...that's because I accidentally ripped open one of the little boats -- beyond repair! LOL I served them with a dollop of additional sauce. They turned out great and would also be great with a different kind of meat such as sausage, turkey or chicken, too. I snapped a few photos for you to see below as well as the recipe. Enjoy!

 |
| 4 little beauties... |
 |
| Stuffed and waiting to be topped... |
 |
| Right before going into the oven... |
 |
| After coming out of the oven... |
Monday, October 7, 2013
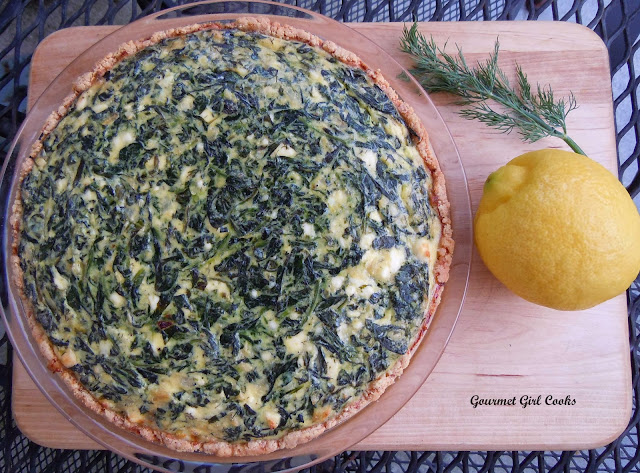
Greek Style Spinach-Feta Pie & My Snack Recipe in Progress
Today was a gorgeous day here -- our high was in the low 70s and it was breezy and pleasant out after pounding rains last night. This evening I made my Greek Style Spinach-Feta Pie for dinner -- it is one of my favorites and reminds me of the spanakopita I used to eat wrapped in crisp phyllo pastry dough. I honestly don't miss it any more because of this recipe. I have also been tinkering with another snack recipe but don't have it exactly where I want it yet...and it's still a work in progress. I'll show you a sneak peek below of my "not quite there yet" results. I have several other ideas rolling around in my head (which can be a bit scary at times)...LOL. Below are a couple photos of our dinner and my "recipe in progress". I've included the recipe for the spinach-feta pie below as well. Enjoy!

 |
| Churros Chips! |
Sunday, October 6, 2013
Super Simple "Sort of" Chicken Tacos
This weekend was a busy one -- I've been working on a number of different projects around the house as well as trying to do some behind the scenes work and house cleaning on my blog (when the truth is my house probably needs it more than my blog does...LOL). I didn't even get around to my Costco run until late this afternoon...so rather than stress about what I was going to make for dinner, I kept it super simple. My youngest son came for dinner tonight but said he wasn't going to stay long...and he wanted to try my lasagna that I had made Friday night. I reheated a piece for him (he had already read my blog post that night about wanting to secretly spring it on them without telling them...LOL). Most of the time they don't read my blog posts -- they see the pictures in their Facebook feeds...what are the odds that he read THAT post??? Well, even knowing that they weren't regular lasagna noodles, he still liked it -- and he is the one that isn't crazy about beef. His only remark was..."I can't tell the difference" (between this and regular noodles) and "there sure is a lot of beef in here"...LOL. But, he ate every single speck of it! Hubby had the lasagna as well and said it was just as good reheated. While I was at Costco late this afternoon...I picked up an "emergency rotisserie chicken"...and it was an emergency chicken in the fact that I wanted to have it as a back-up plan "just in case". I love having my kids over and cooking for them...but they are notorious for waiting to let me know they are coming until 5:00 or 6:00 in the evening when they are already on their way! I guess they assume that my favorite kitchen gadget is my "magic wand"! LOL You have no idea how many YEARS I continued cooking for a family of 5 when there were only 2 of us here much of the time (because they were either away at college or living on their own). I continued cooking for a family of 5 up until the last year or so "just in case" one of them came by. Anyway, I pulled some of the chicken breast meat off of the "emergency rotisserie chicken" and placed it in my little artisan romaine lettuce leaves, topped it with some fresh salsa, shredded cheddar cheese, tomatoes and then added a little sour cream and avocado as I ate them. While these weren't "official tacos" in that I didn't simmer the meat in taco seasoning...they were super simple and quick to make and I didn't freak myself out trying to pretend I had time to make a meal that I didn't have (since youngest son arrived shortly after I returned from Costco and had to leave within a couple of hours so he could rush back home to watch a Braves game)! I snapped a quick photo of my super simple meal below. Enjoy!


Friday, October 4, 2013
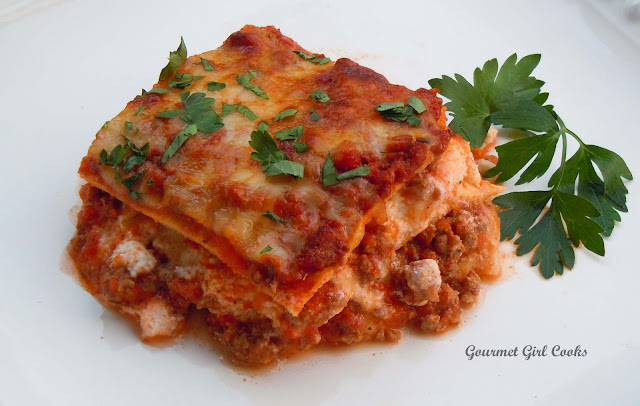
Lasagna w/ Grain-free "Noodles"
This evening I tried an experiment using my grain-free tortillas to make "noodles" to make lasagna with. In case you haven't read my blog this week, I will give you a recap on my "tortilla extravaganza" by beginning with Tuesday when I created grain-free tortillas to wrap around my Grilled Beef Fajitas w/ Chipotle Lime Marinade (they worked fabulously). My tortilla extravaganza continued on into Wednesday when I tested the tortillas as "noodles" in my Mexican Style Beef & Tortilla Noodle Soup (they turned out awesome as noodles for soup). If that wasn't enough, my tortilla streak continued on into Thursday when I tested them as oven baked NOritos, a grain-free snack chip modeled after Doritos (a quick and easy healthy chip substitution). Well, tonight I capped off my tortilla extravaganza with Lasagna w/ Grain-free "Noodles"...which used the tortillas as lasagna noodles instead of using the typical eggplant or zucchini substitution for noodles (it turned out great).
Since I wasn't sure how they would work being baked in a lasagna casserole, I made a very small "test lasagna" using a 1 quart pyrex baking dish instead of making a huge regular sized pan of lasagna. I made a thick meaty sauce (using DelGrosso pasta sauce). It's important when making "alternative lasagna" without wheat noodles to minimize liquids as much as possible. Veggie noodles and these tortilla noodles don't soak up juices the way traditional wheat noodles do. The difference between using these tortilla noodles and veggie noodles is the tortilla noodles don't ADD juices to your lasagna as it bakes (which often happens when using zucchini, eggplant, etc.). So whatever liquids you add (sauce) are what liquids you will have in your end product. When you use veggies as lasagna noodles, you typically end up with additional liquid that cooks out of the veggies as the lasagna bakes, which sometimes make it watery.
The tortilla lasagna noodles held up beautifully -- I used 3 layers of "noodles" In addition to the meat sauce layers, I added a layer of fresh mozzarella, ricotta cheese and topped the final layer with meat sauce, shredded regular mozzarella and Parmigiano Reggiano. I did not cover the lasagna as it baked so it would not get soggy. I baked it for 40 minutes at 350 degrees F. The only "issue" I encountered was that I filled my little casserole pan too high and it bubbled over a little bit into my oven (but I frequently had that same issue when I made traditional lasagna in the past until I bought a super deep lasagna pan). The little casserole dish I used really isn't for lasagna -- but it worked perfectly for my "test lasagna" to see how the "noodles" would hold up. The final test came from my husband (who still eats wheat)...he said it had more of a "pasta-like" mouth feel and thought it tasted good..just like "regular lasagna". These noodles are "lighter" and not as dense as wheat noodles would be...and you don't walk away from the table feeling like you want to slump over and not eat again for 2 weeks! ;-) The lasagna was a success! I will try them next time on the rest of my wheat-eating family without telling them beforehand and see if they notice -- I'm guessing they won't! I snapped a few photos for you to see below. Enjoy!
P.S. -- the only modification I made to my "grain-free tortilla recipe" was omit the ground chipotle chile and increase the Parmesan by 1 teaspoon (the revised recipe for lasagna noodle tortillas is below).
Since I wasn't sure how they would work being baked in a lasagna casserole, I made a very small "test lasagna" using a 1 quart pyrex baking dish instead of making a huge regular sized pan of lasagna. I made a thick meaty sauce (using DelGrosso pasta sauce). It's important when making "alternative lasagna" without wheat noodles to minimize liquids as much as possible. Veggie noodles and these tortilla noodles don't soak up juices the way traditional wheat noodles do. The difference between using these tortilla noodles and veggie noodles is the tortilla noodles don't ADD juices to your lasagna as it bakes (which often happens when using zucchini, eggplant, etc.). So whatever liquids you add (sauce) are what liquids you will have in your end product. When you use veggies as lasagna noodles, you typically end up with additional liquid that cooks out of the veggies as the lasagna bakes, which sometimes make it watery.
The tortilla lasagna noodles held up beautifully -- I used 3 layers of "noodles" In addition to the meat sauce layers, I added a layer of fresh mozzarella, ricotta cheese and topped the final layer with meat sauce, shredded regular mozzarella and Parmigiano Reggiano. I did not cover the lasagna as it baked so it would not get soggy. I baked it for 40 minutes at 350 degrees F. The only "issue" I encountered was that I filled my little casserole pan too high and it bubbled over a little bit into my oven (but I frequently had that same issue when I made traditional lasagna in the past until I bought a super deep lasagna pan). The little casserole dish I used really isn't for lasagna -- but it worked perfectly for my "test lasagna" to see how the "noodles" would hold up. The final test came from my husband (who still eats wheat)...he said it had more of a "pasta-like" mouth feel and thought it tasted good..just like "regular lasagna". These noodles are "lighter" and not as dense as wheat noodles would be...and you don't walk away from the table feeling like you want to slump over and not eat again for 2 weeks! ;-) The lasagna was a success! I will try them next time on the rest of my wheat-eating family without telling them beforehand and see if they notice -- I'm guessing they won't! I snapped a few photos for you to see below. Enjoy!
P.S. -- the only modification I made to my "grain-free tortilla recipe" was omit the ground chipotle chile and increase the Parmesan by 1 teaspoon (the revised recipe for lasagna noodle tortillas is below).
 |
| Can you tell the difference? |

Thursday, October 3, 2013
NOritos Night...the Healthiest Non-junk Food You Will Ever Munch
Today was a semi-crazy busy day for me most of the day. When I got home, I wanted to unwind a bit...and how do I unwind you ask??? Well, by creating some healthy non-junk food, of course (as opposed to unhealthy junk food). Hubby had a conference to attend this evening and won't be home until late...which leaves me plenty of time to focus on playing around in the kitchen rather than preparing a meal. I had 1 leftover tortilla in the fridge that I took out and just kept staring at...LOL. And all of a sudden I had a vision of what was to come...and my vision was pretty awesome! I began looking at the tortilla and thinking....hmmm, Doritos? And then I thought....nah, NOritos...as in "no these are not Doritos"....they just look and taste a lot like them! They were so simple to make that they might actually make you cry a little (as in tears of joy, of course)! ;-)
I cut the tortilla in half (making 2 semi-circles). I then cut each half into 6 pie-shaped wedges and placed them on a parchment covered baking sheet. I preheated my oven to 350 degrees F and then tried to recreate what I thought might taste "Dorito-ish". I just sort of winged it -- I wanted them to be kinda spicy and cheesy since that was the kind I ate in my previous wheat-riddled life. Into a small bowl, I placed a rounded and slightly heaping tablespoon of finely grated Parmesan cheese (powdery style), a generous dash of ground chipotle chile powder (you could substitute regular chili powder, ancho chile powder, or your favorite taco seasoning), a dash of onion powder, a dash of garlic powder, a little pinch of salt and then mixed it all together. I sprayed the top of each little tortilla triangle lightly with olive oil spray to help the seasoning stick and the chips crisp as they baked. I sprinkled my seasoning combo evenly on top of my "NOritos to be"...and then added a light dusting of paprika to give them the characteristic redd-ish orange-ish glow we are so familiar with seeing (use as much or as little seasoning as you prefer). I popped them into a 350 degree oven and baked for 10 minutes; opened the door and checked their crispness and turned the oven off and kept them in the hot oven another 5 minutes to dry out a bit more (do not burn). In less than 15 minutes I was having crispy healthy non-junky baked NOritos chips...instead of unhealthy junky baked Doritos chips. Mine were wheat-free, grain-free and actually provided some protein to boot! One 10" tortilla made 12 NOritos -- that's 1 dozen wedges of crunchy munchy goodness to snack on! I snapped a few photos for you to see below and will re-post my tortilla recipe below that I used to make this super simple "munchy-curing" snack! Enjoy!


I cut the tortilla in half (making 2 semi-circles). I then cut each half into 6 pie-shaped wedges and placed them on a parchment covered baking sheet. I preheated my oven to 350 degrees F and then tried to recreate what I thought might taste "Dorito-ish". I just sort of winged it -- I wanted them to be kinda spicy and cheesy since that was the kind I ate in my previous wheat-riddled life. Into a small bowl, I placed a rounded and slightly heaping tablespoon of finely grated Parmesan cheese (powdery style), a generous dash of ground chipotle chile powder (you could substitute regular chili powder, ancho chile powder, or your favorite taco seasoning), a dash of onion powder, a dash of garlic powder, a little pinch of salt and then mixed it all together. I sprayed the top of each little tortilla triangle lightly with olive oil spray to help the seasoning stick and the chips crisp as they baked. I sprinkled my seasoning combo evenly on top of my "NOritos to be"...and then added a light dusting of paprika to give them the characteristic redd-ish orange-ish glow we are so familiar with seeing (use as much or as little seasoning as you prefer). I popped them into a 350 degree oven and baked for 10 minutes; opened the door and checked their crispness and turned the oven off and kept them in the hot oven another 5 minutes to dry out a bit more (do not burn). In less than 15 minutes I was having crispy healthy non-junky baked NOritos chips...instead of unhealthy junky baked Doritos chips. Mine were wheat-free, grain-free and actually provided some protein to boot! One 10" tortilla made 12 NOritos -- that's 1 dozen wedges of crunchy munchy goodness to snack on! I snapped a few photos for you to see below and will re-post my tortilla recipe below that I used to make this super simple "munchy-curing" snack! Enjoy!


 |
| These were light and crispy "munchie-curing" heaven! |
Wednesday, October 2, 2013
Mexican Style Beef & Tortilla Noodle Soup
Tonight's meal can be summed up in 3 words...Best - Soup - Ever! This evening I was in the mood for soup. As I drove home from work, I thought about what kind of soup I could make that was delicious and didn't take a lot of time to prepare...and the light bulb went off! I had plenty of leftover cooked beef fajita meat and cooked peppers in the fridge -- so I made a quick stop at the grocery store on my way home and picked up some low sodium beef stock and canned fire roasted tomatoes just in case I didn't have any in my pantry (which, of course, I did). When I got home, I diced up the leftover cooked beef and peppers and from there, my super easy soup recipe took off. It was so quick and simple, yet so flavorful. I decided to stick with the "Mexican theme" of the star ingredients (fajita beef and peppers) and made my soup base a combination of beef broth and tomatoes that I pureed with my immersion blender stick to thicken the soup and give it some body -- it worked like a dream. As I was dicing up the beef and peppers, I was thinking about how nice it would be to have noodles in my soup. While I've made zucchini noodles to go in my soup in the past...tonight I wanted "starchy-feeling" noodles in my soup. Then...light bulb #2 went off! I had one grain-free tortilla left in the fridge from last night's fajitas. I went ahead and made one more tortilla to use as part of my noodles experiment (they only take a few minutes to make). I sliced my tortilla up into "noodle strips" and tossed just a few of the "test strips" into my simmering soup to see how they would hold up. I wondered if they would fall apart or bloat and get soggy and gross, so I waited to find out before adding all of them. After 10 minutes of simmering away in the soup I tasted them and they were perfect....and, well..."noodley"!!! I was SO excited and immediately cut up the other tortilla too and added my tortilla noodles (made from 2 tortillas) to the pot of soup. They held up well and actually had a noodle-like texture as they cooked in the soup. Oh the visions dancing around in my head for this fall and winter -- chicken noodle soup, beef and noodle soup, vegetable noodle soup...oodles of noodles soup...you get the picture! This soup is a great way to use leftover pot roast or any type of cooked beef and would also be great with leftover cooked chicken as well (just substitute chicken broth for the beef broth) and it would be good without the noodles as well. I snapped a few photos below along with the super simple recipe. Enjoy!


Tuesday, October 1, 2013
Grilled Beef Fajitas w/ Chipotle Lime Marinade
This evening I made Grilled Beef Fajitas for dinner. While shopping at Costco this weekend, I picked up a package of "inside skirt steaks". While I know what skirt steak is...I wasn't sure about the "inside" part, so I looked it up this evening and this is what I found: "Steak from the bottom sirloin or flank which looks like outside skirt steak but is more tender." I have 2 words for how this meal turned out..."absolutely delicious"! The marinade was super simple to make and I just put it together as I went along by mixing together spices that I thought would taste good and complement the beef. I prepared the marinade for the steak last night after dinner so it could marinate all night last night and all day long today -- about 24 hours. It was a particularly flavorful cut of beef -- the trick is cutting it in thin slices against the grain. I also quickly sauteed some sliced red and yellow bell pepper and thinly sliced onion to put on our fajitas. I have made grain free "tortillas" from others' recipes before -- but I just can't seem to get past the flavor or hint of coconut in my savory dishes for some reason -- as much as I wish I could. So, while I was totally prepared to enjoy my fajita "tortilla-less", I decided to fiddle around with making a tortilla for me to hold my fajitas (hubby had a regular one with his fajita). It was so easy peasy it wasn't funny and it held together perfectly throughout my entire overstuffed fajita-eating extravaganza! I made 2 different tortillas -- one thinner crepe-like version and another sturdier version (they each took about 2 minutes to make). I decided to use the sturdier version to hold the pile of meat and veggies I was planning to put onto and into my tortilla. I am posting my recipe for 1 individual tortilla below (as well as the amounts to use to make 4 of them). One last thing...while I almost always use organic cage free eggs...when I "fiddle with my recipe creations"...I don't like to waste my good eggs -- instead, I use Egg Beaters. This recipe was made using them (I wanted egg whites, not yolks for my tortillas). Just in case they turned out cruddy...I didn't want to throw out "good eggs"...LOL. They turned out great using them and I wouldn't hesitate using them if you have them on hand. The best part for me was NO coconut flavor and they didn't taste eggy either which I didn't want with my fajitas. They would also make great sandwich wraps/holders for breakfast, lunch or dinner. I snapped a few photos for you to see below as well as the recipe. Enjoy!
 |
| Before the "fold-over"... |
Subscribe to:
Posts (Atom)