Tuesday, September 11, 2012

Pumpkin-Walnut Spice Muffin w/ Cream Cheese Frosting

This evening we had a quick and easy dinner since we just had the leftover pizza from last night.  However, with the cooler weather, I had the "itch" to bake something "fall weather appropriate"...if there is such a thing!  While searching online for something else, I accidentally stumbled on a recipe for pumpkin muffins a few days ago on another blog called "Healthy Living How To".  The muffin recipe looked good and they served it with pumpkin butter...but I thought a cinnamon cream cheese "frosting" would be something I'd prefer and it would be easy to experiment with on such a small scale.  Basically this muffin is a variation of a "One Minute Muffin", also called Muffin in a Minute (MIM).  This muffin is made and cooked in a 4-1/2" ramekin or bowl (I used a Corning grab-it bowl...remember those?) rather than a mug and it takes 2 minutes to cook in the microwave (mine actually took 2-1/2 minutes).  I want to tell you that it was really good and really easy to make.  I made a few minor tweaks but essentially followed the recipe.  Below are a few pictures as well as the recipe.  It is definitely worth trying if you like pumpkin...and the best part about it is that since you are only making one portion...if you don't like it, it isn't a big deal and you didn't waste a lot of ingredients...which is a good thing!  Enjoy!


Pumpkin-Walnut Spice Muffin w/ Cream Cheese Frosting

INGREDIENTS:

2 tablespoons coconut flour
2 tablespoons ground golden flaxseed meal
Pinch Celtic sea salt
1/2 teaspoon ground cinnamon
1/2 teaspoon baking powder (aluminum-free & gluten-free)
1 large egg (or 1/4 cup Egg Beaters)
1/2 tablespoon unsalted butter
1 tablespoon water
2 tablespoons walnuts, chopped (optional)
1/4 cup pumpkin puree (Canned or Fresh)
20-30 drops liquid stevia, or to taste (I used 30 drops) or 5-6 teaspoons Swerve sweetener

DIRECTIONS:

1. Melt butter in a 4 1/2 inch ramekin or bowl.
2. Whisk egg with water, pumpkin, stevia or Swerve and melted butter in ramekin or bowl.
3. Add coconut flour, flaxseed meal, sea salt, cinnamon and walnuts and mix well.
4. Sprinkle with baking powder and mix one more time.
5. Spread/smooth out evenly in ramekin and microwave for 2 minutes (mine took 2-1/2 minutes).
6. Remove from microwave with dish towel and invert on cooling rack (I inverted mine on to a plate).
7. Top or frost with cream cheese frosting, if desired.
  
~~~~~~~~~~~~~~~~~~~~~~~~~~~~~~~~~~

Cream Cheese Frosting (for one muffin)

Ingredients:


2 tablespoons cream cheese (brick style, not whipped)
2 tablespoons half-n-half or cream (add gradually to desired consistency)
1/2 - 1 teaspoon Truvia or 2 teaspoons Swerve confectioners sweetener
Dash of cinnamon
Splash of vanilla extract (about 1/4 teaspoon)

Directions:

In a small bowl, whip cream cheese until softened and fluffy with a small spoon; add Truvia or sweetener of choice (I used a little over 1/2 teaspoon Truvia), vanilla, cinnamon and add half-n-half a little at a time, whipping/beating it in until you get the desired consistency (I used almost 2 tablespoons).  Spread or frost on cooled (or almost cooled) muffin.  Sprinkle with “cinnamon sugar” (1/3 teaspoon Truvia mixed with a few shakes of cinnamon) and top with a few chopped walnut pieces, if desired.  Enjoy!


Monday, September 10, 2012

Caprese Pizza (Low Carb)

This evening I decided to make my Low Carb Pizza recipe (made with flax meal); but instead of making the full recipe, I made 1/3 of it "for one".  It is still more pizza than I can eat at one sitting, but I get to have leftovers for lunch for a day or two...which is a good thing.  I reduced my recipe to make it on a smaller scale (it makes one 10" pizza).  I decided that last night's mini Caprese salads were so good that I would stick with that theme for my pizza tonight.  So, I made myself a "Mini Caprese Pizza".  I put a very thin layer of sauce on my baked crust, added fresh diced cherry tomatoes, diced fresh mozzarella and then drizzled a little extra virgin olive oil on top and popped it back in the oven to heat up and melt the cheese for about 6-7 minutes.  When it came out of the oven, I sprinkled freshly torn basil on top....and "Voila"...Caprese Pizza!  Check out a few photos as well as the reduced size crust recipe below.  Enjoy!

Voila!
BOOM!
BOOM! BOOM!

Low Carb Pizza (for one)

Ingredients:

1/2 cup flax seed meal (I used organic golden flax which has a milder taste)
2/3 teaspoon baking powder (aluminum free)
1/2 teaspoon dried oregano (or Italian seasoning)
Pinch of salt, more or less to taste
2 tablespoons Parmesan cheese, shredded
1 egg (or 1/4 cup egg substitute such as Egg Beaters)
1 tablespoon olive oil
2 tablespoons PLUS 2 teaspoons water

Directions:

Preheat oven to 425 degrees.  Mix dry ingredients together; add wet ingredients and mix well.
Let the dough sit for about 5 minutes to thicken. Spread dough on a lightly oiled large round pizza pan or on a cookie sheet with greased parchment paper (I used Reynolds non-stick foil, lightly brushed with olive oil and pressed the dough out with a rubber spatula so it wouldn't stick).  Bake for 15-20 minutes or until cooked through (check it after 15 minutes and take out if it looks and feels done).  Add sauce, cheese, pre-cooked toppings and place back into the oven for 5-10 minutes to melt the cheese.  If desired, run under the broiler for a few minutes to lightly brown the toppings and cheese (be careful not to burn it).

Here is a link to the original crust recipe -- it makes either two 14" pizzas or one huge/large cookie sheet sized crust.  Just press the dough out to your desired thickness.

Low Carb Pizza


Sunday, September 9, 2012

Sunday Night Steak Dinner...and "Mini Caprese Salads"

It was a busy Sunday...we ran lots of errands today.  Both boys came over for dinner this evening so I decided to grill steaks since it was such a beautiful day outside -- it was 59 degrees this morning!  We had grilled filet mignon with sliced mushrooms, steamed fresh broccoli and mini Caprese salads.  Hubby and the boys also had baked potatoes with their meals too.  I decided rather than make the regular typical Caprese salad which is sliced tomatoes, sliced fresh mozzarella, fresh basil leaves drizzled with olive oil (usually layered overlapping on a plate)...that I'd make everyone their own mini versions.  They turned out really good and I actually prefer serving and eating them that way.  I simply quartered ripe cherry tomatoes, diced fresh mozzarella and tore fresh basil leaves into tiny little pieces and then drizzled them with extra virgin olive oil and some freshly cracked black pepper and served them in little individual custard cups .  To give the salads a little more pizzazz, I marinated the tomatoes in some olive oil and Pomegranate vinegar for an hour or so before assembling the mini Caprese salads.  It was a simple, fresh and delicious dinner.  I snapped a few pics below.  Enjoy!

Cute little mini Caprese salads.
Voila!
BOOM!

White Chicken Enchilada Casserole (w/ Coconut Flour Tortillas)

Happy Sunday!  Yesterday, I was quite ambitious and was in the mood to experiment in the kitchen.  If you read my blog regularly, you know that I tackled making onion rings yesterday (oven fried and made with almond flour).  Since I was still feeling adventurous after making those, I decided to tackle the re-make of my White Chicken Enchilada Casserole and make a wheat and grain free version.  Hubby has been craving Mexican food and misses going out to eat it. So, I thought that recipe would be a good one to start revising. I decided to make half of the recipe.  That way I wouldn't waste a lot of ingredients experimenting.  Besides, it was just hubby and I eating so we didn't need to make a full version anyway.

I scoured the internet looking for a suitable grain free tortilla recipe and finally found one I wanted to try on another blog called "Against All Grain".  They were made with coconut flour and looked good. Her blog had a lot of other good looking recipes on it, too. So, other than make grain free tortillas, the other modification I needed to make was to figure out how I was going to thicken the sauce.  The original recipe called for making a roux out of butter and flour and then adding chicken stock and simmering until thickened.  I decided to try substituting coconut flour with the butter to make the roux and if that didn't thicken it sufficiently, my back up plan would be to add some cream cheese and whisk it in until it was thickened enough (I didn't want to keep adding more coconut flour).  The cream cheese took care of the thickening that I couldn't get with the coconut flour, so I won't bother putting the coconut flour in the modified recipe that I post.

The tortillas were not difficult to make...but initially they were pretty tricky to flip over.  Essentially, they are similar to crepes and if you've ever made crepes before, you know that it takes a little practice to get it just right before flipping them or you end up with flops.  Even though I only needed half of the tortilla recipe, I made the full batch to give myself allowance for some mistakes...and there were a few!  There were also a few bad words tossed around along with the tortillas (Fact Checker:  Okay...there were a LOT of bad words).  ;-)  But, by the 3rd tortilla, I figured out the secret that worked best for me.  It was by using 2 pans instead of one....and turning the crepe over upside down into the other pan that was also hot.  That was what saved me from temporary insanity.  It was kind of like making pancakes too -- you know how sometimes the first ones don't look or turn out the best?  Same thing here.  After I got the tortillas made and set aside and the sauce thickened...it was smooth sailing making the casserole the rest of the way!  The casserole turned out good...it even got the "hubby seal of approval" and satisfied his urge for Mexican!  Below I snapped a few photos (but I'm sure you already knew that) as well as the "half recipe" for the original enchilada casserole.  The half version of this recipe generously serves 3 people, possibly 4.  Hubby had 2 enchiladas and I had one (I was so full I had to put my second one back). Enjoy!

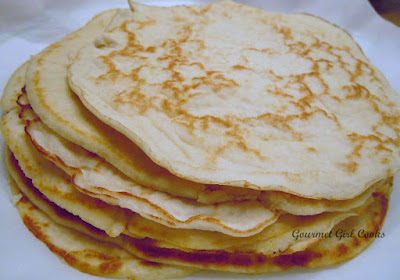
Stack of homemade tortillas -- my pride and joy!
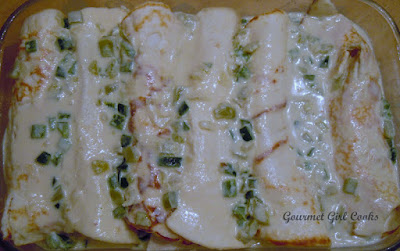
Sauce has been poured over the filled enchiladas, just waiting to be cheesed!
Fresh out of the oven
Voila!
BOOM!

White Chicken Enchilada Casserole (Wheat/Grain/Gluten Free)

INGREDIENTS:

5-6 grain free tortillas (see link to tortilla recipe below)
1 cup cooked, shredded or chopped chicken
1-1/2 cups shredded Monterey Jack cheese (if you like it spicier, substitute some pepper-jack cheese)
1-1/2 Tbsp. butter
2-3 Tbsp. cream cheese ("brick style", not whipped or soft spread)
1 cup chicken broth
1/2 cup sour cream
1/2 (4 oz) can diced green chilies, drained
1/2 Poblano pepper, diced and sauteed (optional)
1/4 cup onion, diced and sauteed (optional)

DIRECTIONS:

1.  Preheat oven to 350 degrees.  Grease a 7 x 11 baking pan or casserole dish
2.  Mix shredded chicken and 3/4 cup cheese.  Roll up in tortillas and place seam side down in pan.
3.  In a sauce pan, melt butter, stir in cream cheese and cook 1 minute until melted.  Add broth and  
     simmer over medium heat, whisking until smooth and slightly thickened and bubbly, stirring 
     frequently.   
4.  Stir in sour cream and green chilies (and optional Poblano peppers and onions).  Do not bring to 
     boil, you don't want to curdle your sour cream.
5.  Pour sauce over enchiladas and top with remaining shredded cheese.
6.  Bake 20-25 min and then run under broiler for a few minutes to lightly brown the cheese.

*Grain Free Tortillas (from the blog, "Against All Grain"):
Link to the recipe on Against All Grain (her pics are gorgeous)!   Against All Grain Blog -- Grain Free Tortillas

Saturday, September 8, 2012

Oven Fried Onion Rings...Low Carb

It is an overcast, dark and dreary Saturday afternoon here with occasional sprinkles coming down, although it looks like the sky could open up at any moment.  It's a great day to play around in the kitchen.  This afternoon I decided to experiment a bit.  I wanted to see if an "almond flour coated" onion ring would work.  So I did a "test batch", making only 1 dozen onions rings.  That way, if it wasn't any good at all...I wouldn't be throwing away a lot of ingredients as well as wasting a lot of my time.  I know that onion rings are typically deep fried...but I don't particularly care with all the mess that goes with that...so I thought I'd see how they would turn out in the oven -- and of course I wanted them to be wheat/grain free.

I started working on this because I am already thinking about some of my Thanksgiving recipes and wondering how I can revisit and revise some of them.  I was thinking this afternoon about my green bean casserole and trying to find a better substitution for the "fried onion" topping from a can that goes on them.  I'm also working on the "sauce" part too...but that will be another day's project.  So, these onion rings turned out surprisingly good -- not super crunchy like deep fried ones would be, but light and crispy and delicious.  Hubby, who is normally an onion ring snob, (unless they are from The Varsity) even liked them!  Below are a few pics as well as my "test batch" recipe if you decide you might also want to try them on a smaller scale first -- that way if you like it, you could multiply the ingredients or you could decide how you might want to adjust them to your own taste (add extra seasonings, etc.).  Enjoy!


Oven Baked Onion Rings

INGREDIENTS:


1 medium to large sweet onion, sliced into 1/4" rings

1 or 2 eggs (I used 1/2 cup Egg Beaters)
3-4 Tablespoons half-n-half
1/2 cup (slightly heaped) almond flour
1/4 teaspoon onion powder
1/4 teaspoon paprika (or enough to give color to the almond flour coating)
Salt, to taste
Freshly ground black pepper, to taste
Olive oil

DIRECTIONS:


Preheat oven to 400 degrees.  Line a baking sheet with foil (I used Reynold's non-stick foil) and brush lightly with about 1 tablespoon of olive oil (no need to use your good Extra Virgin olive oil; I used my light "non-virgin" olive oil for this).  In a small bowl, beat egg and half and half together; season with salt and pepper to taste; add onion rings to the egg mixture, toss and let sit to soak while you make the coating/breading.


In a shallow bowl or plate, mix almond flour, salt and pepper to taste, onion powder, paprika and mix well with a whisk to remove any lumps. 


Take onion rings out, one or two at a time and place in the flour mixture, pressing and turning over with a fork until well coated on both sides.  Place on lightly oiled foil covered baking sheet in a single layer, not touching each other.  Place in oven and bake 7-8 minutes; flip and continue baking another 7-8 minutes or until golden brown and done.  Remove from oven and sprinkle with salt, if desired.


Here they are baking away -- if you wanted them to be more "fried like", you could easily add more oil to the pan -- I only brushed about 1 tablespoon on.
Check out the hundreds of FREE eBooks:  Free Grain-Free eBooks


Thursday, September 6, 2012

Greek Style Spinach-Feta Pie

This evening I made a Greek Style Spinach-Feta Pie for dinner.  The crust was made with almond flour.  The filling was rich and tasty and chocked full of spinach, feta, seasonings, eggs and a little half-n-half.  It was absolutely delicious.  It is probably one of my favorite wheat/gluten free recipes so far.  I poured over numerous quiche recipes and just didn't find exactly what I was looking for, so I put one together myself.  It reminds me of the flavors of Greek Spanikopita (only richer because this one has eggs in it and almond crust instead of flaky phyllo pastry crust).  I snapped several photos of the preparation and finished product as well as the recipe for you to see below.  Enjoy!

Voila!
Fresh spinach has been "wilted"
Ready to cut in the almond flour, egg, butter and Greek Seasoning
Filling is ready to be poured into the lightly baked crust
The spinach-feta pie cut into beautiful slices.
BOOM!

Greek Style Spinach-Feta Pie

INGREDIENTS:

Crust
2 cups almond flour
3 tablespoons cold butter, diced into small cubes
1 egg
1 teaspoon Greek Seasoning (or Italian Seasoning), optional

Filling
10 oz fresh spinach, cooked and chopped coarsely
8 oz feta cheese, crumbled
2 tablespoons olive oil or butter
1/2 cup onion, chopped
2 cloves garlic, minced
1/2 teaspoon dill
1 teaspoon grated lemon peel
Freshly ground black pepper, to taste
5 eggs
1/2 cup cream, milk or half and half

DIRECTIONS:

Preheat oven to 325 degrees F.  Place all crust ingredients in a medium bowl.  Cut butter and egg into flour with a pastry cutter until mixture resembles small pebbles and the flour is thoroughly moistened (the same way you prepare a pie crust).  Press crust mixture into pie dish or tart pan (I used a 10" pyrex pie dish).  Bake for approximately 15 minutes or until lightly browned; remove from oven and set aside.

Increase oven temp to 350 F degrees.  In a non-stick skillet, saute onions and garlic in olive oil until translucent; remove and set aside.  In the same skillet, saute spinach just until wilted.  Drain and press as much of the liquid out of the spinach as possible (I use a mesh strainer and press it with the back of a spoon).  Place well drained spinach in a medium bowl; add cooked onions and garlic, feta, dill, lemon peel, pepper, eggs and half-n-half.  Mix until well combined.  Pour mixture into the lightly baked crust and bake at 350 F for 15 minutes; lower oven temp to 325 F (so edge of crust doesn't over brown); bake for an additional 15-20 minutes or until filling and eggs are set and cooked .  If center still seems a little jiggly, cook an additional few minutes.

P.S....
This is what the flour looks like after the butter & egg have been "cut in".
      

Wednesday, September 5, 2012

Grilled Burgers Topped w/ Fontina, Mushrooms, Onions and Red Peppers

This evening I decided to grill something for dinner.  I had originally planned to grill some seasoned boneless chicken thighs, but when I opened the package they smelled "funky" (and it was still days away from the "sell by" date too)...but when in doubt, throw it out...and I did.  I regrouped and grabbed a pack of ground beef out of the fridge.  This weekend I had picked up a couple packs of grass fed ground beef.  I have never been very much of a beef eater (since childhood)...but I know grass fed is supposed to be healthier for you so I thought I'd give it a try.  Well...I am here to report that it was good but a bit pricey.  Of course, hubby liked it more than I did...but I am not the best person to ask about beef.  However, I did jazz mine up a bit which made it really good!  I sauteed some onions, red bell pepper and sliced mushrooms in a little olive oil and served my burger over a bed of the veggies, topped with fontina cheese and a few more of the veggies.  I also roasted some fresh asparagus in the oven with a little bit of olive oil, sea salt and black pepper to serve with our burgers.  It was a quick and easy dinner.  I snapped a couple pics below (as well as my berry delicious dessert).  Enjoy!


BOOM!
(Fresh berries topped with a dollop of Greek yogurt)

Monday, September 3, 2012

Monday Night's "Pasta" Dinner

This evening it looked like it was going to rain, so we decided ahead of time not to plan on grilling, just in case.  Youngest son came over and had dinner with us and requested "zucchini pasta"...he tried it the last time he was here and loved it.  Even though hubby is still eating whole wheat pasta...my son specifically requested the zucchini pasta that I eat...that tells you how much he really does like it!

I made a big bowl of zucchini noodles using my Spirelli.  I lightly sautee the "noodles" in a non-stick skillet with a little olive oil for a few minutes shortly before serving until they are the consistency I like -- I prefer them "al dente" with a little bite to it.  I cut boneless chicken cutlets into strips and sauteed them in some olive oil, tossed in a couple chopped yellow squash, diced red bell pepper and fresh sliced mushrooms and sauteed them until tender.  I poured a jar of Del Grosso sauce over top of the cooked chicken and veggies, covered and simmered for about 30 minutes.  If you've never simmered chicken in pasta sauce before, it really turns out very tender -- I guess because of the acidity of the tomato sauce.  We topped it with shredded Parmigiano Reggiano and some fresh basil.  It was delicious!  Check out a pic below.  Enjoy!

BOOM!
      

Sunday, September 2, 2012

Amazingly Awesome..."Almondella"

This afternoon I wasn't really hungry for lunch but wanted a little something.  I decided to toast a little slice of my Paleo Bread made with coconut flour and spread some peanut butter on it.  Then, I remembered I had picked up some roasted almond butter a few days ago and decided to have that instead.  While I struggled to get the cap off of the jar of almond butter, I happened to glance over at the can of Ghiradelli unsweetened cocoa sitting on my counter and right beside it sat my little bottle of liquid stevia...and all of a sudden, it was like the heavens opened up and a bolt of lightning all in one...and "Almondella" was born!  Why Almondella you ask???  Well, one of my favorite things to eat years ago was Nutella (the chocolate hazelnut spread)...but it had WAY too much sugar, so I gave up eating it many years ago.  What could be better than almond butter, unsweetened cocoa and stevia you ask?...ABSOLUTELY NOTHING!  I decided to try my idea on an extremely small scale...basically to make enough to spread on my little piece of toast.  I took 2-3 tablespoons of almond butter, mixed it with about 1 teaspoon of cocoa powder and added 12 drops of my liquid stevia and mixed it all up...it was awesome!  I didn't make it very sweet...just sweet enough and all I can say is...if you ever liked Nutella in your pre-wheat/sugar free life...or never tried it...Almondella is definitely worth trying.  It makes an excellent sugar free, low carb substitution for Nutella.  Next time I will try it on a toasted slice of the almond flour version of Paleo Bread.  It would make an awesome sugar free "frosting" for cookies or plain cakes or muffins, etc....the possibilities swirling around in my head are endless.  Check out a few pics below.  Enjoy!

Voila...Almondella!!!
Three simple ingredients = Almondella
BOOM!

Beautiful Sunday Breakfast...

Happy Sunday!  It is a beautiful sunny morning here and even though it is supposed to be hot later today, the morning is very pleasant and in the 70s.  This morning I made a beautiful but simple breakfast.  I split and lightly browned an Applegate Farms Fire Roasted Red Pepper Sausage (organic and nitrite free turkey and chicken), fried a brown organic egg and lightly grilled a slice of Paleo Bread made with coconut flour.  I served it with a small cup of fresh blueberries, strawberries and raspberries and a cup of Wild Mountain Blueberry coffee.  It was tasty, delicious and nutritious!  I snapped a photo for you to see below.  Enjoy!

BOOM!

Saturday, September 1, 2012

When Life Hands You Eggplants...Make Moussaka

This evening I decided to make Moussaka for dinner.  You know the old saying "when life hands you lemons, make lemonade"?  Well I used that same principle, (slightly modified)..."when life (or a generous coworker) hands you eggplants, make Moussaka"!  Even though I have made eggplant dishes several times recently, this week a generous coworker brought me some beautiful fresh eggplants from his garden.  I just couldn't pass up an opportunity to make Moussaka!  Truth be known, I could eat eggplant every day and be happy!   Typical Moussaka recipes are covered with a bechamel/cheese sauce that uses both flour and butter as thickeners.  Since I am not eating wheat, I decided to come up with a way to make it without using any.  I remember thinking earlier in the week when I made my Eggplant Ricotta Bake...that the topping on that reminded me very much of the topping on Moussaka and thought it might work for that as well (with a few tweaks) and that I would try it some day.  I just didn't realize that "some day" would come so soon.  Since these eggplants were so fresh and smaller than the ones I usually find in the store, they were extremely tender and literally melted in your mouth -- hubby thought they were the best ever!  Below you will find a couple pics of the Moussaka (which turned out fabulous) as well as the recipe I used.  Enjoy!


BOOM!

Moussaka (w/ Grain-Free Bechamel)

INGREDIENTS:

2 medium eggplants, sliced lengthwise 1/4" thick (peeled, if desired)
Olive oil (as needed)
1 lb lean ground beef (or lamb)
1 large onion, chopped
3 cloves garlic, minced
1 (8-ounce) can tomato sauce
1 teaspoon dried oregano
1/2 – 1 teaspoon cinnamon, optional
1/2 teaspoon salt, or to taste
1/2 teaspoon fresh ground black pepper, or to taste

For the “Bechamel” Cheese Sauce
1 lb. ricotta
3 eggs
1/2 cup grated Parmesan cheese (plus extra for sprinkling on top)
Nutmeg, dash/pinch

DIRECTIONS:

Preheat oven to 350 degrees F. Grease an 11 x 7” baking pan or similar sized casserole dish. Brush a foil lined cookie sheet with olive oil.

Brush each side of sliced eggplant with olive oil and sprinkle with salt and freshly ground pepper.  Place the eggplant slices in a single layer on cookie sheet; broil until lightly brown; turn and broil the other side, brushing with additional oil, if needed. Broil until completely fork tender (alternatively you could grill the eggplant slices).  In the bottom of the prepared baking dish, arrange half of the eggplant slices and set aside.

In a large skillet, brown beef; add onions and cook stirring until the beef is no longer pink and the onions are soft and translucent; add garlic and cook a few minutes more.  Add tomato sauce, oregano, cinnamon, 1/2 teaspoon salt (to taste) and black pepper (to taste); simmer uncovered about 10 minutes (you don’t want much liquid left).  Pour meat mixture over eggplant slices.  Arrange the remaining eggplant slices over the beef mixture.

For the Bechamel/Cheese Sauce, in a medium bowl, whisk ricotta, eggs, 1/2 cup Parmesan cheese and dash of nutmeg together until smooth and well blended; add salt and pepper to taste, if desired (the Parmesan cheese is salty, so be careful not to over salt).  Pour the cheese sauce over the top and spread evenly.  Sprinkle additional Parmesan cheese on top, if desired.  Bake in a 350 degree oven for 45 minutes.  If desired, run casserole under the broiler for a few minutes to lightly brown.  Let sit about 15-20 minutes or so to set before cutting into squares.  Serves approximately 4 to 5. 

*Note: Even though you may not think 8 ounces of tomato sauce is enough, the tomato sauce is simply being used to flavor the meat and keep it moist; it isn't supposed to be like lasagna's meat sauce. If you don't like the idea of adding cinnamon to the meat mixture, you can omit it; however it is the unique flavor that I think "makes the dish".  Also, it is imperative to cook your eggplant slices until completely tender; this is not a vegetable that is pleasant undercooked (unless you like chewing on erasers).

Salmon Salad for Lunch...and Coffee Fever

This morning we got up early and ran a few errands, dropped our doggy off at the groomer and came back home to have lunch.  While out today, I picked up a bunch of coffee flavors for our Keurig.  I figure with the cool weather right around the corner that I wanted a variety of flavors to choose from since most evenings now coffee ends up being my "dessert".  I don't seem to crave sweets much any more.  Check out some of the flavors I picked up:  Mudslide, Butter Toffee, Hazelnut, Wild Mountain Blueberry, Donut Shoppe, Raspberry Chocolate Truffle and French Roast Decaf.  I am sipping on some Wild Mountain Blueberry now after lunch.  It smells so good...kind of like getting a cup of coffee and aromatherapy all rolled into one!  :-)  I snapped a quick photo of my lunch today -- this is why I like to cook an extra piece or two of salmon when we make it for dinner.  It makes a quick and delicious lunch the next day too.  Enjoy!

BOOM!

My Paleo Bread Review (almond version)

This morning I decided to try the almond version of the new Paleo Bread (by Julian Bakery) that I purchased recently.  Last weekend I tried their coconut flour version and posted my review for it (basically stating that it was okay...no cartwheels or anything).  I found the almond version, in addition to being darker in color than the coconut version, to be a bit more dense.  I had one slice of the almond bread toasted and buttered alongside my omelet (that was filled w/ red bell peppers, onions, finely diced Applegate chicken apple sausage, and Dubliner cheese).  At "first bite"....it was "alright".  Again, not much in the way of flavor -- almost as if it might have needed a little pinch of salt or something.  I continued eating it, alternating a bite of omelet with a bite of toast...and I found it a suitable substitution for toast to serve alongside a flavorful omelet.  Again, this one didn't win any flavor awards or make you want to do any cartwheels and scream 'yippeeeeee"...but it was acceptable.  It is quite filling because of the density and would be great on those mornings where you want a heartier breakfast.  At some point in the future, I will sample these breads toasted and topped with some peanut butter (seems like they would make a good base to hold something like that).  I also want to try using them to make French toast as well.  So, if you are looking for the exact taste and texture of regular bread, you might be disappointed.  If you are looking for something that would give you the ability to enjoy toast or a grilled sandwich or panini, or simply just something to spread your peanut or almond butter on...then you just might find this bread worthy of at least a cartwheel or two!  :-)  Enjoy!