Sunday, March 17, 2013

Seedy Power Bars

This past week, I have been trying to figure out what else I might want to make with the "Sweetened Condensed Coconut Milk" (made with Swerve) I had leftover from making last weekend's "Absolutely Magical Cookie Bars".  I had 1-1/2 cups of the condensed milk left to make something else with.  Late last night...we are talking 11:00 pm (nuts...huh???), I decided to make "Seedy Power Bars".  On one of my adventures to Whole Foods a couple months ago, I purchased all kinds of raw seeds to make something with.  So, last night I put them to good use!  It was a concoction of raw seeds and a little dark chocolate, blueberries, coconut, roasted almonds and sunflower seeds. Now, these are not granola bars...because they are predominantly made of seeds.  I used the condensed coconut milk as the glue to hold them all together.  They turned out good.  I must say, that even though I knew exactly what was in them -- I still was expecting them to be like chewy granola bars when I first bit into them since they sort of looked like granola type bars...LOL.  I wasn't trying to achieve that...but old habits die young I guess.  I made a 9x13" pan of them -- which is a LOT since I cut them into small bars.  I cut them into 24 little power bars.  Each bar has about 3 grams of sugar and 5 grams of net carbs (I rounded up to be safe).  I purposely baked them at a low temp so I wouldn't roast the seeds too much -- I was going for more of a raw type finish...but I bet they'd also be really tasty (and crunchier, too) if the seeds were lightly toasted before mixing and baking.  It was a very heavy pan of bars with all those dense seeds.  I may try making half a batch next time using lightly roasted/toasted seeds to compare the difference.  Below are a few pictures as well as the simple recipe I put together.  Enjoy!


Seedy Power Bars

Ingredients:

1 cup raw shelled hemp seeds
1 cup raw shelled pumpkin seeds (pepitas)
1 cup roasted sunflower seeds (kernels)
1 cup roasted almonds
1 cup unsweetened coconut chips (shaved dry coconut)
1/2 cup ground golden flax
1/2 cup unsweetened dried blueberries (I used Bob's Red Mill)
1 (3.5 ounce) 70% cacao chocolate bar, chopped (I used Green & Black's)
1-1/2 cups Sweetened Condensed Coconut Milk, slightly warmed

Directions:

Preheat oven to 250 degrees F.  In a large bowl, place all ingredients and stir until everything is well coated (taste for sweetness and add additional sweetener, if necessary or desired).  Press evenly, using a rubber spatula, into a lightly greased nonstick 9 x 13" baking pan.  Bake at 250 degrees for 1 hour.  If you prefer your bars lightly browned, increase the baking time a bit.  Let cool about 20 minutes.  Cut into bars while still in pan and allow to cool completely.  Cover and refrigerate to keep firm and fresh.

**Note:  This recipe uses about 6 cups of "nuts/seeds/fruits/etc." mixed with 1-1/2 cups of Sweetened Condensed Coconut Milk.  You can easily substitute or replace any of the power bar's ingredients if you don't like them or have them available -- just mix together about the same amount of your favorite ingredients.  To make a half batch using an 8 x 8" pan, use 3 cups of mixed seeds, nuts, etc. mixed with 3/4 cup of the Sweetened Condensed Coconut Milk.


Saturday, March 16, 2013

Today's Yummy Tuna Salad Roll-ups for Lunch...

Today, it's an absolutely gorgeous top 10 day here.  Bright, sunny, clear blue skies...and 73 degrees for our high! Last night after work, we did our Costco run to get it out of the way because I had to take my car in for service early this morning.  When we got back from Costco last night around 8:30, I made a batch of tuna salad to have for dinner...but put it back in the fridge and decided to take my walk first before eating since it was so gorgeous out.  Hubby and I have started back to walking again as of 2 weeks ago.  It's hard to believe that only a couple short years ago we were power walking 5 miles per day every day and had just started incorporating intervals of running with our daily walks. It seemed like a brilliant idea at the time...until one night while running about a mile from home at 11:30 pm...(yes, that's right...in the DARK)...I was running through the old part of our town and tripped and fell on very uneven sidewalks...and went SPLAT...it wasn't pretty.  I messed up my knee, my wrist, tore the palm of my hand...and still had to walk bleeding and injured one mile to get back home.  I didn't think I would ever get the gravel and grit out of my wounds!!! So, that was an abrupt end to my 2-year long joy of walking and running every day.  So...here we go again...LOL.  I have learned my lesson -- I won't go running in the dark or on uneven sidewalks...EVER again.  :-)   Wow...how did I get off on this tangent anyway???  Oh...I was originally talking about making tuna salad for dinner last night but decided to get my walk in beforehand instead...well, when I got back in from walking last night I was no longer hungry and didn't eat dinner, except for a few pistachios. When we got back from the car dealer this afternoon, I used last night's tuna salad to make myself some yummy Tuna Salad Roll-ups for lunch.  To make the tuna salad, I used canned Wild Planet wild caught tuna that I buy at Costco.  I mixed it with some olive oil mayonnaise, a squirt of Dijon mustard, finely minced shallot, diced celery, red bell pepper, and finely diced dill pickle.  I rolled them up in beautiful butter lettuce leaves and topped them with strips of provolone cheese and sliced fresh roma tomatoes and served them with some roasted almonds.  It was really good, simple and fresh.  I snapped a few photos below.  Enjoy!

Voila!

So simple...and so pretty!
BOOM!

Thursday, March 14, 2013

Mousse a la Grecque au Chocolat...HUH???

This evening I didn't have to cook dinner since we had plenty of leftovers from the last couple of nights -- both the Chicken Scampi-ish as well as the Chipotle Grilled Chicken.  However, I was in the mood to tinker.and...for chocolate!  Last week, I received an order of a couple different gourmet cocoa powders that I have been wanting to try and they came just in time to cure my chocolate fix this evening!  I ordered both Valrhona and Scharffen Berger unsweetened cocoa powder.  I decided to try the Scharffen Berger cocoa tonight -- it came highly recommended from a fellow foodie follower and friend that also shares my love of both cooking and eating (thanks, Katie)!   I decided to make something completely quick and simple...and delicious, of course.  It is so simple that it is almost embarrassing to call it a recipe...but I guess when you mix multiple ingredients together, regardless of how simple it is...that's called a recipe!  So, tonight I bring you...Mousse a la Grecque au Chocolat....I know, you probably thought..."what WHAT???"  Basically, I made chocolate mousse (which is French) and used Greek yogurt...which obviously is NOT.  So we have a bi-national dessert here.

I had about 3 tablespoons of heavy cream left in a carton that I poured into a small deep bowl and using a tiny whisk (that is so cute), I beat the heck out of it for a few minutes until it was whipped and fluffy, but not to the "stiff peak" stage.  I added 2 tablespoons of Swerve Confectioners Style sweetener and beat that into the whipped cream and then slowly folded in 3 tablespoons of the Scharffen Berger cocoa powder and beat that a little -- it became thick, fluffy and creamy (almost like frosting).  I added 1 cup of Greek Gods full fat plain Greek yogurt and folded that into the chocolate cream mixture and added about 25 drops of liquid stevia.  I could have added more Swerve instead of stevia, but I really liked the "creamy and fluffy" texture I currently had -- so I opted to use the drops instead to get more sweetness without adding very much volume to change the current texture that I really liked.  I purposely didn't want it overly sweet because I wanted to taste the chocolate...and taste I did!  I had a few spoonfuls and put it in the fridge to enjoy later this evening.  My "plan" is to have half of it tonight and half tomorrow night as a special treat....but you know what they say about plans...(they are made to be broken)!   :-)   Below are a couple pictures of my Mousse a la Grecque au Chocolat...or French Chocolate Greek Mousse!  ;-)   Enjoy!


Wednesday, March 13, 2013

Chipotle Grilled Chicken & Chipotle Chili-Lime Sprouts

This evening I was in the mood for something simple...and something good.  I had a package of boneless chicken breasts in the fridge that I had planned to grill.  Unfortunately, no matter how hard I tried, I just couldn't get our grill to light.  The wind whipping around probably didn't help either. So, I gave up and reached for my trusty little panini grill pan and decided to grill the chicken inside instead.  Tonight's dinner was so very simple...but so VERY tasty.  I was in the mood for something a little spicy...so I beat my boneless chicken breasts until they were a little less than 1/2" thick and then sprayed both sides with olive oil and seasoned the top of them (1 side only) with Spicy Montreal Steak Seasoning (which happens to be one of my faves).  I then sprinkled them with ground Chipotle Chili Pepper, too.  I got my little panini pan HOT...and then brushed it lightly with coconut oil and placed the chicken on it "spiced side down" and cooked it for 3 minutes, flipped them and cooked them for another 3 minutes and then moved them to a plate and covered them with foil and let them sit for 10 minutes or so while I made my brussel sprouts.  While my chicken was "grilling", I sliced some fresh brussel sprouts in half and tossed them with olive oil and salt, then roasted them for about 15-20 minutes at 400 degrees.  I stirred them around about half way through to roast more evenly.  To jazz the sprouts up a bit and make them a little spicy too, I made a super quick and easy Chipotle Chili-Lime Butter -- I melted a couple tablespoons of butter and stirred in some Chipotle Chili Pepper and freshly grated lime zest and tossed the roasted sprouts in the spicy butter...and "voila", I had Roasted Chipotle Chili-Lime Sprouts!  The sprouts were awesome -- it's amazing how much a little flavored butter bumped them up a notch.  I sliced the chicken breasts diagonally and plated them and served them with the chili-lime sprouts, sliced avocado topped with fresh salsa and a little dollop of sour cream.  I grated more fresh lime zest over the chicken and avocado.  It was as delicious as it was beautiful.  I snapped a couple photos below for you to see. Enjoy!

Voila!
Aerial photo...
BOOM!
KA-BOOM!

Tuesday, March 12, 2013

Chicken Scampi-ish over Parmesan Cauliflower Mash

Tonight I decided to make my Chicken Scampi-ish over Rich and Thick Parmesan Cauliflower Mash for dinner.  It was quick and simple to do -- especially since I had leftover Parmesan Cauliflower Mash from last night's dinner.  I love to serve it on top of that -- it is excellent.  It tastes so much better than serving it over boring old pasta.  The cauliflower mash is rich, thick and decadent since it is cooked in chicken stock, then mixed with cream cheese, cream and Parmesan cheese and then topped with the flavorful lemony, buttery, garlicky, herb and wine sauce in the Chicken Scampi-ish. It's a match made in heaven!  :-)   The link to the recipe is embedded in the first sentence.  I snapped a few photos for you to see below.  Enjoy!

Voila!
Come a little closer...
BOOM!

Monday, March 11, 2013

Pan Seared Salmon & Parmesan Cauliflower Mash

Tonight I made a quick and simple dinner.  I decided to pan sear wild caught salmon fillets.  I simply seasoned them with some kosher salt, freshly ground black pepper and a dusting of Chinese Five Spice powder and then seared both sides on medium-high heat in olive oil for about 3 or 4 minutes on each side.  I picked up the Chinese Five Spice at Whole Foods a couple weeks ago to try.  Well, tonight...I realized that I am not particularly fond of the Chinese Five Spice powder!  The spices contained in it are:  Star Anise, Fennel, Black Pepper, Cinnamon and Cloves.  The last 3 of those spices I am very familiar with and like the taste of.  I have had fennel in sausage before...but the Star Anise has a licorice type of flavor which is quite different, to say the least.  I'm not sure if I don't like it...or simply don't like it on salmon.  It wasn't so awful that I would never try it again...but it was odd tasting enough on the salmon that I know I will never try it on my salmon again!  :-)   I was glad that I had only "lightly dusted" the salmon with it so it didn't overpower it.  I also made my Rich and Thick Parmesan Cauliflower Mash tonight, which I absolutely love, as well as some steamed green beans with almonds.  I snapped a couple photos for you to see below.  Enjoy!


Sunday, March 10, 2013

Happy Sunday -- It's Breakfast Time!

This morning we awoke to a beautiful, sunny, cool morning. Hubby, Spike and I took a walk first thing this morning and it was absolutely gorgeous out. Before we ran errands this morning, I fixed a "Sunday Breakfast" (which simply means I didn't have Greek yogurt for breakfast...LOL). I had a bit of trouble this morning for whatever reason -- I broke an egg...then I actually managed to drop a cooked egg on the floor while transferring it to the plate! I don't know what was wrong with me this morning...but all that "trauma" led me to adding a small cookie bar to my breakfast plate for "comfort"...and it worked (well, that's my story and I'm sticking to it)! I am not usually accustomed to cookies for breakfast...but this morning it was kind of nice to have one available!  ;-)  I had a fried organic cage free egg topped with some shredded cheddar cheese, a square of Asiago bagel toast, and half of a sliced avocado with a little salsa and sour cream. Oh, I almost forgot to mention the little cookie bar too!  :-)  I had a cup of Nantucket Blend coffee...and I am now good to go and seize this beautiful day. When I stepped out onto my patio to snap a picture of my breakfast, the wind had picked up and was actually blowing the shredded cheese and black pepper off of my plate! Never had that happen before. Below are a couple of pictures of my awesome breakfast! Enjoy!

BOOM!
Voila!

Saturday, March 9, 2013

Absolutely Magical Cookie Bars

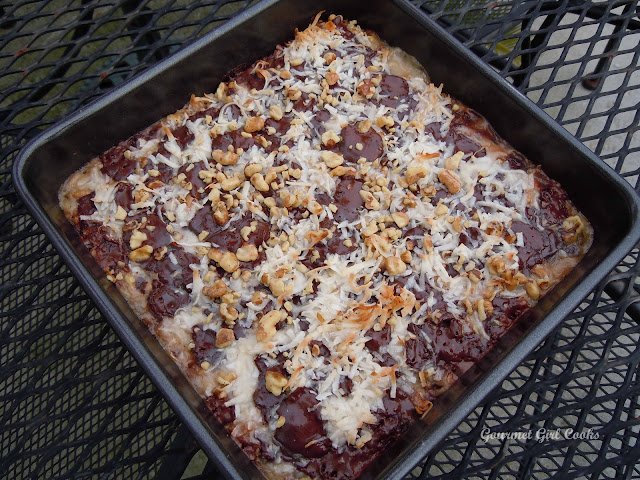
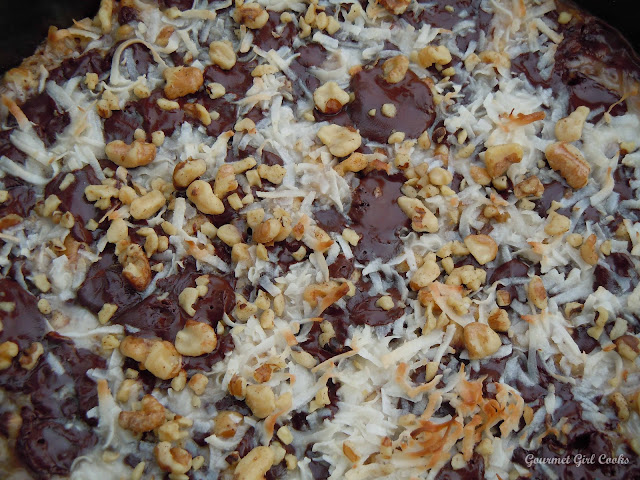
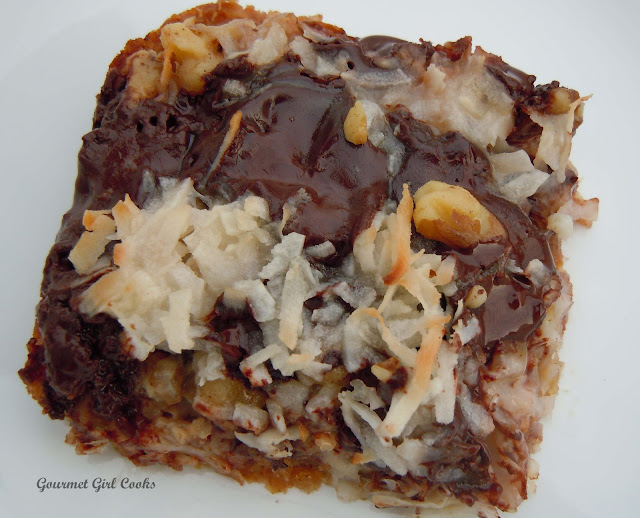
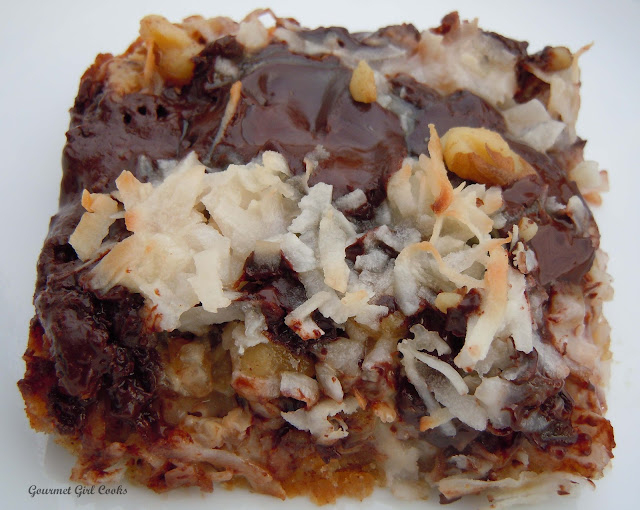
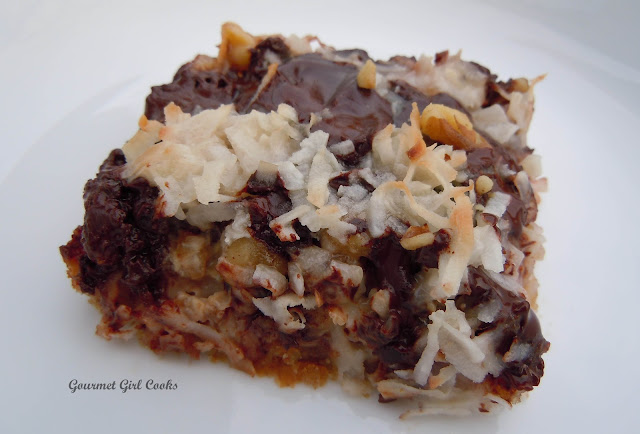
Today it was bright, sunny and beautiful out -- it actually made it to 61 degrees late this afternoon. Tomorrow is supposed to be 67 degrees....yay!  I am so looking forward to a little warmer weather after this last brutal cold snap we had.  After I ran some errands today, I came home and decided to make a grain free/no sugar added version of the Magic Cookie Bars I used to enjoy eating when I was young...and have made almost every Easter and Christmas (substituting the red & green or pastel colored M&Ms for the chocolate chips to make them festive). Today, to substitute for the chocolate chips or M&Ms of "yesteryear", I chopped up a bar of Green & Black's 70% cacao chocolate bar to use instead. Besides being good, they are so easy to make, too.

Obviously, since I can't just buy a can of sweetened condensed milk any more to make them, they aren't quite as convenient to make...but it is possible to recreate a sugar and grain free version (using Swerve sweetener) with a little time and patience. For anyone that doesn't know what Magic Bars are...they are simply a "graham cracker and melted butter crust" cookie bar layered with nuts, coconut, chocolate chips and drizzled with sweetened condensed milk and then baked and cut (after cooling) into nice oooey....goooey....chewy cookie bars.  Since I don't use sugar or eat grains any more...I made my own version...I made "Absolutely Magical Cookie Bars" instead! Even though they are a little time consuming compared to the original version, I think they are worth it for a special treat.  I snapped a few photos below as well as the recipe.  Note that the recipe yields twice the amount of "sweetened condensed milk" (made with Swerve) needed for this recipe, but since it takes about 45 minutes to make it, I doubled the condensed milk part and made extra to use for another recipe. If you want, you can instead cut that part of the recipe in half (using only 1 can of coconut milk) or increase the crust, nuts and coconut part of the recipe and make a larger 9x13" pan of cookie bars instead of the 9x9" size pan I made.  You are supposed to let them cool completely before cutting...forgive me for being a little bit impatient!  :-)   Enjoy!

P.S. - Here are a few of my other dessert recipes using my sugar free sweetened condensed milk: Desserts made w/ Sugar Free Sweetened Condensed Milk. Enjoy!
Voila!
Fresh out of the oven!
Take a closer look...
BOOM!
KA-BOOM!

Absolutely Magical Cookie Bars

Ingredients:
1 cup Sweetened Condensed Coconut Milk (recipe below)
1 cup chopped walnuts
1 cup unsweetened flaked coconut (the longer shreds)
1 (3.5 ounce) bar of 70% cacao chocolate, chopped (I used Green & Black's)
1/4 cup ground golden flax meal
1/4 cup Swerve Sweetener (or equivalent sweetener to 1/4 cup sugar)
1/2 teaspoon cinnamon
4 tablespoons butter, diced
1 egg


For the Sweetened Condensed Coconut Milk (makes 2-1/2 cups):
2 (14-ounce) cans unsweetened coconut milk
3/4 cup Swerve granular or confectioners sweetener (or equivalent sweetener to 3/4 cup)
2 tablespoons unsalted butter (salted butter is okay to use)
1 teaspoon vanilla extract
Stevia drops, optional

Directions:
To make the Sweetened Condensed Coconut Milk, add coconut milk to a small heavy saucepan and stir in Swerve or sweetener of choice, butter and vanilla. Bring to a boil over medium-high heat. After milk comes to a boil, reduce heat to low-medium and simmer, stirring and whisking frequently for about 45 minutes until reduced by almost half. Taste for sweetness. If additional sweetness is desired, add liquid stevia drops until desired sweetness is achieved (I add about 10 drops). Makes approximately 2-1/2 cups of sweetened condensed coconut milk. Cool before using to make cookie bars. Refrigerate any unused portion. (*Note - cookie bar recipe uses only 1 cup of the sweetened condensed milk; refrigerate any leftover condensed milk).

Preheat oven to 325 degrees F. In a medium bowl, combine almond flour, flax, Swerve, cinnamon, diced butter and 1 egg. Using a pastry/dough cutter, cut butter and egg into flour mixture until a thick, dense dough forms. Using your hands or a rubber spatula, press dough evenly into an 8x8" or 9x9" nonstick baking pan. Bake crust at 325 degrees for 12 minutes or until very lightly browned. Remove crust and let cool about 15 minutes.  

Increase oven temperature to 350 degrees. Layer chocolate, walnuts and coconut on top of crust and drizzle evenly with 1 cup of sweetened condensed coconut milk. Bake at 350 degrees for 15 to 18 minutes or until lightly golden on top.  Let cool completely and cut into bars.  

*Note:  Absolutely Magical Cookie Bars use 1 cup of Sweetened Condensed Coconut Milk

Extra 1-1/2 cups of "Sweetened Condensed Coconut Milk" leftover for another treat!


Thursday, March 7, 2013

Quick & Easy Asian Chicken Burgers

Tonight I made a quick dinner using some ground chicken breast that I had in the fridge. I made Asian Chicken Burgers topped with some fresh mushrooms sauteed with a splash of Tamari sauce. I also steamed fresh broccoli and diced red bell peppers and tossed them together with some butter. Hubby is having the leftover steak from last night's dinner. I snapped a couple photos below for you to see. The link to the burger recipe is embedded in the 2nd sentence above. Enjoy!

Voila!

BOOM!
P.S....

Squawkie...youngest son's bird is back home living with me...AGAIN!!!  She's kind of like a bad penny that keeps turning up again.  I had forgotten how much I loved having my eardrums pierced and walking on bird seed all the time!  ;-)

Wednesday, March 6, 2013

Grilled Steak, Roasted Butternut Squash & Broccoli

Today was an absolutely frigid day here!  We started out this morning in the upper teens with some scattered snow flurries and I don't think the temperature got above the upper 30s all day long.  The wind gusts were insane, too...making it feel even colder than it was.  It should probably be at least 20 degrees or more warmer at this time of year.  Unfortunately, I had bought some strip steaks a couple days ago with the hopes of grilling them outside...but I had to regroup when the winter weather returned.  I decided to whip out my heavy panini pan and grill them inside instead.  They turned out really good.  I also sauteed some fresh sliced mushrooms, steamed some fresh broccoli and made one of my favorites...Roasted Butternut Squash to go with our steak.  It was a simple and delicious meal to put together on a weeknight.  The simple recipe for the butternut squash is embedded in the link a couple sentences above.  I snapped a couple photos for you to see below. Enjoy!

Voila!

BOOM!

Monday, March 4, 2013

Moussaka Monday...we're having Moussaka!

Tonight we had Moussaka for dinner. In order to save some time getting dinner on the table tonight, I did a lot of the prep work last night. I broiled the eggplant slices, made the meat sauce and layered it in the casserole dish, which left only the bechamel custard sauce topping to make this evening and spread on top and then pop in the oven to bake for 45 minutes. My grain free version of bechamel custard topping has ricotta, Parmesan, eggs and a dash of nutmeg -- and...surprisingly, it's almost identical to the "regular version" that uses flour. This evening I decided to kick it up a notch by squeezing in just a little more cheese as well as more flavor. I stirred a heaping cup of crumbled feta cheese into the custard sauce before spreading it on top of the casserole. The extra volume from the feta made the custard topping thicker, too...and even more delicious! I snapped a few photos for you to see below. The recipe for the Moussaka is linked in the first sentence above. Enjoy!

BOOM!
Ready for the topping to be added...
Ready to be popped into the oven!

Saturday, March 2, 2013

Holy Moly Cannoli

Last weekend I made cannoli -- not your traditional cannoli that are crispy fried pastry shells piped with a creamy ricotta filling with chocolate chips...but a more simple wheat, grain and sugar free version without all the fuss and muss.  Basically, the trickiest part is adapting a substitute for the "tube shaped pastry shell" part.  I decided the best thing to do was to forget about trying to duplicate the tube shell part...but instead, to make a more simple substitution by making small cookie-type wafers to pipe the ricotta filling onto instead of into.

I made and tested 2 different versions of the crust as well as the filling to see which one came out closer to what I remembered eating when I was younger.  The first version of crust I made actually turned out more crisp and stayed crisp for several days compared to the second version I made which was not as crisp to start with and tended to soften a bit (it became more chewy cookie-like as the days went by).  Both were good, but I preferred the first version I made best because of the crispness factor.  The ricotta filling I ate when I was younger was an orange essence flavored ricotta and both ends of the cannoli were dipped in mini dark chocolate chips and sometimes chopped pistachios too.

When I made the first filling batch, I used pure orange extract to flavor the ricotta.  In the second version I made, I used finely grated fresh orange zest instead of the extract.  I preferred the version with the zest because it had more of an "undertone orange flavor" rather than an "in your face orange flavor".  I have also had cannoli with vanilla flavoring or almond and amaretto flavoring too.  You can flavor the ricotta filling any way you like.  Also, some people like to drain their ricotta in cheesecloth first for an hour or two to remove any excess liquid.  I chose not to do that.  I used whole milk ricotta and piped the filling on one crust at a time as I was going to eat them so the shell part would stay crispy instead of doing a bunch in advance.  You don't have to pipe the filling on if you don't want to -- you can simply spread it on and swirl it with a little spatula -- it just looks prettier when it is piped on.  For the chocolate chip part, I chopped some Green & Black's 70% cacao chocolate bar and sprinkled it on top and added a few roasted salted pistachios as well.  They turned out really good.  The key is to bake the crisps until they are crispy, but not burned...and since I used almond flour for the flour, it's important not to use too high a temperature since it burns more easily than regular flour does.  Also, when making the filling...if using a granular sweetener, it is best to finely grind (to a powder) it first to keep it from feeling gritty in the smooth ricotta filling. Granular erythritol based sweeteners tend to have a slightly gritty texture when refrigerated, so it helps to start off with a finely ground powdered or "confectioner-type" consistency like Swerve confectioners sweetener or to use a powdered or liquid version of stevia instead.  Below is a picture of the cannoli as well as the simple recipe.  Enjoy!


Holy Moly Cannoli

INGREDIENTS:

Cannoli Wafer Crusts
1/2 cup blanched almond flour
1/4 cup ground golden flax meal, PLUS 1 tablespoon
2/3 teaspoon baking powder
2 tablespoons Swerve granular sweetener (or preferred equivalent to 2 tablespoons sugar)
1 teaspoon unsweetened cocoa powder
1/2 teaspoon cinnamon
1/4 teaspoon lemon extract
2 tablespoons light olive oil or melted coconut oil or melted butter
2 tablespoons water
1 egg

Cannoli Ricotta Filling
1 pound whole milk ricotta
Zest of 1 orange (finely zested)
1 teaspoon vanilla extract
1/2 cup of Swerve "confectioners style" sweetener (or preferred powdered equivalent to 1/2 cup sugar)
70% Cacao Chocolate Chips (or chopped 70% chocolate bar)
Roasted pistachios, almonds or other nuts (optional)

DIRECTIONS:

Mix all the crust ingredients together into a thick batter (add additional Swerve sweetener if you prefer them sweeter). Drop by tablespoonfuls onto a greased baking sheet or parchment paper lined sheet.  Using a small spoon or spatula, spread the batter into thin wafer cookie shaped circles, about 1/4 inch thick.  Bake at 375 degrees for about 15 minutes.  Check closely during the last couple of minutes to make sure they don't burn. When the wafers feel done to the touch, remove and let sit for a couple of minutes and then transfer to a cooling rack to cool.  They crisp as they cool off.   While wafer crusts are baking, prepare ricotta filling.

Mix ricotta, orange zest, vanilla and sweetener together until smooth.  Taste to adjust sweetness.  If desired, fill a decorating bag or small ziploc bag (with corner cut to fit a star decorating tip) with the ricotta mixture and pipe onto wafer crusts.  You could also spread and swirl the filling on with a small spatula.  Top with chocolate chips and nuts, if desired.   

Store the remaining wafer crusts loosely covered to stay crisp (I wrapped mine in parchment paper).


Friday, March 1, 2013

Tuna Salad Lettuce Wraps

This evening, hubby and I made our Costco run after work rather than wait until the weekend. Hubby has a training class all day tomorrow and I have a day full of projects planned too...so we decided to get it out of the way tonight.  We also ran a couple of other errands as well and didn't get home until just after 9:00 tonight.  Neither of us had eaten dinner or were unusually hungry.  One of the items I picked up at Costco to try was their canned wild tuna.  I don't eat tuna very often any more because of all the concern about mercury...but this brand claims to have low amounts and they refer to it as "100% pole and troll caught wild albacore tuna."  I'm not really sure what polled and trolled means...LOL.  For whatever reason, the image I conjure up is that of a little "ugly troll looking tuna" lurking under a bridge somewhere, hiding from a fishing poll.  I know that sounds weird...but it's what first comes to my mind.  Anyway...Costco also had some big containers of beautiful green hydroponic Bibb lettuce that I picked up too.  On the ride home, I decided I would make some quick Tuna Salad Lettuce Wraps with it.  The tuna is actually solid tuna steaks packed in a can that I flaked with a fork and broke up into small pieces.  I added a couple tablespoons of mayonnaise, some finely diced celery, a tiny bit of minced onion, a little finely diced dill pickle and a squeeze of mustard and mixed it all together and placed it in the lettuce leaves and sprinkled with a little paprika. I served them with some roasted almonds and it was a delicious dinner that took less than 10 minutes to make.  I snapped a quick photo for you to see below.  Enjoy!

Voila!
Ta-Da!
BOOM!
This is the tuna I picked up at Costco

Thursday, February 28, 2013

Spicy Chipotle Peanut Crusted Chicken & Roasted Cauliflower

This evening I was in the mood for something a little different for dinner so I made Spicy Chipotle Peanut Crusted Chicken.  I made a coating out of coarsely ground peanuts chipotle chili powder, paprika, onion power and a little cayenne.  I rolled boneless chicken breasts in the nut mixture and baked them at 350 degrees for about 40 minutes since they were so thick.  I also made oven roasted cauliflower.  I cut up a head of fresh cauliflower and tossed the florets in a large bowl with some olive oil, kosher salt, black pepper, roasted cumin and smoked paprika to help give them a slightly smoky flavor.  I spread the cauliflower florets out in a single layer on a baking sheet and baked them at 425 degrees for 10 minutes and then flipped the florets over and baked them an additional 10 minutes until browned.  I topped them with a little shredded Parmigiano Reggiano after pulling them out of the oven.

Our dinner last night's was a "clean out the fridge" meal that had all kinds of random things in it.  I had actually snapped a picture and intended to post it last night but fell asleep on the couch before I did!  I will post a quick picture of last night's meal (since I already took the pics) so you can see what I'm talking about when I say "clean out the fridge".  LOL  I had a pack of chicken cutlets I needed to use that I sliced into thin strips first.  This is what I put into my "mish-mosh"....I sauteed sliced chicken cutlets, sliced andouille sausage links, 1/4 of a diced onion, 2 small sliced yellow squash and 1/2 a package of sliced mushrooms -- then added 1/2 a jar of arrabbiata sauce and 1/4 cup leftover shredded romano cheese and simmered everything for 30 minutes and then stirred in 1/4 cup of cream to help blunt the spiciness a bit.  I served it over grated zucchini that I had left in a bowl from earlier in the week.  It was kind of like a "Jambalaya-Arrabbiata-Alfredo-ish" sort of concoction.  It was strange -- but in a good way?  I did manage to get rid of all the odds and ends in my fridge though!  :-)   I also did another test run last night on my cannolis and hope to post the recipe for those tomorrow.  Below are pictures of tonight's dinner as well as last night's "clean out the fridge" special.  Enjoy!

Spicy Chipotle Peanut Crusted Chicken & Roasted Cauliflower
BOOM!
Last Night's "Clean out the Fridge" Special   :-)

Monday, February 25, 2013

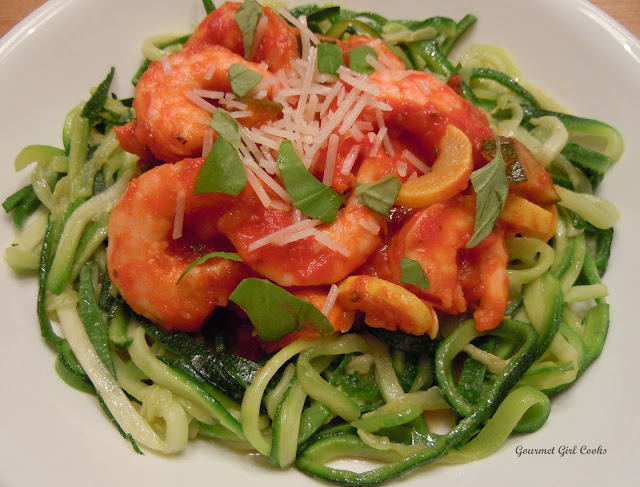
Quick & Easy Shrimp & Squash Arrabbiata

This evening I decided to make a super quick and simple Shrimp & Squash Arrabbiata to use up the steamed shrimp we had leftover from yesterday's shrimp cocktails that we had for lunch. It was unusually quick and easy to make because I used a prepared pasta sauce by Mezzetta -- it was their Napa Valley Bistro Arrabbiata sauce -- spicy, flavorful and delicious (all natural with no added sugar). I sliced up a small yellow summer squash and a small zucchini and sauteed them in a little olive oil until almost tender and then dumped half of the jar of sauce in with them, covered the pan and simmered on low for about 10 minutes and then added the cooked shrimp to the sauce and simmered just a couple minutes until the shrimp were heated through. I didn't want to cook them any further. I served the Shrimp & Squash Arrabbiata on top of some zucchini fettuccine (zucchini that I cut into noodles with my Spirelli, sauteed in olive oil for a few minutes). I topped our bowls with some shredded Parmigiano Reggiano and tossed some torn fresh basil leaves on top...and "Voila"...dinner was served! I snapped a couple photos for you to see below. Enjoy!

Voila!
BOOM!
If you are looking for a good jarred sauce...this one is great!
These are the kind of ingredients you are looking for in a jarred sauce -- all ingredients that you would use if you made it yourself at home.