Tuesday, December 11, 2012

Quick & Spicy Stir-Fried Chicken with Broccoli

Tonight I just threw together Quick & Spicy Stir-Fried Chicken with Broccoli.  The part that was different about this stir-fry for me is that tonight I used boneless, skinless chicken thighs instead of the boneless chicken breasts that I normally use.  I originally planned to grill the thighs outside after I got home -- but seeing that the temperature gauge on my car was already registering only 45 degrees at 5:00 and it was really windy too...I decided that cooking them inside instead would suit me just fine!

I really didn't follow any recipe, but just put it together as I went (my favorite kind of meal to do)!  I diced about 1-1/2 pounds of boneless chicken thighs and set them aside.  Next, I thinly sliced a couple of green onions; julienne cut 1 carrot into thin strips; and minced 2 cloves of garlic.  I also cut up about 3 cups of fresh broccoli florets and steamed them in a little water in the microwave for 3 minutes until they were crisp tender and still bright green.  I quickly stir-fried the chicken in a hot wok in a couple tablespoons of extra virgin coconut oil until it was done; then tossed in the minced garlic, stir-frying for another couple of minutes; and then added the carrots and green onions.

To make the sauce, I added a little over 1/2 cup of chicken broth to the wok; added a few tablespoons of low sodium Tamari sauce, a few good shakes of cayenne pepper a pinch of red pepper flakes and 1 teaspoon of hot Sriracha and stirred everything together.  I then pushed the chicken and vegetables towards the outer edge of the wok, making a well in the center and added about 3 tablespoons of peanut butter to melt into the spicy broth mixture.  As soon as it began to bubble a little, I stirred everything together to coat with the sauce.  If you want a thicker sauce, add additional peanut butter;  if you prefer a thinner sauce, add additional chicken broth a little at a time.  Taste sauce for seasoning and make adjustments according to your taste.  I sprinkled some roasted peanuts on top to add some nutty crunchiness that I love.  I have to say, that I really enjoyed the flavor of the chicken thigh meat in this stir-fry.  The meat was exceptionally tender and flavorful, and since I cut it up myself, it was trimmed well.  I think the reason why I never liked getting dark meat at Chinese restaurants was that it was never trimmed well and was always blubbery and grisly, so I always paid extra to have them substitute white meat for me instead.  The only time consuming part of the entire meal was cutting up the chicken and veggies which took about 20 minutes total.  That, along with the 10 minutes or so of cooking time, and dinner was ready in about 30 minutes.  I snapped a couple photos for you to see below.  Enjoy!

Voila!
BOOM!

Monday, December 10, 2012

Hawaiian Style Milk Chocolate Coconut Nests..."Move over Russell"

This evening we had leftovers for dinner...which meant that I didn't have to cook.  This gave me a little time to play around a bit in the kitchen instead. While grocery shopping this weekend, I was looking at the Russell Stover's Christmas candy display...and thinking about what once was my favorite of theirs -- their little milk chocolate "coconut nests" that used to be filled with jelly beans. I say "used to be"...because they suddenly stopped putting little "eggs" in the nests a couple of years ago (how chintzy). Long story short...this evening I decided to see if I could create a more "milk chocolate" flavored confection in order to make them taste more authentic. Sometimes I just like to see if I can do it. They turned out great!!! Basically, these are my version of Mr. Stover's chocolate coconut nests...minus the sugar and plus the macadamia nuts!  :-)

When I got home, I toasted some unsweetened shredded coconut in the oven until it was golden brown and toasty. I mixed a conglomeration of ingredients together to help transform the super dark 100% cacao Ghirardelli chocolate bar into something more resembling "milk chocolate". I decided that the roasted lightly salted macadamia nuts I picked up at Costco this weekend would be perfect to fill my nests with. Costco had their 1-1/2 pound bags for $17.99...which is a great price for that many macadamia nuts. The only thing I would do differently when making them again would be to add a little more toasted coconut since I love it. I snapped a few photos below as well as the recipe I put together. I also think these would be great with some chopped roasted almonds or macadamias added along with the toasted coconut for some added crunch. Enjoy!


Hawaiian Style Milk Chocolate Coconut Nests

Ingredients:

1/2 - 3/4 cup unsweetened shredded coconut (I used 1/2 cup; add more if you like)
1 tablespoon extra virgin coconut oil
1/4 cup cream
1/4 cup light cream (half and half)
1/2 teaspoon vanilla extract
Pinch of salt
1/2 cup Swerve sweetener
2 oz. Ghirardelli 100% cacao unsweetened baking bar (4 squares), broken into pieces
Roasted macadamia nuts, enough for 1 per nest (or cut in half if large)

Directions:

Preheat oven to 350 degrees F.  Spread coconut out on a foil or parchment lined cookie sheet in a thin layer and bake for about 5 minutes, or until toasted and golden brown; remove from oven and set aside.  Line another cookie sheet with parchment paper and set aside (this will be to spoon/drop the chocolate coconut nests on). 

In a small saucepan on low-medium heat, add coconut oil, cream, vanilla, salt and Swerve; heat slowly, stirring frequently until it begins to bubble and just begins to boil.  Let boil gently for 1-2 minutes, stirring constantly.  Turn off heat and whisk chocolate pieces into the hot mixture, stirring until the chocolate is melted and smooth.  Stir toasted coconut into the chocolate mixture and drop by slightly heaped tablespoonfuls onto the parchment paper lined cookie sheet, shaping them into little nests with a slight depression in the center (work quickly so the chocolate doesn't begin to cool off and set before you finish making your nests).  Place either whole or halved macadamia nuts in the center of the nests, pressing down slightly.  Refrigerate until chocolate has firmed up.  Makes approximately 10 nests.

***Note:   I used 1/2 cup of toasted coconut in these nests but it could easily be increased up to 3/4 cup if you like lots of toasted coconut in your chocolate.  I used the shorter finely shredded coconut, not the longer shreds.  Any kind of nut such as roasted almonds could be substituted for the macadamias, or you could omit them entirely if your prefer.  These nests would also be good with some chopped nuts mixed into the chocolate along with the coconut.

P.S. -- This is what the "original" nests looked like...(back when they actually filled them)!

Sunday, December 9, 2012

Happy Sunday!

Happy Sunday!  It is an overcast, damp and foggy morning here today.  I enjoyed sleeping in a little bit, which I rarely do.  This morning we enjoyed omelets, sausage and buttermilk biscuits for breakfast along with some big beautiful fresh raspberries.  I made simple cheese and chive omelets that were filled with finely grated Kerrygold's Ballyshannon white cheddar cheese as well as a few snipped chives.  Our sausages were Applegate's chicken breakfast sausages and I toasted some of the buttermilk biscuits leftover from last night's dinner.  While the biscuits are too delicate to cut in half and slice, I simply popped it into the toaster whole to warm up.  It was a delicious breakfast and will give us the energy to finish decorating the house for Christmas today.  Enjoy!

Voila!
BOOM!


Saturday, December 8, 2012

Spicy & Sweet Autumn Chili w/ Southern Style Buttermilk Biscuits

This morning I woke up bright and early and decided to make spicy chili for dinner and I wanted to give it an autumn theme.  Instead of using beans, I decided to add cubes of roasted butternut squash in at the end to balance the spiciness of the chili with the sweet and nutty flavor of roasted butternut squash.  I normally don't make my chili very spicy, but today I wanted to bump it up a few notches with heat -- and this chili definitely does just that!!!  I love roasted butternut squash and thought the combination of spicy and sweet would work, so I made "Spicy & Sweet Autumn Chili".  This chili is packed with flavor and spices and the texture from using both ground and cubed beef was really good.  When I wrote the chili recipe up below, I carefully made note of the spicy ingredients and mentioned which ones to reduce or omit to knock the spiciness down -- this chili was REAL spicy...and might be too spicy for some, although both hubby and I enjoyed it a lot -- topped with a dollop of sour cream and some freshly shredded Wisconsin Red Hoop Cheddar cheese.  The spicy ingredients that might need to be reduced or omitted if you don't like your chili spicy (and particularly if you are serving it to young children) have the "less spicy suggestions" listed beside them.  Use your judgement and if unsure, add just a tiny bit of heat until you have tasted it first -- you can always add more spice, but I haven't yet discovered a way you can take too much out!  :-) 

I had originally intended to prep the chili this morning and put it in my crock-pot to cook all day, but since I was home I just let it simmer for a couple of hours on low on the stove.  Because of the time involved chopping everything up, this is probably not a "weeknight chili recipe", particularly if you work during the day.  However, if you put it together ahead of time (chop your veggies and meat and pre-cook them) you could easily put it in your crock-pot in the morning and cook on low during the day.  You would just need to roast the cubed butternut squash when you got home.  When I've used butternut squash in the past, I purchased it fresh and already peeled and cubed.  Today I wanted to try doing that myself.  While it wasn't difficult, it definitely was more time consuming and a bit messy...so if you want to save some time, I would suggest enjoying the luxury of buying it already cubed and ready to use.  If you don't like butternut squash or don't want the extra carbs they add to this chili, you could easily omit adding it. 

I decided southern style buttermilk biscuits would go great with our chili, so I made some using blanched almond flour.  I used a combination of both butter and cream cheese in them (the cream cheese was used as a substitute for the "shortening" frequently used in traditional buttermilk biscuits).  Instead of rolling these biscuits out and cutting them, I used my small retractable trigger type ice cream scoop to portion the dough out into 12 equal sized mounds onto my baking sheet and then lightly tamp them down on top (they were about 1-inch thick).  As they baked, they spread out some and touched each other.  The batter was surprisingly very light and airy and not dense like other biscuits I've made using almond flour.  I added one full cup of thick rich buttermilk to the dough and they turned out very light, tender and moist.  Next time I make them I will see if reducing the buttermilk to 3/4 cup (and adding more as necessary) might keep them from spreading out as much.  These tasted just like regular southern buttermilk biscuits and were very delicate (these might be difficult to slice in half though because of their tenderness).  We enjoyed these lightly brushed with melted butter on top.

I snapped a few photos for you to see below as well as the recipes for the chili, roasted butternut squash and the biscuits.  Enjoy!

Voila!
BOOM!


Spicy & Sweet Autumn Chili

Ingredients:

1 lb. ground sirloin
1 lb. boneless beef chuck arm roast, diced into 1/2" cubes
2 - 3 tablespoons oil, to saute vegetables and brown beef
1 cup onion, diced
1-1/2 - 2 cups red, yellow or orange sweet bell peppers, diced
1 Poblano pepper, diced
1 jalapeno pepper, diced
5 - 6 cloves garlic, minced
Spices:
   1 tablespoon chili powder
   1 teaspoon "chipotle chili powder" (or use regular chili powder to reduce heat)
   1 teaspoon hot Hungarian paprika (or use sweet paprika to reduce heat)
   1 teaspoon ground coriander
   1 teaspoon cumin (I used 1/2 tsp regular cumin and 1/2 tsp. roasted cumin)
   1/2 teaspoon cayenne pepper (use less or omit to reduce heat)
   1 teaspoon oregano
   1 teaspoon Kosher salt
   1 teaspoon freshly ground black pepper (or less to reduce heat)
1 14.5-oz can fire roasted diced tomatoes (including juice)
1 8-oz can tomato sauce
1 6-oz. tomato paste
1 cup chicken broth
1-1/2 cups water (more or less, depending on preferred thickness)

Directions:

In a large stockpot, add a couple tablespoons of oil and quickly saute onion, sweet bell peppers, Poblano and jalapeno peppers until almost tender; add minced garlic and cook a couple more minutes, stirring frequently (covering the pan for a bit helps speed up cooking the veggies).   Using a slotted spoon, remove the veggies and set aside on a platter.  Add additional tablespoon of oil and brown beef cubes well, until almost done.  Remove browned beef cubes and set aside on the platter along with the cooked pepper and onion mixture.  Add ground sirloin to the pot and brown quickly, breaking up and crumbling the beef as it cooks.  When the ground sirloin is cooked, add the platter of cooked beef cubes and pepper mixture back to the pot.   Add all the spices, diced tomatoes, tomato sauce, tomato paste, chicken broth and water and stir well.  Bring to a medium boil and taste to adjust seasonings, if necessary.  Cover the pot and turn heat to low and simmer for 2 to 2-1/2 hours on low (if desired, at this point the chili can be placed into a crock-pot and cooked on low for 8 - 10 hours instead of simmering on top of the stove).  

Ladle chili into bowls and stir in roasted butternut squash cubes (recipe below); top with a dollop of sour cream and sprinkle with shredded cheddar cheese, if desired.  Serves approximately 6.


 ~~~~~~~~~~~~~~~~~~~~~~~~~~~~~~~~~~~~~~


Roasted Butternut Squash

Ingredients:

4-6 cups of cubed fresh butternut squash
Celtic salt or sea salt, to taste
Freshly ground black pepper, to taste
2 to 3 tablespoons olive oil

Directions:

Preheat oven to 400 degrees F.  Line a cookie sheet with foil and place the cubed butternut squash in a single layer on it.  Sprinkle with salt and pepper, to taste; toss squash cubes with olive oil and spread back out in a single layer.  Bake at 400 degrees for about 35 minutes or until lightly browned; stirring a couple of times to evenly brown,  Remove from oven when squash is tender on the inside and lightly browned on the outside.  

~~~~~~~~~~~~~~~~~~~~~~~~~~~~~~~~~~~~~~


Southern Style Buttermilk Biscuits

Ingredients:

3 cups blanched almond flour
4 teaspoons baking powder
1/4 teaspoon baking soda
1/2 - 3/4 teaspoon Kosher or Celtic salt
3 tablespoons chilled butter, small diced
2 ounces very cold brick style cream cheese, diced
3/4 - 1 cup cold buttermilk (start with 3/4 cup; add additional if necessary to moisten dry ingredients)\
1 or 2 tablespoons of butter, melted (to top biscuits with near the end of baking)

Ingredients:

Preheat oven to 350 degrees F.  Place flour, baking powder, soda and salt in a medium mixing bowl and whisk to mix well.  Add diced chilled butter and cream cheese.  Using a pastry cutter, quickly cut butter and cream cheese into dry ingredients until it appears crumbly.  Make a well in the center of the mixture and add cold buttermilk, starting with 3/4 cup, stirring to mix well (add additional buttermilk as necessary to wet dry ingredients until it pulls together into a dough).  Mix quickly until a soft sticky dough forms.  The dough will be light, airy and fluffy.  On a parchment paper lined baking sheet (I used lightly buttered non-stick foil), use a cookie scoop or retractable ice cream scoop to make 12 equal sized mounds of dough on the baking sheet, spaced evenly apart.  Lightly tamp mounds down on top to approximately 1-inch thick.  Bake at 350 degrees for about 25 minutes; remove and brush tops lightly with melted butter; return to the oven and bake an additional 5 minutes or until light golden brown.  Let cool about 5 to 10 minutes before serving.  Makes 1 dozen biscuits

***Note:  I used the full 1 cup of buttermilk which produced very tender, delicate moist biscuits that spread out a bit as they baked.  To help reduce the spread, start with 3/4 cup buttermilk and add just enough extra to moisten the dry ingredients and form a light, fluffy dough.


Thursday, December 6, 2012

Fire Roasted Red Pepper Sausage & Zucchini Pasta Bowl

This evening I made a quick and easy dinner.  I sliced and browned a couple of organic Fire Roasted Red Pepper Chicken & Turkey Sausages and tossed in some diced zucchini to saute along with them and then simmered it in spicy marinara sauce for about 20 minutes.  I served it over zucchini pasta that I made with my julienne peeler.  The diced zucchini that was in the sauce was the leftover center portions that I didn't shred...so nothing went to waste.  I topped it off with some shredded Parmigiano Reggiano.  It was delicious, simple and quick.  Enjoy!

Voila!
BOOM!
      

Wednesday, December 5, 2012

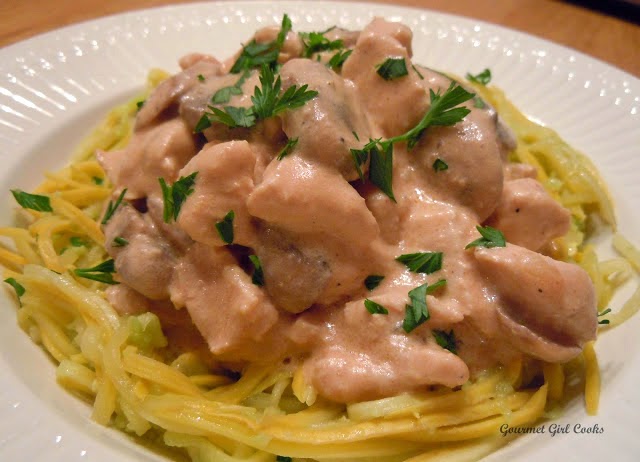
Stroganoff (Beef or Chicken) - Wheat/Grain Free

Tonight, I decided to revise the Chicken Stroganoff recipe that I have made at least a buzzillion times over the years.  I made several modifications to the original recipe, one of which was removing the wheat flour and then a few other minor changes as well.  I also served it on a bed of "hot buttered yellow squash noodles" instead of the wide egg noodles that I used to serve it over.  It was absolutely delicious!  I used almond flour to make the roux instead of wheat flour for the base of the sauce but it didn't thicken up quite as much as I wanted it to, so I added 1/4 teaspoon of xanthum gum (1/8 teaspoon at a time) to thicken it up just a tiny bit to make it the consistency I was looking for without being able to notice that it was in there.  It turned out exactly the way I remember it being.  For those that don't have or want to use xanthum gum, 1 or 2 tablespoons of brick style cream cheese should thicken it up enough (I'd start with one first).  If you are making this recipe for the first time and don't really have anything to compare it to, you might even enjoy it without adding any additional thickening agent...but I was looking to recreate a recipe that I have made a lot over the years...so I knew exactly what the original version's consistency and taste was and that is what I was looking to duplicate.  I suggest tasting your sauce for salt and pepper and adjust as needed to suit your taste.  This recipe was a success...hubby said he couldn't tell the difference at all between the original version and the new revised version.  I served mine over yellow squash noodles that I made with my julienne peeler and hubby ate his over regular noodles.  I've snapped a few photos below as well as the recipe.  Enjoy!


Stroganoff (Beef or Chicken)

Ingredients:

  • 1 lb. sirloin steak or boneless chicken breast, cut into thin strips or small cubes
  • 1/2 teaspoon salt, or to taste
  • Freshly ground black pepper, to taste
  • 2 Tablespoons butter or oil
  • 2 cups sliced fresh mushrooms, cooked
  • 1/2 cup onion, diced
  • 1 clove garlic, minced
  • 2 Tablespoons butter
  • 1/4 cup almond flour
  • 1 Tablespoon tomato paste
  • 1 cup beef or chicken broth
  • 1/4 teaspoon xanthum gum, optional (if desired, substitute 1 - 2 tablespoons brick style cream cheese)
  • 1 cup sour cream
  • 2 tablespoons dry white wine
  • Hot buttered yellow squash noodles
Directions:

Season beef or chicken with salt and freshly ground black pepper.   Saute seasoned beef or chicken in large skillet with 2 Tablespoons butter or oil until cooked and slightly browned.

Add onion and garlic to meat mixture; continue to cook until tender, about 5 to 6 minutes; add cooked mushrooms.  Transfer meat and vegetables from skillet to a bowl or platter; set aside.

Add 2 Tablespoons butter to the pan drippings, blend in 1/4 cup almond flour; cook 1-2 minutes.   Add tomato paste and beef or chicken broth; cook and stir over medium heat until thickened and bubbly.   If additional thickening is desired, quickly stir in 1/4 teaspoon xanthum gum (or cream cheese).   Add meat and vegetables back to the skillet; mix well.   Stir in sour cream and dry white wine; cook slowly until heated through (DO NOT BOIL).   Serve over hot buttered yellow squash noodles. 

Monday, December 3, 2012

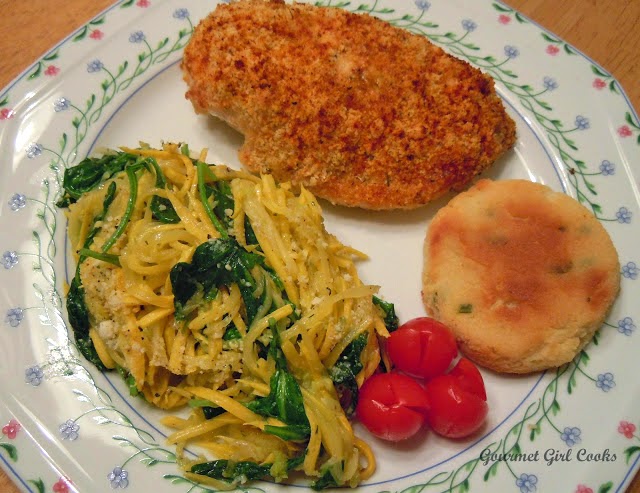
Parmesan Crusted Chicken & Garlic Herb Squash w/ Baby Arugula

This evening I made a really simple, but tasty dinner.  Our Publix grocery store usually has a dinner idea in each weekly sale flyer.  Of course, they usually contain wheat.  I decided to make a wheat and grain free version of their meal suggestion for this week.  I served our meal with a sour cream and chive biscuit that I made last night (recipe to come soon after perfecting).

I placed 3 boneless chicken breasts on a baking sheet and brushed the tops of them with a mixture of 4 tablespoons of mayonnaise mixed with 1/4 cup grated Parmesan cheese.  Next, I mixed together about 1/4 cup of almond flour, a couple tablespoons of grated Parmesan, 1 teaspoon of Italian seasoning and a dash of cayenne to make "Italian herb bread crumbs".  I sprinkled the seasoned crumbs on top of the coated chicken breasts and then baked them at 400 degrees F for about 25 minutes until they were done (the cooking time may need to be increased or decreased a little depending on the size and thickness of your chicken breasts).  The mayonnaise keeps the boneless skinless chicken breasts very moist and tender while you bake them.  When the chicken is done, I sprinkle it with a bit of paprika. 

While the chicken was baking, I finely julienned a few yellow squash (using my julienne peeler) and lightly sauteed them in a little olive oil in a non-stick skillet.  I then added a big handful of baby arugula, the zest of 1/2 of a fresh lemon and tossed until the arugula wilted.  I added a couple tablespoons of Kerrygold Garlic and Herb Butter, a few dashes of sea salt and generous grinds of black pepper and then sprinkled on about 1/4 cup of grated Parmesan cheese and tossed it all together.  The natural sweetness of the yellow squash, combined with the slight bitterness of the baby arugula, the fresh taste of the lemon zest and saltiness of the Parmesan made a delicious combination of flavors for this side dish.  I snapped a couple of photos below for you to see.  Enjoy!


Sunday, December 2, 2012

Sunday Night's Pan Seared Salmon & Roasted Asparagus

Today was a pretty day here -- it got up to around 70 degrees this afternoon and tomorrow is supposed to get up to 73, which is pretty warm for this time of year!   This evening, youngest son came over for dinner.  I just quickly pan seared some salmon filets and roasted asparagus in the oven.  I also made sour cream & chive biscuits to go with our meal.  They turned out good, but I won't post the recipe until I see if I can tweak them a bit to get a little more rise out of them first.  We all had a slice of cake for dessert.  I snapped a quick picture of our dinner below -- it was simple and nothing fancy, but it was good.  Enjoy!

BOOM!

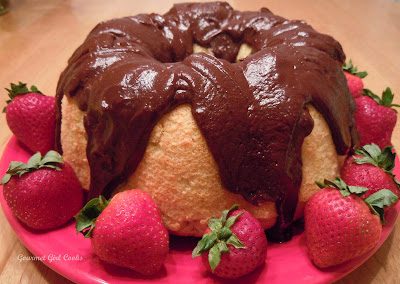
Yellow Pound Cake w/ Rich Chocolate Almond Frosting/Glaze

Last night I made my first grain and sugar free cake.  I made a Yellow Pound Cake w/ Rich Chocolate Almond Frosting/Glaze.  It turned out really good.  I baked it in a 6-cup Bundt pan and it was a little tricky getting it out of the pan because I forgot to flour the pan after greasing it...so next time I will make sure to do that.  I have lots of baking experience using regular wheat flour, but this was my first grain free alternative flour cake.  I basically made the recipe up as I went along and kept my fingers crossed that it would turn out good -- and I'm happy to report that it did.  I intentionally did not make it overly sweet since I don't like things very sweet any more.  I would describe this cake as a yellow cake with a texture very similar to pound cake.  The frosting/glaze is thick and rich with a very deep dark chocolate flavor and not overly sweet, although you could easily sweeten it more if you wanted to.  Hubby and I enjoyed a piece after dinner last night with a cup of strong Italian Roast coffee and it was delicious.  Based on the size of the slices we ate tonight, we should get about 20 slices from the cake -- that is a LOT!  Our slices were about 1-inch thick.

Below is the recipe as well as a number of photos at various stages.  I wanted to make sure the cake wasn't overly heavy or dense since I was using almond flour which tends to be a bit heavier and oilier.  I also wanted to get some rise in the cake -- and I surely got plenty of rise (you will see what I'm talking about in the photos below).  I got so much rise that while it was in the oven baking, I was actually worried that it would rise right out of the pan and all over my oven -- but thankfully, it did not.  Note that I used "extra light" olive oil in this cake recipe which has no discernible olive taste -- do not substitute the stronger tasting extra virgin olive oil (you could substitute melted butter for the oil if you prefer).  If you prefer your cakes a bit sweeter, you can increase the sweetener in both the cake and the frosting/glaze recipes, if desired.  The amount of sweetness was perfect for my taste.  The frosting/glaze recipe makes a very rich, thick, and dark deep chocolate flavored frosting.  You could add additional sweetener if you prefer a sweeter frosting or glaze.  Check out the recipe and photos below.  Enjoy!

Voila!
I put 5 cups of batter in a 6-cup pan thinking it wouldn't rise much...
Guess I was wrong...the cake actually rose a lot!
As you can see, it almost rose right out of my bundt pan...yikes!
This is what it looked like on top after it came out of the oven
BOOM!


Yellow Pound Cake w/ Rich Chocolate Frosting/Glaze

Cake Ingredients:

3 cups almond flour (blanched)
1 cup Swerve sweetener (or equivalent to 1 cup sugar sweetness)
1/2 cup vanilla protein powder
2 teaspoons baking powder
1/2 teaspoon Celtic or sea salt
6 eggs (I used a combination of Egg Beaters and whole eggs)
1/2 cup PLUS 2 tablespoons "extra light" olive oil (do not use strong flavored extra  
      virgin olive oil)
1-1/2 teaspoons vanilla (I used concentrated double vanilla from Penzey's)
1 tablespoon apple cider vinegar
15 drops NuNaturals alcohol free stevia (or equivalent to 2 teaspoons sugar sweetness)
3/4 cup water

Rich Chocolate Almond Frosting/Glaze Ingredients:

5 - 6 tablespoons coconut oil
6 tablespoons unsweetened cocoa powder (I use Ghirardelli or Green & Blacks)
Dash of sea salt
6 tablespoons Swerve sweetener
22 drops NuNaturals alcohol free stevia (or equivalent to about 3 teaspoons sugar sweetness)
1 tablespoon unsalted butter
1/4 cup PLUS 2 tablespoons unsalted almond butter
1/4 cup heavy cream

Directions for Cake:

Preheat oven to 325 degrees F.  Grease a 6-cup Bundt type pan very well with butter and dust with flour; set aside.  In a large bowl, mix almond flour, Swerve sweetener, protein powder, baking powder and salt in a bowl; using a wire whisk, stir to mix and sift any lumps in the dry ingredients.  In a separate bowl, mix eggs, oil, vanilla, vinegar, stevia drops and water; beat with a whisk until well blended.  Add liquid mixture into dry ingredients and mix well; beat with a whisk or hand mixer until well blended and smooth (about 2-3 minutes).  Pour batter into well greased AND floured baking pan.  This recipe makes approximately 5 cups of cake batter.  Place bundt cake in oven and bake approximately 50-55 minutes at 325 degrees or until a toothpick inserted in the cake comes out clean (begin checking cake for doneness after about 30 minutes or if making 2 layers begin to check after 20 minutes).  Let cool approximately 5 to 10 minutes; invert onto a plate and let cool completely (if necessary, gently use a rubber spatula to loosen the edges of the cake from the pan).  Frost or glaze as desired.  

***NoteThis recipe can also be used to bake two 8-inch round layers or a square or rectangular cake.  If making 2 separate layers, the cooking time would need to be reduced, so check baking times. If using a Bundt pan, make sure to liberally grease pan and flour well so it doesn't stick when removing from pan.  Taste batter for sweetness after mixing and before pouring into pan (add up to an additional 1/2 cup of Swerve or sweetener of choice if a sweeter cake is desired).

Directions for Rich Chocolate Almond Frosting/Glaze

In a medium saucepan on low, melt coconut oil; add cocoa powder and stir until blended and smooth.  Add dash of salt and Swerve sweetener and stir until completely dissolved into the mixture.  Add almond butter, stevia, and butter, stirring or whisking until melted and smooth.  Add cream and whisk in well.  Taste to adjust desired sweetness, adding more sweetener, if necessary.  If a thinner frosting/glaze is desired, add a little additional cream to thin out; if a thicker consistency is desired, add additional almond butter.  Pour warm frosting/glaze on top of bundt cake, allowing it to run down the sides.  If spreading as a frosting on top of a cake layer, allow to cool and thicken a bit first. 


Saturday, December 1, 2012

It's Saturday Night...and We're having Pizza & Cake!!!

Today we ran a bunch of errands and got a lot done.  I hope to begin decorating for Christmas tomorrow.  Since it's Saturday, it seemed like a good night to have pizza for dinner.  Hubby was busy watching football, so I thought it would be a good time for me to experiment some in the kitchen with baking a grain and sugar free cake for the first time.  I wasn't sure how it would turn out since I sort of made it up as I went...LOL (sometimes those are the scariest adventures for me).  I have lots of "regular baking experience" but very limited experience when it comes to grain free baking -- and there's quite a bit of difference baking with alternative flours.  I am pleased to report that the cake turned out great!  I decided to use almond flour and didn't want the cake to be overly dense -- I wanted to get some "rise" with it -- and rise it did!!!  I held my breath for a minute or two because I actually thought it might just rise right out of the Bundt pan I baked it in.  Thankfully, it stayed in the pan and didn't spill over.  I made a basic pound cake/yellow cake and wanted to cover it with some type of frosting or glaze -- preferably one with chocolate.  I made a thick dark chocolate almond frosting/glaze.  Below is a picture of the pizza (and crust recipe) we had for dinner -- it is topped with red and yellow bell peppers, onions, mushrooms and turkey pepperoni.  You will also find a picture of the cake I baked.  I'll post the recipe for the cake separately because I still need to write it up first and translate my chicken scratch that I jotted down as I went along.  I'll post the cake recipe either later this evening or tomorrow.  Enjoy!

Voila!
BOOM!
TA-DA!

Below is the pizza crust recipe...cake recipe to follow soon!

Saturday's Breakfast...Biscuits, Eggs & Sausage

Happy Saturday!  It's a beautiful bright and sunny morning today -- and a chilly 39 degrees.  I decided after a long and emotionally draining week that a good "comfort" breakfast might just be the best way to start my morning.  I made myself a fried organic cage free egg along with a couple of Applegate's chicken & apple breakfast sausage links and enjoyed them with one of my lightly toasted Black Pepper Cheddar Herb Biscuits that I made a few days ago.  That, along with a strong cup of coffee, gave me the great start I needed for this beautiful day.

I snapped a few photos for you to see below and hope it allows you to see that it is still possible to enjoy a delicious, absolutely grain free breakfast, much like the breakfasts most of enjoyed when we still consumed wheat and grains.  Enjoy!

Biscuits, eggs & sausage...


BOOM!
The only thing absent from this delicious breakfast is the wheat and grains -- who needs them -- I surely don't!